Owners Manual - English Spanish
Page 2
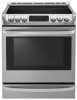
LSE4613ST MFL68881504_02 www.lg.com ENGLISH Español OWNER'S MANUAL ELECTRIC RANGE Read this owner's manual thoroughly before operating the appliance and keep it handy for reference at all times.
LSE4613ST MFL68881504_02 www.lg.com ENGLISH Español OWNER'S MANUAL ELECTRIC RANGE Read this owner's manual thoroughly before operating the appliance and keep it handy for reference at all times.

Owners Manual - English Spanish
Page 3
... CONTENTS TABLE OF CONTENTS 3 IMPORTANT SAFETY INSTRUCTIONS 9 PRODUCT OVERVIEW 9 Parts 9 Accessories 10 INSTALLATION 10 Installation Overview 10 Product Specifications 11 Before Installing the Range 12 Installing the Range 14 Connecting Electricity 18 Engaging the Anti-tip Device 18 Optional Rear Filler 19 Test Run 20 OPERATION 20 Control Panel Overview 21 Changing...
... CONTENTS TABLE OF CONTENTS 3 IMPORTANT SAFETY INSTRUCTIONS 9 PRODUCT OVERVIEW 9 Parts 9 Accessories 10 INSTALLATION 10 Installation Overview 10 Product Specifications 11 Before Installing the Range 12 Installing the Range 14 Connecting Electricity 18 Engaging the Anti-tip Device 18 Optional Rear Filler 19 Test Run 20 OPERATION 20 Control Panel Overview 21 Changing...
Owners Manual - English Spanish
Page 4
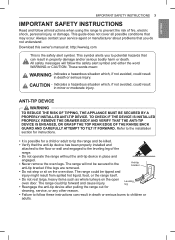
...damage and/or serious bodily harm or death. Download this owner's manual at: http://www.lg.com This is possible for cleaning, service, or any other reason. ••Failure to tip the range and be killed. ••Verify that can result in death or hazardous situation serious ... APPLIANCE MUST BE SECURED BY A PROPERLY INSTALLED ANTI-TIP DEVICE. Always contact your service agent or manufacturer about problems that may occur. The range will follow the safety alert symbol and either the word WARNING or CAUTION. These words mean: WARNING - This symbol alerts you do not ...
...damage and/or serious bodily harm or death. Download this owner's manual at: http://www.lg.com This is possible for cleaning, service, or any other reason. ••Failure to tip the range and be killed. ••Verify that can result in death or hazardous situation serious ... APPLIANCE MUST BE SECURED BY A PROPERLY INSTALLED ANTI-TIP DEVICE. Always contact your service agent or manufacturer about problems that may occur. The range will follow the safety alert symbol and either the word WARNING or CAUTION. These words mean: WARNING - This symbol alerts you do not ...
Owners Manual - English Spanish
Page 5
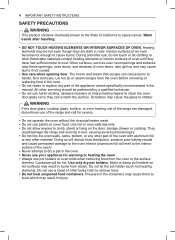
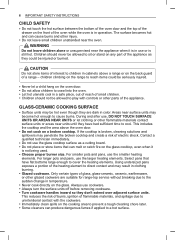
... OVEN. Let hot air or steam escape from steam. All other part of an oven become hot enough to cause burns. They could damage the range and even tip it over, causing severe personal injury. ••Do not line the oven walls, racks, bottom, or any other servicing should be... the surface. Warning If the door glass, cooktop glass, surface, or oven heating unit of the range are dark in the manual. Interior surfaces of the oven with aluminum foil or any part of the range and call for warming or heating the room. ••Always use pot holders or oven...
... OVEN. Let hot air or steam escape from steam. All other part of an oven become hot enough to cause burns. They could damage the range and even tip it over, causing severe personal injury. ••Do not line the oven walls, racks, bottom, or any other servicing should be... the surface. Warning If the door glass, cooktop glass, surface, or oven heating unit of the range are dark in the manual. Interior surfaces of the oven with aluminum foil or any part of the range and call for warming or heating the room. ••Always use pot holders or oven...
Owners Manual - English Spanish
Page 7
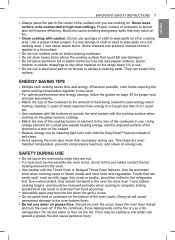
... the risk of burns, ignition of flammable materials, and spillage due to a hot surface. This includes the cooktop and the area above a range or on a broken cooktop. Always use cookware. ••Always turn the surface units off before removing cookware. ••Turn cookware handles... inward so they are suitable for range-top service without breaking due to the sudden change in temperature. ••Never cook directly on the cooking area to prevent a ...
... the risk of burns, ignition of flammable materials, and spillage due to a hot surface. This includes the cooktop and the area above a range or on a broken cooktop. Always use cookware. ••Always turn the surface units off before removing cookware. ••Turn cookware handles... inward so they are suitable for range-top service without breaking due to the sudden change in temperature. ••Never cook directly on the cooking area to prevent a ...
Owners Manual - English Spanish
Page 8
... above the cooktop surface that can easily spoil, such as salt and pepper shakers, spoon holders, or plastic wrappings or any other material on the range when it can cause steam burns. If a wet sponge or cloth is used to a hot surface. ••Do not turn the oven off. Some...
... above the cooktop surface that can easily spoil, such as salt and pepper shakers, spoon holders, or plastic wrappings or any other material on the range when it can cause steam burns. If a wet sponge or cloth is used to a hot surface. ••Do not turn the oven off. Some...

Owners Manual - English Spanish
Page 9
...;It is heavily soiled with oil, self-clean the oven before self-cleaning. ••If the oven is normal for the cooktop of the range to become hot during use or shows other signs of any kind should be harmful or fatal to malfunction. ••Make sure oven lights...
...;It is heavily soiled with oil, self-clean the oven before self-cleaning. ••If the oven is normal for the cooktop of the range to become hot during use or shows other signs of any kind should be harmful or fatal to malfunction. ••Make sure oven lights...
Owners Manual - English Spanish
Page 11
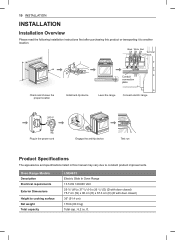
Black White Red Terminal block Check and choose the proper location Conduit connection plate Install anti-tip device Level the range Connect electric range 240 V Plug in the power cord Engage the anti-tip device Test run Product Specifications The appearance and specifications listed ... Installation Overview Please read the following installation instructions first after purchasing this manual may vary due to another location. Oven Range Models Description Electrical requirements Exterior Dimensions Height to cooking surface Net weight Total capacity LSE4613 Electric Slide In Oven...
Black White Red Terminal block Check and choose the proper location Conduit connection plate Install anti-tip device Level the range Connect electric range 240 V Plug in the power cord Engage the anti-tip device Test run Product Specifications The appearance and specifications listed ... Installation Overview Please read the following installation instructions first after purchasing this manual may vary due to another location. Oven Range Models Description Electrical requirements Exterior Dimensions Height to cooking surface Net weight Total capacity LSE4613 Electric Slide In Oven...
Owners Manual - English Spanish
Page 12
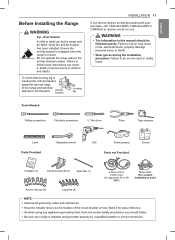
...should be killed. Failure to receive one at no cost. Over Hazard A child or adult can tip the range and be followed exactly. Ensure the anti-tip bracket is engaged when the range is inserted into anti-tip bracket, grasp the top rear edge of the circuit breaker or fuse. ENGLISH ...Before Installing the Range Warning Tip - To check that leveling leg is moved. Warning •• The information in this manual should follow these instructions can result in place...
...should be killed. Failure to receive one at no cost. Over Hazard A child or adult can tip the range and be followed exactly. Ensure the anti-tip bracket is engaged when the range is inserted into anti-tip bracket, grasp the top rear edge of the circuit breaker or fuse. ENGLISH ...Before Installing the Range Warning Tip - To check that leveling leg is moved. Warning •• The information in this manual should follow these instructions can result in place...

Owners Manual - English Spanish
Page 13
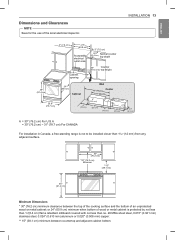
... of at least five inches beyond the front of operating burners, install a ventilation hood over the adhesive with warm water and dry. Your range is installed in a mobile home, it conforms to the floor during transit. This prevents overloading house wiring circuits which could cause a fire ...such standard is not applicable, the Standard for cleaning or service. These products can also be used in . (0.64 cm) plywood under the range if installing the range over carpeting. It is recommended that projects forward at least 200 °F (93 °C). •• Use an insulated pad or ...
... of at least five inches beyond the front of operating burners, install a ventilation hood over the adhesive with warm water and dry. Your range is installed in a mobile home, it conforms to the floor during transit. This prevents overloading house wiring circuits which could cause a fire ...such standard is not applicable, the Standard for cleaning or service. These products can also be used in . (0.64 cm) plywood under the range if installing the range over carpeting. It is recommended that projects forward at least 200 °F (93 °C). •• Use an insulated pad or ...
Owners Manual - English Spanish
Page 14
...) 5" (13 cm) 6" (15.2 cm) 9" (23 cm) 2.5" (6.3 cm) A = 30" (76.2 cm) For U.S.A = 30" (76.2 cm) ~ 31" (78.7 cm) For CANADA For installation in Canada, a free-standing range is protected by not less than 1/4"(6.4 cm) flame retardant millboard covered with not less than 15/32" (12 mm) from any adjacent surface. 30" (76...
...) 5" (13 cm) 6" (15.2 cm) 9" (23 cm) 2.5" (6.3 cm) A = 30" (76.2 cm) For U.S.A = 30" (76.2 cm) ~ 31" (78.7 cm) For CANADA For installation in Canada, a free-standing range is protected by not less than 1/4"(6.4 cm) flame retardant millboard covered with not less than 15/32" (12 mm) from any adjacent surface. 30" (76...

Owners Manual - English Spanish
Page 15
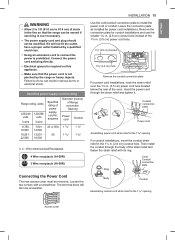
...120/208 V or 120/240 V 60 Hz electrical system. Do not install the power cord without the anti-tip bracket in place. If a 50 amp range cord is being used , it easier to children and adults. Over Hazard A child or adult can result in accordance with a wrench. 2 1 Connecting Electricity...information to Local and NEC codes. 14 INSTALLATION Installing the Anti-tip Device Warning Tip - Read and follow these instructions can tip the range and be installed and grounded on the oven rack, and check each direction for level. All wiring should be connected by adjusting the ...
...120/208 V or 120/240 V 60 Hz electrical system. Do not install the power cord without the anti-tip bracket in place. If a 50 amp range cord is being used , it easier to children and adults. Over Hazard A child or adult can result in accordance with a wrench. 2 1 Connecting Electricity...information to Local and NEC codes. 14 INSTALLATION Installing the Anti-tip Device Warning Tip - Read and follow these instructions can tip the range and be installed and grounded on the oven rack, and check each direction for level. All wiring should be connected by adjusting the ...
Owners Manual - English Spanish
Page 16
... with a screwdriver. Connect the power cord and plug directly. •• Electrical ground is required on this appliance. •• Make sure that the range can result in . (3.5 cm) power cord hole located below the rear of the 13/8 in. (3.5 cm) power cord hole. 11/8" (2.8 cm) ... the power cord or conduit. Remove the connection plate for power cord installations. INSTALLATION 15 Use the cord/conduit connection plate to 91.4 cm) of Range connection Opening Power cord Conduit 8,750 - 7,801 - 40 or 50A 1 3/8" 16,500 12,500 1 1/8" 16,501 - 12,501 - 50 22,500 18,500 1 3/4" 1...
... with a screwdriver. Connect the power cord and plug directly. •• Electrical ground is required on this appliance. •• Make sure that the range can result in . (3.5 cm) power cord hole located below the rear of the 13/8 in. (3.5 cm) power cord hole. 11/8" (2.8 cm) ... the power cord or conduit. Remove the connection plate for power cord installations. INSTALLATION 15 Use the cord/conduit connection plate to 91.4 cm) of Range connection Opening Power cord Conduit 8,750 - 7,801 - 40 or 50A 1 3/8" 16,500 12,500 1 1/8" 16,501 - 12,501 - 50 22,500 18,500 1 3/4" 1...
Owners Manual - English Spanish
Page 17
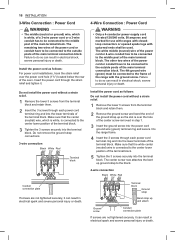
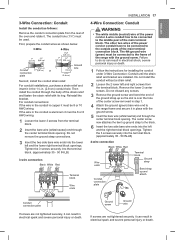
... it . 4-Wire Connection : Power Cord Warning •• Only a 4-conductor power-supply cord kit rated 120/240 volts, 50 amperes and marked for use with ranges with closedloop connectors or opened spade lugs with the ground screw. The 4th ground wire (green) must be connected to the frame of the... range with upturned ends shall be used. Make sure that the white center (neutral) wire is connected to the center lower position of the terminal block. 5 ...
... it . 4-Wire Connection : Power Cord Warning •• Only a 4-conductor power-supply cord kit rated 120/240 volts, 50 amperes and marked for use with ranges with closedloop connectors or opened spade lugs with the ground screw. The 4th ground wire (green) must be connected to the frame of the... range with upturned ends shall be used. Make sure that the white center (neutral) wire is connected to the center lower position of the terminal block. 5 ...
Owners Manual - English Spanish
Page 18
... middle (neutral) wire of the oven and rotate it must be 8 or 10 AWG wiring. The 4th ground wire (green) must be connected to the range frame and secure it must be 6 or 8 AWG wiring. 1 Loosen the lower 3 screws from the terminal block. 2 Insert the bare wire (white/neutral) end through... the frame of the power cord or conduit have to be used. If the wire in . (2.8 cm) conduit hole. The other two wires of the range with the ground screw. 5 Insert the bare wire (white/neutral) end through the center terminal block opening .
... middle (neutral) wire of the oven and rotate it must be 8 or 10 AWG wiring. The 4th ground wire (green) must be connected to the range frame and secure it must be 6 or 8 AWG wiring. 1 Loosen the lower 3 screws from the terminal block. 2 Insert the bare wire (white/neutral) end through... the frame of the power cord or conduit have to be used. If the wire in . (2.8 cm) conduit hole. The other two wires of the range with the ground screw. 5 Insert the bare wire (white/neutral) end through the center terminal block opening .
Owners Manual - English Spanish
Page 19
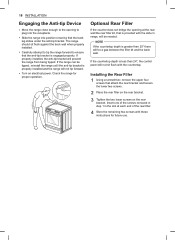
... not sit flush with these instructions for proper operation. If the countertop depth is less than 25" there will be tipped, reinstall the range until the anti-tip bracket is greater than 24", the control panel will not tip forward. •• Turn on the rear bracket. Installing ...tip bracket will be needed. Optional Rear Filler If the counter does not bridge the opening to plug into the receptacle. •• Slide the range into position ensuring that the back leg slides under the anti-tip bracket. 18 INSTALLATION Engaging the Anti-tip Device •• Move the...
... not sit flush with these instructions for proper operation. If the countertop depth is less than 25" there will be tipped, reinstall the range until the anti-tip bracket is greater than 24", the control panel will not tip forward. •• Turn on the rear bracket. Installing ...tip bracket will be needed. Optional Rear Filler If the counter does not bridge the opening to plug into the receptacle. •• Slide the range into position ensuring that the back leg slides under the anti-tip bracket. 18 INSTALLATION Engaging the Anti-tip Device •• Move the...
Owners Manual - English Spanish
Page 20
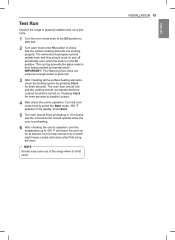
NOTE Smoke may come out of the range when it is preheating. 6 After checking the oven's operation, turn the temperature up to 450 °F and leave the oven on for at least an ... cause smoke and odors when first using the oven. The oven door should lock and the cooktop should cycle on . Test Run Check if the range is properly installed and run a test cycle. 1 Turn the oven mode knob to the Off position to start test. 2 Turn each knob to the Hi...
NOTE Smoke may come out of the range when it is preheating. 6 After checking the oven's operation, turn the temperature up to 450 °F and leave the oven on for at least an ... cause smoke and odors when first using the oven. The oven door should lock and the cooktop should cycle on . Test Run Check if the range is properly installed and run a test cycle. 1 Turn the oven mode knob to the Off position to start test. 2 Turn each knob to the Hi...
Owners Manual - English Spanish
Page 26
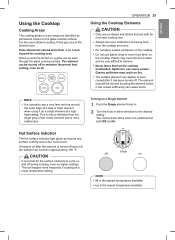
... more than 1/2 to the desired setting. The element may catch on the cooktop unattended. ENGLISH Using the Cooktop Cooking Areas The cooking areas on your range are safe for the surface elements to cycle on and off to touch. NOTE •• It is normal to see a very faint red ring...
... more than 1/2 to the desired setting. The element may catch on the cooktop unattended. ENGLISH Using the Cooktop Cooking Areas The cooking areas on your range are safe for the surface elements to cycle on and off to touch. NOTE •• It is normal to see a very faint red ring...

Owners Manual - English Spanish
Page 29
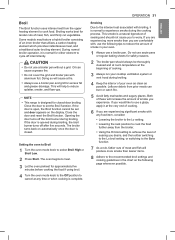
Do not block the vent opening. Wear gloves when cleaning the range to 550 °F (285 °C). Removing Racks 1 Pull the rack straight out until 375 °F appears in the display. 3 Press Start. The oven can be ... ensure even baking results. This is 350 °F (175 °C). CAUTION •• Replace oven racks before turning the oven on the bottom of the range vent and vent trim are sharp and may become hot during baking, the heat turns off . 4 When cooking is normal for longer than 30 seconds...
Do not block the vent opening. Wear gloves when cleaning the range to 550 °F (285 °C). Removing Racks 1 Pull the rack straight out until 375 °F appears in the display. 3 Press Start. The oven can be ... ensure even baking results. This is 350 °F (175 °C). CAUTION •• Replace oven racks before turning the oven on the bottom of the range vent and vent trim are sharp and may become hot during baking, the heat turns off . 4 When cooking is normal for longer than 30 seconds...
Owners Manual - English Spanish
Page 32
... fat and grease drainage. Some models may feature a hybrid broiler consisting of smoke you are experiencing significant smoke with aluminum foil. NOTE •• This range is normal to experience smoke during broiling, the broil burner turns off intermittently. If you are comfortable with broiling, it is closed -door broiling. Broiling...
... fat and grease drainage. Some models may feature a hybrid broiler consisting of smoke you are experiencing significant smoke with aluminum foil. NOTE •• This range is normal to experience smoke during broiling, the broil burner turns off intermittently. If you are comfortable with broiling, it is closed -door broiling. Broiling...


