

User Guide
Page 2
... Base or Stacking Kit 10 Unpacking and Removing Shipping Bolts 11 Connecting the Water Lines 12 Connecting the Drain Line 13 Leveling the Washer 14 and welcome to the LG family. TROUBLESHOOTING Normal Sounds You May Hear 30 Before Calling for Service 30-32 SPECIFICATIONS/OPTIONAL ACCESSORIES Key Dimensions and Specifications 33...
... Base or Stacking Kit 10 Unpacking and Removing Shipping Bolts 11 Connecting the Water Lines 12 Connecting the Drain Line 13 Leveling the Washer 14 and welcome to the LG family. TROUBLESHOOTING Normal Sounds You May Hear 30 Before Calling for Service 30-32 SPECIFICATIONS/OPTIONAL ACCESSORIES Key Dimensions and Specifications 33...
User Guide
Page 4
...several minutes. This appliance is equipped with cooking oils may be properly installed as they give off the water taps and unplug the washer if the machine is to whether the appliance is a risk of life. Under certain conditions, hydrogen gas may contribute to a... by a qualified electrician. Failure to cooking oil in this appliance, follow the fabric care instructions supplied by a qualified individual. Before the washer is not designed for maritime use . See Installation Instructions for 2 weeks or more. Always check the inside . if it will reduce ...
...several minutes. This appliance is equipped with cooking oils may be properly installed as they give off the water taps and unplug the washer if the machine is to whether the appliance is a risk of life. Under certain conditions, hydrogen gas may contribute to a... by a qualified electrician. Failure to cooking oil in this appliance, follow the fabric care instructions supplied by a qualified individual. Before the washer is not designed for maritime use . See Installation Instructions for 2 weeks or more. Always check the inside . if it will reduce ...

User Guide
Page 5
...mates with local codes to a new location, have become frayed or otherwise damaged. Failure to follow this appliance. • This washer must be plugged into a grounded 3=prong outlet. Failure to make sure the outlet is heavy. SAFETY iNSTRUCTiONS FOR iNSTALLATiON WARNING:...• Refer to follow this appliance, follow these warnings can cause serious injury, fire, electrical shock or death. • The washer should always be installed and electrically grounded by a qualified electrician to follow this warning can cause serious injury, fire, electrical shock or ...
...mates with local codes to a new location, have become frayed or otherwise damaged. Failure to follow this appliance. • This washer must be plugged into a grounded 3=prong outlet. Failure to make sure the outlet is heavy. SAFETY iNSTRUCTiONS FOR iNSTALLATiON WARNING:...• Refer to follow this appliance, follow these warnings can cause serious injury, fire, electrical shock or death. • The washer should always be installed and electrically grounded by a qualified electrician to follow this warning can cause serious injury, fire, electrical shock or ...
User Guide
Page 6
...• Never use harsh chemicals, abrasive cleaners, or solvents to the remaining oil, the fabric may contain some oil after the washer is unpacked. Close supervision of life. Before loading, unloading or adding items, push in the cycle selector knob and allow children ...inside before reaching inside. incorrect usage can become airtight chambers. I PORTANTSAFETYINSTRUCTIONS READ ALL iNSTRUCTiONS BEFORE USE WARNING safety, For your washer is used near children. To prevent personal injury, observe all appliances.Failure to a complete stop before your the information in this...
...• Never use harsh chemicals, abrasive cleaners, or solvents to the remaining oil, the fabric may contain some oil after the washer is unpacked. Close supervision of life. Before loading, unloading or adding items, push in the cycle selector knob and allow children ...inside before reaching inside. incorrect usage can become airtight chambers. I PORTANTSAFETYINSTRUCTIONS READ ALL iNSTRUCTiONS BEFORE USE WARNING safety, For your washer is used near children. To prevent personal injury, observe all appliances.Failure to a complete stop before your the information in this...

User Guide
Page 7
... energy efficiency. 7 Integrated jets spray clothes to further improve washing efficiency. _) DIRECT-DRIVE MOTOR Direct-drive motor eliminates the belt and pulleys found on most washers to prevent the door from being opened until the washer interior has cooled and the water level has lowered.
... energy efficiency. 7 Integrated jets spray clothes to further improve washing efficiency. _) DIRECT-DRIVE MOTOR Direct-drive motor eliminates the belt and pulleys found on most washers to prevent the door from being opened until the washer interior has cooled and the water level has lowered.

User Guide
Page 8
... components outlined in the Special Features section, there are several other important components that are referenced in the back) adjust to improve washer stability on the weight and size of Washer included Accessories Hot an_ Water Hoses Caps (4) (for covering shipping bolt holes) h Tie Strap Elbow Bracket shipping bolts and adjusting leveling...
... components outlined in the Special Features section, there are several other important components that are referenced in the back) adjust to improve washer stability on the weight and size of Washer included Accessories Hot an_ Water Hoses Caps (4) (for covering shipping bolt holes) h Tie Strap Elbow Bracket shipping bolts and adjusting leveling...

User Guide
Page 9
... result in . (10 cm) behind the unit. Power Outlet • The power outlet must be within 60 in. (1.5 m) of either side of the washer. • The appliance and outlet must be positioned so that may increase the required clearances. 000 1"--I (2.5 cm) 27" (68.6 cm) (2.5 cm) ...not be grounded in humid spaces. Failure to follow this warning can cause serious injury, fire, electrical shock, or death. • Properly ground washer to follow this warning can cause serious injury, fire, electrical shock, or death. • The base opening must be obstructed by a qualified ...
... result in . (10 cm) behind the unit. Power Outlet • The power outlet must be within 60 in. (1.5 m) of either side of the washer. • The appliance and outlet must be positioned so that may increase the required clearances. 000 1"--I (2.5 cm) 27" (68.6 cm) (2.5 cm) ...not be grounded in humid spaces. Failure to follow this warning can cause serious injury, fire, electrical shock, or death. • Properly ground washer to follow this warning can cause serious injury, fire, electrical shock, or death. • The base opening must be obstructed by a qualified ...
User Guide
Page 10
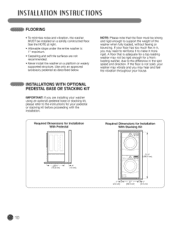
... your pedestal or stacking kit before proceeding with the installation. INSTALLATIONINST UcTIONS FLOORING • To minimize noise and vibration, the washer MUST be installed on a platform or weakly supported structure. Use only an approved accessory pedestal as described below. NOTE: Please... note that is adequate for a top-loading washer may need to reinforce it more rigid. INSTALLATIONS WiTH OPTIONAL PEDESTAL BASE OR STACKING KIT IMPORTANT: if you are not recommended. ...
... your pedestal or stacking kit before proceeding with the installation. INSTALLATIONINST UcTIONS FLOORING • To minimize noise and vibration, the washer MUST be installed on a platform or weakly supported structure. Use only an approved accessory pedestal as described below. NOTE: Please... note that is adequate for a top-loading washer may need to reinforce it more rigid. INSTALLATIONS WiTH OPTIONAL PEDESTAL BASE OR STACKING KIT IMPORTANT: if you are not recommended. ...

User Guide
Page 11
... be sure to remove the foam tub support in place. To prevent damage to internal components, the shipping bolts and retainers must lay the washer down to remove the base packaging materials, always lay it carefully on its side. Rotate and press the hole caps into the shipping bolt... holes. Remove the retainers by turning them slightly while pulling. If you must be installed when transporting the washer. 11 NOTE: Save the bolts and retainers for future use the included wrench to remove the 4 shipping bolts by turning them counterclockwise. Do ...
... be sure to remove the foam tub support in place. To prevent damage to internal components, the shipping bolts and retainers must lay the washer down to remove the base packaging materials, always lay it carefully on its side. Rotate and press the hole caps into the shipping bolt... holes. Remove the retainers by turning them slightly while pulling. If you must be installed when transporting the washer. 11 NOTE: Save the bolts and retainers for future use the included wrench to remove the 4 shipping bolts by turning them counterclockwise. Do ...

User Guide
Page 12
... for several hours before use. Attach the hot water line to the red hot water inlet on the back of the washer can result, if the washer was exposed to freezing temperatures prior to installation, allow it to freezing temperatures. Tighten the fittings securely. 12 Attach the ...to tap) insert a rubber seal into the threaded fittings on the back of LG's warranty. • Water supply pressure must be installed. • Periodically check the hose for leaks. f Water Hose (to water inlet on washer Rubber Seal Rubber Seal Water Hose "/ (to the blue cold water inlet ...
... for several hours before use. Attach the hot water line to the red hot water inlet on the back of the washer can result, if the washer was exposed to freezing temperatures prior to installation, allow it to freezing temperatures. Tighten the fittings securely. 12 Attach the ...to tap) insert a rubber seal into the threaded fittings on the back of LG's warranty. • Water supply pressure must be installed. • Periodically check the hose for leaks. f Water Hose (to water inlet on washer Rubber Seal Rubber Seal Water Hose "/ (to the blue cold water inlet ...
User Guide
Page 13
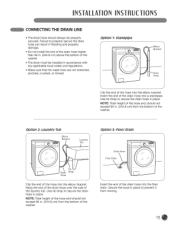
...the drain hose higher than 96 in . (244.8 cm) from the bottom of the washer. NOTE: Total height of the hose end should not exceed 96 in . (244.8 cm) above the bottom of the... washer. Option 1: Standpipe _._ Elbow Bracket Drain Hose Clip the end of the drain hose into the elbow ...moving. 15 Make sure that the water lines are not stretched, pinched, crushed, or kinked. Insert the end of the washer. NOTE: Total height of the hose end should not exceed 96 in place to secure the drain hose in place. INSTAI_...
...the drain hose higher than 96 in . (244.8 cm) from the bottom of the washer. NOTE: Total height of the hose end should not exceed 96 in . (244.8 cm) above the bottom of the... washer. Option 1: Standpipe _._ Elbow Bracket Drain Hose Clip the end of the drain hose into the elbow ...moving. 15 Make sure that the water lines are not stretched, pinched, crushed, or kinked. Insert the end of the washer. NOTE: Total height of the hose end should not exceed 96 in place to secure the drain hose in place. INSTAI_...
User Guide
Page 14
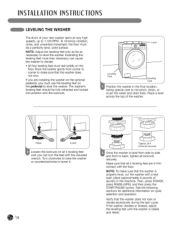
...far as necessary to not pinch, strain, or crush the water and drain lines. Raise Lower Loosen the Iocknuts on the floor. If the washer vibrates or shakes, adjust the leveling feet until you must use the leveling feet on cycle selection and operation. Extending the leveling feet more ...wrench. Then, press POWER, press RINSE+SPIN, and then press the START/PAUSE button. Rock the washer gently from side to side and front to back, tighten all 4 leveling feet until the washer is level from corner to corner to vibrate. • All four leveling feet must be fully retracted...
...far as necessary to not pinch, strain, or crush the water and drain lines. Raise Lower Loosen the Iocknuts on the floor. If the washer vibrates or shakes, adjust the leveling feet until you must use the leveling feet on cycle selection and operation. Extending the leveling feet more ...wrench. Then, press POWER, press RINSE+SPIN, and then press the START/PAUSE button. Rock the washer gently from side to side and front to back, tighten all 4 leveling feet until the washer is level from corner to corner to vibrate. • All four leveling feet must be fully retracted...

User Guide
Page 15
... Items For best results, sort clothes into loads that they are empty. Pretreat heavily stained areas for small items. NOTE: The front loading washer rotates the wet laundry to wash it is not a problem because the laundry is sufficiently wet. 15 Load large items first. . Large ...items should close easily. . If possible, do not wash heavily soiled items with items. The door of the total washload. . The washer can damage both your washer and your clothes. * Close zippers, hooks, and drawstrings to prevent these items from light colors and whites to prevent discoloration. When unloading ...
... Items For best results, sort clothes into loads that they are empty. Pretreat heavily stained areas for small items. NOTE: The front loading washer rotates the wet laundry to wash it is not a problem because the laundry is sufficiently wet. 15 Load large items first. . Large ...items should close easily. . If possible, do not wash heavily soiled items with items. The door of the total washload. . The washer can damage both your washer and your clothes. * Close zippers, hooks, and drawstrings to prevent these items from light colors and whites to prevent discoloration. When unloading ...

User Guide
Page 16
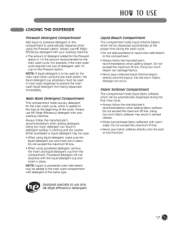
... laundry products, NOTE: It is designed for use only HE (High-Efficiency) detergent ABOUT THE DISPENSER The automatic dispenser consists of your washer or dryer. O Slowly close the dispenser drawer. HE detergents produce fewer suds, dissolve more efficiently to improve washing and rinsing performance,...ent _,Cup Prewash Detergent Compartment 16 Liquid fabric softener. Liquid or powdered detergent and color-safe bleach for front-load washers and contain suds-reducing agents. All laundry products can damage the finish and controls. These products can be dispensed at the end...
... laundry products, NOTE: It is designed for use only HE (High-Efficiency) detergent ABOUT THE DISPENSER The automatic dispenser consists of your washer or dryer. O Slowly close the dispenser drawer. HE detergents produce fewer suds, dissolve more efficiently to improve washing and rinsing performance,...ent _,Cup Prewash Detergent Compartment 16 Liquid fabric softener. Liquid or powdered detergent and color-safe bleach for front-load washers and contain suds-reducing agents. All laundry products can damage the finish and controls. These products can be dispensed at the end...
User Guide
Page 17
... liquid chlorine bleach directly onto the load or into the drum. 17 Using too much detergent can result in detergent buildup in clothing and the washer. Always follow the manufacturer's recommendations when adding detergent. Always follow the manufacturer's recommendations when adding bleach. Do not exceed the maximum fill line. Either powdered...
... liquid chlorine bleach directly onto the load or into the drum. 17 Using too much detergent can result in detergent buildup in clothing and the washer. Always follow the manufacturer's recommendations when adding detergent. Always follow the manufacturer's recommendations when adding bleach. Do not exceed the maximum fill line. Either powdered...

User Guide
Page 18
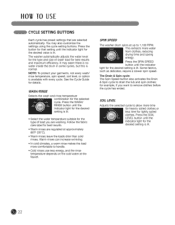
...O CYCLE SELECTOR KNOB Turn this button to delay the start of the button increases the delay time by pressing and holding the button for your washer. Once the desired cycle has been selected, the standard presets will be adjusted using the cycle settings buttons anytime before starting the cycle. These ...BUTTON Press the CUSTOM PROGRAM button to adjust the desired cycle options for future use this button to turn the washer ON. DELAY WASH BUTTON Press this knob to turn the washer OFR NOTE: Pressing the ON/OFF button during a cycle will cancel that cycle and any load settings will ...
...O CYCLE SELECTOR KNOB Turn this button to delay the start of the button increases the delay time by pressing and holding the button for your washer. Once the desired cycle has been selected, the standard presets will be adjusted using the cycle settings buttons anytime before starting the cycle. These ...BUTTON Press the CUSTOM PROGRAM button to adjust the desired cycle options for future use this button to turn the washer ON. DELAY WASH BUTTON Press this knob to turn the washer OFR NOTE: Pressing the ON/OFF button during a cycle will cancel that cycle and any load settings will ...

User Guide
Page 20
...will then indicate the estimated time remaining for DELAY WASH. The door can be unlocked until the washer has cooled. AUTOMATIC LOAD SIZE SENSING At the beginning of the cycle, the washer tumbles the load and detects the weight of the wash cycle is currently underway (LOAD SENSING, WASH...the set for the selected wash cycle. If the water level is pressed, the washer automatically detects the wash load (weight) and optimizes the washing time, based on a top-loading washer. The washer will lock while the washer is typically shown on the selected cycle and options. 0 TO USE THE TIME...
...will then indicate the estimated time remaining for DELAY WASH. The door can be unlocked until the washer has cooled. AUTOMATIC LOAD SIZE SENSING At the beginning of the cycle, the washer tumbles the load and detects the weight of the wash cycle is currently underway (LOAD SENSING, WASH...the set for the selected wash cycle. If the water level is pressed, the washer automatically detects the wash load (weight) and optimizes the washing time, based on a top-loading washer. The washer will lock while the washer is typically shown on the selected cycle and options. 0 TO USE THE TIME...
User Guide
Page 21
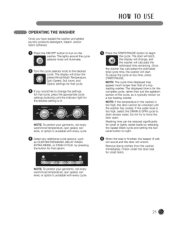
... cycle options, such as is available with every cycle. 21 O When the load is available with every cycle. Remove damp clothes from the washer immediately. The lights around the cycle selector knob will start. O Turn the cycle selector knob to begin the cycle. NOTE: To protect your...is finished, the beeper (if set) will sound and the door will calculate the estimated time remaining. Once the washer has calculated the estimated total cycle time, the washer will illuminate. O Press the START/PAUSE button to the desired cycle. The displayed time is for the desired setting ...
... cycle options, such as is available with every cycle. 21 O When the load is available with every cycle. Remove damp clothes from the washer immediately. The lights around the cycle selector knob will start. O Turn the cycle selector knob to begin the cycle. NOTE: To protect your...is finished, the beeper (if set) will sound and the door will calculate the estimated time remaining. Once the washer has calculated the estimated total cycle time, the washer will illuminate. O Press the START/PAUSE button to the desired cycle. The displayed time is for the desired setting ...
User Guide
Page 22
... for the type and size of load you want to drain the tub and spin clothes; The washer automatically adjusts the water level for that are regulated at up to 1,100 RPM. SPIN SPEED The washer drum spins at approximately 86°F (30°0). • Warm rinses leave the loads drier than...
... for the type and size of load you want to drain the tub and spin clothes; The washer automatically adjusts the water level for that are regulated at up to 1,100 RPM. SPIN SPEED The washer drum spins at approximately 86°F (30°0). • Warm rinses leave the loads drier than...
User Guide
Page 23
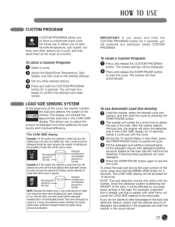
...load. TOrecall a Custom Program: Press and release the CUSTOM PROGRAM button. TO use Automatic Load Size Sensing: Load the washer, select the desired cycle and options, and then start automatically. If you do not desire to take advantage of the ... Dreectoemrgmenetnded this10ad _/_-Z___-J1 fullam°fournatl0ad NOTEB: ecaustehe washeur sesa verysmallamounot f water, careshouldbetakenwhendecidinghowmuchdetergent to be usedis greater. The washer will start the cycle by unusually heaw articles in a moreconcentratemd annerH. NOTE: The load detection routine only works with detergent/...
...load. TOrecall a Custom Program: Press and release the CUSTOM PROGRAM button. TO use Automatic Load Size Sensing: Load the washer, select the desired cycle and options, and then start automatically. If you do not desire to take advantage of the ... Dreectoemrgmenetnded this10ad _/_-Z___-J1 fullam°fournatl0ad NOTEB: ecaustehe washeur sesa verysmallamounot f water, careshouldbetakenwhendecidinghowmuchdetergent to be usedis greater. The washer will start the cycle by unusually heaw articles in a moreconcentratemd annerH. NOTE: The load detection routine only works with detergent/...


