User Manual
Page 19
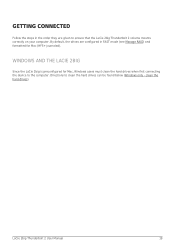
clean the hard drives). WINDOWS AND THE LACIE 2BIG Since the LaCie 2big is preconfigured for Mac (HFS+ journaled). LaCie 2big Thunderbolt 2 User Manual 19 By default, the drives are given to clean the hard drives can be found below (Windows only - GETTING CONNECTED Follow the steps in the order they are configured in FAST mode (see Manage RAID) and formatted for Mac, Windows users must clean the hard drives when first connecting the device to the computer. Directions to ensure that the LaCie 2big Thunderbolt 2 volume mounts correctly on your computer.
clean the hard drives). WINDOWS AND THE LACIE 2BIG Since the LaCie 2big is preconfigured for Mac (HFS+ journaled). LaCie 2big Thunderbolt 2 User Manual 19 By default, the drives are given to clean the hard drives can be found below (Windows only - GETTING CONNECTED Follow the steps in the order they are configured in FAST mode (see Manage RAID) and formatted for Mac, Windows users must clean the hard drives when first connecting the device to the computer. Directions to ensure that the LaCie 2big Thunderbolt 2 volume mounts correctly on your computer.

User Manual
Page 21
... for Windows. Important: The side panel may require added pressure to a computer with a USB 3.0 port. 4. The LaCie 2big will mount on . USB 3.0 transfer rates are only available when connecting the LaCie 2big to reinsert it into the slot. See the note below. 5. LaCie 2big Thunderbolt 2 User Manual 21 s USB 3.0 (PC/Mac): Use the included USB 3.0 cable. The second...
... for Windows. Important: The side panel may require added pressure to a computer with a USB 3.0 port. 4. The LaCie 2big will mount on . USB 3.0 transfer rates are only available when connecting the LaCie 2big to reinsert it into the slot. See the note below. 5. LaCie 2big Thunderbolt 2 User Manual 21 s USB 3.0 (PC/Mac): Use the included USB 3.0 cable. The second...
User Manual
Page 33
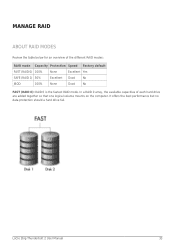
LaCie 2big Thunderbolt 2 User Manual 33 It offers the best performance but no data protection should a hard drive fail. MANAGE RAID ABOUT RAID MODES Review the table below for an overview of each hard drive are added together so that one logical volume mounts on the computer. In a RAID 0 array, the available capacities of the different RAID modes: RAID mode Capacity Protection Speed Factory default FAST (RAID 0) 100% None Excellent Yes SAFE (RAID 1) 50% Excellent Good No JBOD 100% None Good No FAST (RAID 0): RAID 0 is the fastest RAID mode.
LaCie 2big Thunderbolt 2 User Manual 33 It offers the best performance but no data protection should a hard drive fail. MANAGE RAID ABOUT RAID MODES Review the table below for an overview of each hard drive are added together so that one logical volume mounts on the computer. In a RAID 0 array, the available capacities of the different RAID modes: RAID mode Capacity Protection Speed Factory default FAST (RAID 0) 100% None Excellent Yes SAFE (RAID 1) 50% Excellent Good No JBOD 100% None Good No FAST (RAID 0): RAID 0 is the fastest RAID mode.
User Manual
Page 42
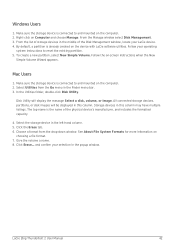
...mounted on the device with LaCie software utilities. In the Utilities folder, double-click Disk Utility. Select the storage device in the Finder menu bar. 3. See About File System Formats for more information on -screen instructions when the New Simple Volume Wizard appears. and confirm your LaCie device. 4. LaCie 2big Thunderbolt...the volume a name. 8. Windows Users 1. Right-click on the computer. 2. Follow your operating system instructions to and mounted on Computer and choose Manage. Select Utilities from the drop-down window. Click the Erase tab. 6. Choose a format ...
...mounted on the device with LaCie software utilities. In the Utilities folder, double-click Disk Utility. Select the storage device in the Finder menu bar. 3. See About File System Formats for more information on -screen instructions when the New Simple Volume Wizard appears. and confirm your LaCie device. 4. LaCie 2big Thunderbolt...the volume a name. 8. Windows Users 1. Right-click on the computer. 2. Follow your operating system instructions to and mounted on Computer and choose Manage. Select Utilities from the drop-down window. Click the Erase tab. 6. Choose a format ...
