
Lantronix SpiderDuo - Quick Start Guide
Page 7
...L A N T R O N I X . HyperTerminal). For transparent local access, connect cables to a static IP address, at the IP autoconfiguration prompt type none and press Enter. Upon bootup, the terminal window displays the IP Configuration screen. . Plug the power adaptor into the Spider Duo's serial port. W W W. CO M 5... At the command prompt type config and press Enter. 4. To change the default IP auto configuration from DHCP to local keyboard, video and mouse. Plug the RJ45 end of a PC/laptop running a terminal emulation (e.g. The...
...L A N T R O N I X . HyperTerminal). For transparent local access, connect cables to a static IP address, at the IP autoconfiguration prompt type none and press Enter. Upon bootup, the terminal window displays the IP Configuration screen. . Plug the power adaptor into the Spider Duo's serial port. W W W. CO M 5... At the command prompt type config and press Enter. 4. To change the default IP auto configuration from DHCP to local keyboard, video and mouse. Plug the RJ45 end of a PC/laptop running a terminal emulation (e.g. The...

Lantronix SpiderDuo - Quick Start Guide
Page 8
...illuminates. 6 Enter y for Yes, n for No or c to enter the unit's IP address, subnet mask, default gateway, and LAN interface information. [172.18.100.17 spider]> config IP autoconfiguration (none/dhcp/bootp) [dhcp]: none IP [172.18.100.17]: NetMask [255.255.0.0]: Gateway (0.0.0.0 for the following features: -...network into the Ethernet port. . Plug an Ethernet cable connected to complete. Press Enter, to display the updated IP address. 7. Press Enter once again at the prompt to accept the changes. Quick Start Guide SecureLinx Spider Duo INSTALLATION AND NETWORK SETTINGS CONTINUED...
...illuminates. 6 Enter y for Yes, n for No or c to enter the unit's IP address, subnet mask, default gateway, and LAN interface information. [172.18.100.17 spider]> config IP autoconfiguration (none/dhcp/bootp) [dhcp]: none IP [172.18.100.17]: NetMask [255.255.0.0]: Gateway (0.0.0.0 for the following features: -...network into the Ethernet port. . Plug an Ethernet cable connected to complete. Press Enter, to display the updated IP address. 7. Press Enter once again at the prompt to accept the changes. Quick Start Guide SecureLinx Spider Duo INSTALLATION AND NETWORK SETTINGS CONTINUED...

Lantronix SpiderDuo - Quick Start Guide
Page 9
SPIDER DUO WEB CONFIGURATION 1. The Spider Duo home page displays. connection and its IP address in the address bar. 2. CO M 7 Access the Spider Duo over the network using a favorite web browser by entering https:// for a secure SSL connection or http:// for an insecure . L A N T R O N I X . W W W. Enter your user name (default is sysadmin) and password (default is PASS) at the prompt.
SPIDER DUO WEB CONFIGURATION 1. The Spider Duo home page displays. connection and its IP address in the address bar. 2. CO M 7 Access the Spider Duo over the network using a favorite web browser by entering https:// for a secure SSL connection or http:// for an insecure . L A N T R O N I X . W W W. Enter your user name (default is sysadmin) and password (default is PASS) at the prompt.

Lantronix SpiderDuo - Quick Start Guide
Page 10
... SSL encryption, select Force HTTPS for Web access. To change the target interface keyboard/mouse settings from the default (Auto) to access the Spider Duo's IP address as well as necessary. To change to store your settings in nonvolatile memory. Network TCP Ports and Services: a. Consult your system administrator if your settings...
... SSL encryption, select Force HTTPS for Web access. To change the target interface keyboard/mouse settings from the default (Auto) to access the Spider Duo's IP address as well as necessary. To change to store your settings in nonvolatile memory. Network TCP Ports and Services: a. Consult your system administrator if your settings...

Lantronix Spider / SpiderDuo - User Guide
Page 3
...support; Updated to enable drive redirection, configure backup/restore, and reset factory defaults; Updated and added SpiderDuo. Spider™ and SpiderDuo® KVM-over-IP Device User Guide 3 The manufacturer assumes no responsibility for Class A digital device pursuant to correct ...limits are designed to operate the device. instructions for assigning IP address; Added Direct KVM; Changes or modifications to this User Guide, may clause interference to correct the interference at www.lantronix.com/support/documentation. added Detector utility for using the ...
...support; Updated to enable drive redirection, configure backup/restore, and reset factory defaults; Updated and added SpiderDuo. Spider™ and SpiderDuo® KVM-over-IP Device User Guide 3 The manufacturer assumes no responsibility for Class A digital device pursuant to correct ...limits are designed to operate the device. instructions for assigning IP address; Added Direct KVM; Changes or modifications to this User Guide, may clause interference to correct the interference at www.lantronix.com/support/documentation. added Detector utility for using the ...

Lantronix Spider / SpiderDuo - User Guide
Page 4
... 17 System Configuration and Cables 17 Technical Specifications 19 SpiderDuo Overview 20 Features 20 Functionality 20 System Configuration and Cables 21 Technical Specifications 22 Product Information Label 23 3: Installing the Spider Device 25 Package Contents 25 Installing the Spider 25 Detector Installation and IP Address Reset 28 Target Computer Setup 30 Video Resolutions...
... 17 System Configuration and Cables 17 Technical Specifications 19 SpiderDuo Overview 20 Features 20 Functionality 20 System Configuration and Cables 21 Technical Specifications 22 Product Information Label 23 3: Installing the Spider Device 25 Package Contents 25 Installing the Spider 25 Detector Installation and IP Address Reset 28 Target Computer Setup 30 Video Resolutions...

Lantronix Spider / SpiderDuo - User Guide
Page 5
Client Server Setup 33 Network Environment 33 Spider Power 33 4: Installing the SpiderDuo Device 34 Package Contents 34 Installing the SpiderDuo 34 Detector Installation and IP Address Reset 37 Target Computer Setup 39 Video Resolutions and Refresh Rates Configuration 40 Mouse-to-Cursor Synchronization 40 Telnet/SSH Connections to ... 50 Single and Double Mouse Modes 50 Local Cursor 50 Optimizing Video 51 Auto and Manual Video Adjustment 51 Spider™ and SpiderDuo® KVM-over-IP Device User Guide 5 Resolution 48 Information Bar - Connection 48 Information Bar -
Client Server Setup 33 Network Environment 33 Spider Power 33 4: Installing the SpiderDuo Device 34 Package Contents 34 Installing the SpiderDuo 34 Detector Installation and IP Address Reset 37 Target Computer Setup 39 Video Resolutions and Refresh Rates Configuration 40 Mouse-to-Cursor Synchronization 40 Telnet/SSH Connections to ... 50 Single and Double Mouse Modes 50 Local Cursor 50 Optimizing Video 51 Auto and Manual Video Adjustment 51 Spider™ and SpiderDuo® KVM-over-IP Device User Guide 5 Resolution 48 Information Bar - Connection 48 Information Bar -

Lantronix Spider / SpiderDuo - User Guide
Page 25
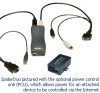
...Package Contents Installing the Spider Detector Installation and IP Address Reset Target Computer Setup Client Server Setup ... Spider Power For technical specifications of the Spider KVM-over -IP module, the package contains the following factors when planning the ...line management. Package Contents In addition to the Spider distributed KVM -over -IP device, see Chapter 4: Mounting Bracket Kit) Quick Start Guide...independent AC power source. Spider™ and SpiderDuo® KVM-over -IP device. It can use a modem or other serial...
...Package Contents Installing the Spider Detector Installation and IP Address Reset Target Computer Setup Client Server Setup ... Spider Power For technical specifications of the Spider KVM-over -IP module, the package contains the following factors when planning the ...line management. Package Contents In addition to the Spider distributed KVM -over -IP device, see Chapter 4: Mounting Bracket Kit) Quick Start Guide...independent AC power source. Spider™ and SpiderDuo® KVM-over -IP device. It can use a modem or other serial...

Lantronix Spider / SpiderDuo - User Guide
Page 26
... into the target computer. Spider™ and SpiderDuo® KVM-over-IP Device User Guide 26 3: Installing the Spider ...Device Ethernet Ports-Connects to the Spider device and server conserving a switch or router port. - The Spider device contains a hardware Ethernet switch that an external management network can be performed as a general-purpose switch port. Batch vs. Lantronix...daisy" chain physically, logically each Spider device with its own IP address on the server, so that connects to the Spider device and...
... into the target computer. Spider™ and SpiderDuo® KVM-over-IP Device User Guide 26 3: Installing the Spider ...Device Ethernet Ports-Connects to the Spider device and server conserving a switch or router port. - The Spider device contains a hardware Ethernet switch that an external management network can be performed as a general-purpose switch port. Batch vs. Lantronix...daisy" chain physically, logically each Spider device with its own IP address on the server, so that connects to the Spider device and...

Lantronix Spider / SpiderDuo - User Guide
Page 27
...Green Green Orange Table 3-2 Spider LEDs Action Indicates adequate power from DHCP to assist in Figure 3-3. Indicates, when lit, to a static IP address, type config and press Enter. 7. When the bootup process completes, the terminal window displays the login prompt as shown in Figure 3-4. ... USB2 or PS/2. Figure 3-4 Spider Prompts 9. Plug an Ethernet cable connected to boot, Pwr1 illuminates blue. Spider™ and SpiderDuo® KVM-over-IP Device User Guide 27 3: Installing the Spider Device 4. If you use the external power supply to your network into the Ethernet ...
...Green Green Orange Table 3-2 Spider LEDs Action Indicates adequate power from DHCP to assist in Figure 3-3. Indicates, when lit, to a static IP address, type config and press Enter. 7. When the bootup process completes, the terminal window displays the login prompt as shown in Figure 3-4. ... USB2 or PS/2. Figure 3-4 Spider Prompts 9. Plug an Ethernet cable connected to boot, Pwr1 illuminates blue. Spider™ and SpiderDuo® KVM-over-IP Device User Guide 27 3: Installing the Spider Device 4. If you use the external power supply to your network into the Ethernet ...

Lantronix Spider / SpiderDuo - User Guide
Page 28
... the .NET Framework application from its CD. Figure 3-6 Lantronix Detector Window Spider™ and SpiderDuo® KVM-over-IP Device User Guide 28 Note: Lantronix recommends that you need to change it from there rather than from Lantronix at http://www.lantronix.com/support/ downloads.html or go to terminate the application...=en. 3. Detector gets installed successfully. 4. 3: Installing the Spider Device Figure 3-5 Spider RJ45 Ethernet and Cascade Ports Detector Installation and IP Address Reset The initial IP address gets assigned during bootup of the Spider device.
... the .NET Framework application from its CD. Figure 3-6 Lantronix Detector Window Spider™ and SpiderDuo® KVM-over-IP Device User Guide 28 Note: Lantronix recommends that you need to change it from there rather than from Lantronix at http://www.lantronix.com/support/ downloads.html or go to terminate the application...=en. 3. Detector gets installed successfully. 4. 3: Installing the Spider Device Figure 3-5 Spider RJ45 Ethernet and Cascade Ports Detector Installation and IP Address Reset The initial IP address gets assigned during bootup of the Spider device.
Lantronix Spider / SpiderDuo - User Guide
Page 29
...-down menu. Click the Search icon shown in Figure 3-8. Spider™ and SpiderDuo® KVM-over-IP Device User Guide 29 Change the milliseconds for devices, go to change the IP address. 3: Installing the Spider Device 5. The default is 3000. 6. A list of Lantronix Ethernet devices on the network displays as shown in Figure 3-7. . Before searching...
...-down menu. Click the Search icon shown in Figure 3-8. Spider™ and SpiderDuo® KVM-over-IP Device User Guide 29 Change the milliseconds for devices, go to change the IP address. 3: Installing the Spider Device 5. The default is 3000. 6. A list of Lantronix Ethernet devices on the network displays as shown in Figure 3-7. . Before searching...

Lantronix Spider / SpiderDuo - User Guide
Page 30
.... To accept the default, leave blank. 11. Each of the web interface, make sure Disable Setup Protocol is the router IP address for KVM and USB Spider™ and SpiderDuo® KVM-over-IP Device User Guide 30 that is the network segment connected to -cursor movement is no default. 9. You can access the...
.... To accept the default, leave blank. 11. Each of the web interface, make sure Disable Setup Protocol is the router IP address for KVM and USB Spider™ and SpiderDuo® KVM-over-IP Device User Guide 30 that is the network segment connected to -cursor movement is no default. 9. You can access the...

Lantronix Spider / SpiderDuo - User Guide
Page 34
.... It contains the following factors when planning the installation of the SpiderDuo, see Chapter 2: Overview. Use the Lantronix power supply only, part number 520-104-R. Installing the SpiderDuo Consider the following sections: Package Contents Installing the SpiderDuo Detector Installation and IP Address Reset Target Computer Setup Client Server Setup Network...
.... It contains the following factors when planning the installation of the SpiderDuo, see Chapter 2: Overview. Use the Lantronix power supply only, part number 520-104-R. Installing the SpiderDuo Consider the following sections: Package Contents Installing the SpiderDuo Detector Installation and IP Address Reset Target Computer Setup Client Server Setup Network...

Lantronix Spider / SpiderDuo - User Guide
Page 36
... (out) 4 PCu Sense (in) 5 GND (out) 6 RX (in) 7 PCU Drive (out) 8 CTS (in) Color Amber Blue Green Table 4-3 SpiderDuo Indicator LEDs Action On - Type Enter, to a static IP address, at the prompt to enter the IP address, subnet mask, default gateway, and LAN interface information. 8. Plug an Ethernet cable connected to complete. Powered up and...
... (out) 4 PCu Sense (in) 5 GND (out) 6 RX (in) 7 PCU Drive (out) 8 CTS (in) Color Amber Blue Green Table 4-3 SpiderDuo Indicator LEDs Action On - Type Enter, to a static IP address, at the prompt to enter the IP address, subnet mask, default gateway, and LAN interface information. 8. Plug an Ethernet cable connected to complete. Powered up and...

Lantronix Spider / SpiderDuo - User Guide
Page 37
... again. d. Note: Lantronix recommends that you may get a security exception. 4: Installing the SpiderDuo Device Note: To reboot or reset the SpiderDuo, press the reset switch through the pinhole on the bottom of the SpiderDuo device. Turn on the SpiderDuo device first, and wait... at http://www.lantronix.com/support/downloads.html. Open the Detector software. If you need to install Detector. 1. c. To change your security settings using the .NET Framework Configuration or "caspol" tool. Detector Installation and IP Address Reset The initial IP address gets assigned during ...
... again. d. Note: Lantronix recommends that you may get a security exception. 4: Installing the SpiderDuo Device Note: To reboot or reset the SpiderDuo, press the reset switch through the pinhole on the bottom of the SpiderDuo device. Turn on the SpiderDuo device first, and wait... at http://www.lantronix.com/support/downloads.html. Open the Detector software. If you need to install Detector. 1. c. To change your security settings using the .NET Framework Configuration or "caspol" tool. Detector Installation and IP Address Reset The initial IP address gets assigned during ...
Lantronix Spider / SpiderDuo - User Guide
Page 38
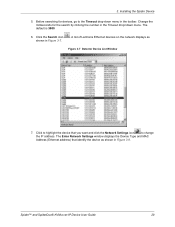
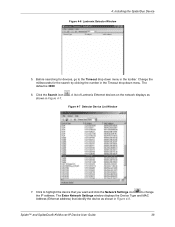
... Network Settings window displays the Device Type and MAC Address (Ethernet address) that you want and click the Network Settings icon to change the IP address. Click the Search icon shown in the toolbar. Spider™ and SpiderDuo® KVM-over-IP Device User Guide 38 A list of Lantronix Ethernet devices on the network displays as shown...
... Network Settings window displays the Device Type and MAC Address (Ethernet address) that you want and click the Network Settings icon to change the IP address. Click the Search icon shown in the toolbar. Spider™ and SpiderDuo® KVM-over-IP Device User Guide 38 A list of Lantronix Ethernet devices on the network displays as shown...

Lantronix Spider / SpiderDuo - User Guide
Page 39
... discussed in more detail in the Network Miscellaneous Settings section. that is the network segment connected to -cursor movement is the router IP address for the taget computer monitor; 4: Installing the SpiderDuo Device Figure 4-8 Network Settings Window 8. Enter the subnet mask that the mouse-to the Spider device. Note: On the Interfaces Network...
... discussed in more detail in the Network Miscellaneous Settings section. that is the network segment connected to -cursor movement is the router IP address for the taget computer monitor; 4: Installing the SpiderDuo Device Figure 4-8 Network Settings Window 8. Enter the subnet mask that the mouse-to the Spider device. Note: On the Interfaces Network...

Lantronix Spider / SpiderDuo - User Guide
Page 46
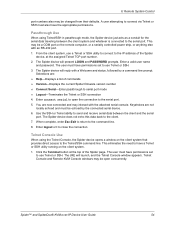
...Remote Console Operation Optimizing Video Keyboard Functions Other Remote Console Functions Telnet/SSH Overview The Lantronix Spider and SpiderDuo devices control the target system by clicking the link below the preview image on the KVM Console Preview window. By scaling the... Remote Console window, mouse movements and keystrokes are transmitted to a remote computer. The title bar of the window shows the IP address of remote system control. You can be applied within the window itself. When the local computer window displays in the background,...
...Remote Console Operation Optimizing Video Keyboard Functions Other Remote Console Functions Telnet/SSH Overview The Lantronix Spider and SpiderDuo devices control the target system by clicking the link below the preview image on the KVM Console Preview window. By scaling the... Remote Console window, mouse movements and keystrokes are transmitted to a remote computer. The title bar of the window shows the IP address of remote system control. You can be applied within the window itself. When the local computer window displays in the background,...
Lantronix Spider / SpiderDuo - User Guide
Page 54
... Terminal button at the assigned Telnet TCP port number. 2. From the client system, use a Telnet or SSH utility to connect to the IP address of the Spider device, at the top of commands Version-Displays the current Spider firmware version number Connect Serial-Enter passthrough... Enter connect serial to have permissions set to use Telnet or SSH. This eliminates the need to open concurrently. Spider™ and SpiderDuo® KVM-over-IP Device User Guide 54 You are : Help-Displays a list of the Spider page. Telnet Console and Remote KVM Console ...
... Terminal button at the assigned Telnet TCP port number. 2. From the client system, use a Telnet or SSH utility to connect to the IP address of the Spider device, at the top of commands Version-Displays the current Spider firmware version number Connect Serial-Enter passthrough... Enter connect serial to have permissions set to use Telnet or SSH. This eliminates the need to open concurrently. Spider™ and SpiderDuo® KVM-over-IP Device User Guide 54 You are : Help-Displays a list of the Spider page. Telnet Console and Remote KVM Console ...

