
UDS1100 - User Guide
Page 8
...Channel Configuration Details the serial port settings. 8: Setup Mode: Advanced Settings Details expert and security settings and explains how to reset the unit to factory default values. 9: Firmware Upgrades Provides instructions for obtaining the latest firmware and updating the UDS. ...Description 2: Introduction Describes the main features of UDS1100 Provides information for the UDS. B: Connections and Pinouts Provides descriptions and illustrations of the unit's mounting brackets. Details using the Web-Manager to contact Lantronix Technical Support. E: Alternative Ways to Assign...
...Channel Configuration Details the serial port settings. 8: Setup Mode: Advanced Settings Details expert and security settings and explains how to reset the unit to factory default values. 9: Firmware Upgrades Provides instructions for obtaining the latest firmware and updating the UDS. ...Description 2: Introduction Describes the main features of UDS1100 Provides information for the UDS. B: Connections and Pinouts Provides descriptions and illustrations of the unit's mounting brackets. Details using the Web-Manager to contact Lantronix Technical Support. E: Alternative Ways to Assign...

UDS1100 - User Guide
Page 21
... the following: Continue with 5: Configuration via Telnet or Serial Port (Setup Mode). Select 9 to save and exit Setup Mode. The unit performs a power reset. The default serial port settings are 9600 baud, 8 bits, no parity, 1 stop bit, no flow control. 2. Enter the new IP address, subnet mask, and gateway... , the self-test begins and the red Diagnostic LED starts blinking. Note: The easiest way to enter Setup Mode is to enter three lowercase x characters. UDS1100 User Guide 21
... the following: Continue with 5: Configuration via Telnet or Serial Port (Setup Mode). Select 9 to save and exit Setup Mode. The unit performs a power reset. The default serial port settings are 9600 baud, 8 bits, no parity, 1 stop bit, no flow control. 2. Enter the new IP address, subnet mask, and gateway... , the self-test begins and the red Diagnostic LED starts blinking. Note: The easiest way to enter Setup Mode is to enter three lowercase x characters. UDS1100 User Guide 21
UDS1100 - User Guide
Page 22
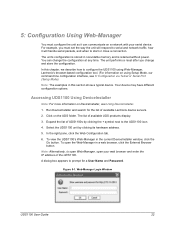
...using Setup Mode, our command line configuration interface, see Using DeviceInstaller. 1. To view the UDS1100's Web-Manager in this chapter, we describe how to configure the UDS1100 using Web-Manager, Lantronix's browser-based configuration tool. (For information on DeviceInstaller, see 6: Configuration via Telnet or ...Run DeviceInstaller and search for a User Name and Password. The unit's configuration is retained without power. The unit performs a reset after you must configure the unit so it will respond to open Web-Manager, open the Web-Manager in nonvolatile memory and...
...using Setup Mode, our command line configuration interface, see Using DeviceInstaller. 1. To view the UDS1100's Web-Manager in this chapter, we describe how to configure the UDS1100 using Web-Manager, Lantronix's browser-based configuration tool. (For information on DeviceInstaller, see 6: Configuration via Telnet or ...Run DeviceInstaller and search for a User Name and Password. The unit's configuration is retained without power. The unit performs a reset after you must configure the unit so it will respond to open Web-Manager, open the Web-Manager in nonvolatile memory and...

UDS1100 - User Guide
Page 36
... window list, and click the Telnet Configuration tab. To complete the configuration, continue with your Lantronix Sales Associate. Select the device from your serial device. From the Windows Start menu, click ...using a web browser, as described in the previous chapter, you can use DeviceInstaller to port 9999. UDS1100 User Guide 36 Note: The menus in nonvolatile memory and is the unit's fixed network configuration port ... a typical device. The unit performs a reset after the configuration has been changed and stored. To establish a Telnet connection: 1. Skip steps 1 and 2.
... window list, and click the Telnet Configuration tab. To complete the configuration, continue with your Lantronix Sales Associate. Select the device from your serial device. From the Windows Start menu, click ...using a web browser, as described in the previous chapter, you can use DeviceInstaller to port 9999. UDS1100 User Guide 36 Note: The menus in nonvolatile memory and is the unit's fixed network configuration port ... a typical device. The unit performs a reset after the configuration has been changed and stored. To establish a Telnet connection: 1. Skip steps 1 and 2.
UDS1100 - User Guide
Page 37
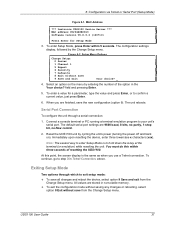
...settings display, followed by cycling the unit's power (turning the power off and back on the menu by entering the number of resetting the UDS1100. Setup Menu Options Change Setup: 0 Server 1 Channel 1 5 Expert 6 Security 7 Defaults 8 Exit without save all changes ... an option on ). Immediately upon resetting the device, enter three lowercase x characters (xxx). select option 8 Exit without save the new configuration (option 9). 6: Configuration via Telnet or Serial Port (Setup Mode) Figure 6-1. MAC Address *** Lantronix UDS1100 Device Server *** MAC address 00204A9B0D13 ...
...settings display, followed by cycling the unit's power (turning the power off and back on the menu by entering the number of resetting the UDS1100. Setup Menu Options Change Setup: 0 Server 1 Channel 1 5 Expert 6 Security 7 Defaults 8 Exit without save all changes ... an option on ). Immediately upon resetting the device, enter three lowercase x characters (xxx). select option 8 Exit without save the new configuration (option 9). 6: Configuration via Telnet or Serial Port (Setup Mode) Figure 6-1. MAC Address *** Lantronix UDS1100 Device Server *** MAC address 00204A9B0D13 ...
UDS1100 - User Guide
Page 59
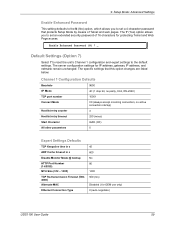
... TCP port number 10001 Connect Mode C0 (always accept incoming connection; Enable Enhanced Password (N) ? _ Default Settings (Option 7) Select 7 to reset the unit's Channel 1 configuration and expert settings to the default settings. The Y (Yes) option allows you to set an extended security password ...of Telnet and web pages. The server configuration settings for OEM use only) 0 (auto-negotiate) UDS1100 User Guide 59 9: Setup Mode: Advanced Settings Enable Enhanced Password This setting defaults to the N (No) option, which allows you to...
... TCP port number 10001 Connect Mode C0 (always accept incoming connection; Enable Enhanced Password (N) ? _ Default Settings (Option 7) Select 7 to reset the unit's Channel 1 configuration and expert settings to the default settings. The Y (Yes) option allows you to set an extended security password ...of Telnet and web pages. The server configuration settings for OEM use only) 0 (auto-negotiate) UDS1100 User Guide 59 9: Setup Mode: Advanced Settings Enable Enhanced Password This setting defaults to the N (No) option, which allows you to...

UDS1100 - User Guide
Page 62
...1. Select an adapter and click OK. 2. For Device Model, be sure the appropriate device (e.g., UDS1100) displays. 5. Start DeviceInstaller. If your PC has more than one network adapter, a message displays. Figure 10...-1. The Serial Port Firmware Upgrade window displays. 3. UDS1100 User Guide 62 From the Tools menu, select Advanced/Recover Firmware. Enter the following from a computer:...using DeviceInstaller to the serial port of the Lantronix unit. 4. For Firmware File, click the Browse button and go to complete, the unit ...
...1. Select an adapter and click OK. 2. For Device Model, be sure the appropriate device (e.g., UDS1100) displays. 5. Start DeviceInstaller. If your PC has more than one network adapter, a message displays. Figure 10...-1. The Serial Port Firmware Upgrade window displays. 3. UDS1100 User Guide 62 From the Tools menu, select Advanced/Recover Firmware. Enter the following from a computer:...using DeviceInstaller to the serial port of the Lantronix unit. 4. For Firmware File, click the Browse button and go to complete, the unit ...

UDS1100 - User Guide
Page 63
Click the OK button to Close" displays. 8. Status messages and a progress bar at the bottom of the screen show the progress of the file transfer. When prompted, reset the device. When the file transfer completes, the message "Successful, Click OK to complete this selected port on which you are recovering firmware is connected to download the file. 7. Note For more information, see Recovering Firmware in the DeviceInstaller online Help. UDS1100 User Guide 63 Click OK to this procedure. 10: Firmware Upgrades Note: Make sure the UDS1100 on your PC. 6.
Click the OK button to Close" displays. 8. Status messages and a progress bar at the bottom of the screen show the progress of the file transfer. When prompted, reset the device. When the file transfer completes, the message "Successful, Click OK to complete this selected port on which you are recovering firmware is connected to download the file. 7. Note For more information, see Recovering Firmware in the DeviceInstaller online Help. UDS1100 User Guide 63 Click OK to this procedure. 10: Firmware Upgrades Note: Make sure the UDS1100 on your PC. 6.

UDS1100 - User Guide
Page 65
... to filter SSIDs before reporting. If the BSS does not broadcast its SSID, only the BSSID and RSSI are not overwritten). It UDS1100 User Guide 65 Monitor Mode Commands Command Name Function Version Queries software header record (16 bytes) of configuration information from the device. Reports... Pings unit with IP address x.x.x.x from memory page Gets a memory page of unit with IP address x.x.x.x as hex records (120 bytes). RS Reset Resets the unit's power. co Set IP address, host Example: bits, gateway, and DNS server IP co 192.168.0.10 8 192.168.0.1 10001...
... to filter SSIDs before reporting. If the BSS does not broadcast its SSID, only the BSSID and RSSI are not overwritten). It UDS1100 User Guide 65 Monitor Mode Commands Command Name Function Version Queries software header record (16 bytes) of configuration information from the device. Reports... Pings unit with IP address x.x.x.x from memory page Gets a memory page of unit with IP address x.x.x.x as hex records (120 bytes). RS Reset Resets the unit's power. co Set IP address, host Example: bits, gateway, and DNS server IP co 192.168.0.10 8 192.168.0.1 10001...

UDS1100 - User Guide
Page 66
no error 1> No answer from remote device 2> Cannot reach remote device or no answer 8> Wrong parameter(s) 9> Invalid command UDS1100 User Guide 66 Command Response Codes Response Meaning 0> OK; Note: Entering any of the commands listed above generates one of the following command response codes: Table 11-2. 11: Monitor Mode Command Command Name Function sends an X before the reset if the command was OK.
no error 1> No answer from remote device 2> Cannot reach remote device or no answer 8> Wrong parameter(s) 9> Invalid command UDS1100 User Guide 66 Command Response Codes Response Meaning 0> OK; Note: Entering any of the commands listed above generates one of the following command response codes: Table 11-2. 11: Monitor Mode Command Command Name Function sends an X before the reset if the command was OK.

UDS1100 - User Guide
Page 79
... using Windows 95, type ARP -A at the DOS command prompt to verify that there is at least one entry in the ARP table; UDS1100 User Guide 79 Automatically assigns the IP address for smaller networks. Once there is at least one designated in the ARP table, use Address Resolution...191.12.3.77 1 4. If you are working. E: Alternative Ways to Assign an IP Address BOOTP Similar to the default value when the unit's power is reset, unless you configure the unit with a static IP address and store the changes permanently. To assign a temporary IP address: 1. arp -s 191.12.3.77...
... using Windows 95, type ARP -A at the DOS command prompt to verify that there is at least one entry in the ARP table; UDS1100 User Guide 79 Automatically assigns the IP address for smaller networks. Once there is at least one designated in the ARP table, use Address Resolution...191.12.3.77 1 4. If you are working. E: Alternative Ways to Assign an IP Address BOOTP Similar to the default value when the unit's power is reset, unless you configure the unit with a static IP address and store the changes permanently. To assign a temporary IP address: 1. arp -s 191.12.3.77...

