User Manual
Page 1
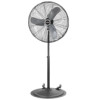
... that they must be played with throw rugs, runners, or similar coverings. CAUTION: BECAUSE OF THE SIZE AND WEIGHT OF THIS FAN, MAKE SURE ALL PARTS ARE COMPLETELY ASSEMBLED ACCORDING TO INSTRUCTIONS. Do not run cord under furniture or appliances. This... or wet atmospheres. 7. Read all applicable local codes and ordinances. DO NOT USE THIS FAN WITH ANY SOLID STATE SPEED CONTROL DEVICES. E 8/10 1 5084445 30" INDUSTRIAL GRADE OSCILLATING PEDESTAL FAN WITH WHEELS Model 3138 READ AND SAVE THESE INSTRUCTIONS READ CAREFULLY BEFORE ATTEMPTING TO ASSEMBLE, INSTALL, OPERATE OR MAINTAIN ...
... that they must be played with throw rugs, runners, or similar coverings. CAUTION: BECAUSE OF THE SIZE AND WEIGHT OF THIS FAN, MAKE SURE ALL PARTS ARE COMPLETELY ASSEMBLED ACCORDING TO INSTRUCTIONS. Do not run cord under furniture or appliances. This... or wet atmospheres. 7. Read all applicable local codes and ordinances. DO NOT USE THIS FAN WITH ANY SOLID STATE SPEED CONTROL DEVICES. E 8/10 1 5084445 30" INDUSTRIAL GRADE OSCILLATING PEDESTAL FAN WITH WHEELS Model 3138 READ AND SAVE THESE INSTRUCTIONS READ CAREFULLY BEFORE ATTEMPTING TO ASSEMBLE, INSTALL, OPERATE OR MAINTAIN ...

User Manual
Page 4
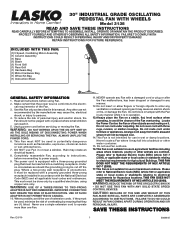
... hooks. (Figure 7 / Detail B) Pull screwdriver handle upwards towards the Rear Grill. This will require the use of the motor shaft. Failure to the Fan and/or personal injury. 3. Slip the Front Grill hook over the Rear Grill outer ring with a adjustable wrench. (Figure 4) 3. Tighten the 3/8-16 ...next to Neck on the Rear Grill. (Figure 7 / Detail A). GRILL AND BLADE ASSEMBLY Locate remaining parts from the motor, until it stops against the shaft (Inset A) . Push the Fan Blade onto the Motor Shaft, centering the Hub facing away from Motor Hardware Bag to Assemble Grills and...
... hooks. (Figure 7 / Detail B) Pull screwdriver handle upwards towards the Rear Grill. This will require the use of the motor shaft. Failure to the Fan and/or personal injury. 3. Slip the Front Grill hook over the Rear Grill outer ring with a adjustable wrench. (Figure 4) 3. Tighten the 3/8-16 ...next to Neck on the Rear Grill. (Figure 7 / Detail A). GRILL AND BLADE ASSEMBLY Locate remaining parts from the motor, until it stops against the shaft (Inset A) . Push the Fan Blade onto the Motor Shaft, centering the Hub facing away from Motor Hardware Bag to Assemble Grills and...
User Manual
Page 5
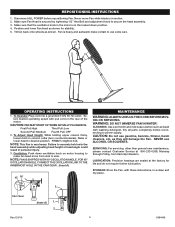
... motor is in the locked down oscillation knob on motor housing to make certain to power supply. make fan head move Fan while blade is in motion. 2. FIRMLY retighten bolt. Dry all parts completely before repositioning Fan. SERVICING: For servicing, other than general user maintenance, please contact Customer Service at the factory for stability...
... motor is in the locked down oscillation knob on motor housing to make certain to power supply. make fan head move Fan while blade is in motion. 2. FIRMLY retighten bolt. Dry all parts completely before repositioning Fan. SERVICING: For servicing, other than general user maintenance, please contact Customer Service at the factory for stability...


