Hardware Maintenance Manual
Page 3
...HDD) and solid-state drive (SSD 69 1050 DIMM slot cover 70 1060 DIMM (in the slot under the keyboard) . . . 78 1100 Backup battery 80 1110 PCI Express Mini Card for CTO, CMV, and GAV products 25 Chapter 3. General checkout . . . . . 27 What to -FRU ... . 24 Important notice for DOS diagnostics program 28 System supporting the Lenovo diagnostics programs 34 Power system checkout 36 Checking the AC adapter 36 Checking operational charging 37 Checking the battery pack 37 Checking the backup battery 38 Chapter 4. FRU replacement notices 61 Screw notices 61 Retaining serial...
...HDD) and solid-state drive (SSD 69 1050 DIMM slot cover 70 1060 DIMM (in the slot under the keyboard) . . . 78 1100 Backup battery 80 1110 PCI Express Mini Card for CTO, CMV, and GAV products 25 Chapter 3. General checkout . . . . . 27 What to -FRU ... . 24 Important notice for DOS diagnostics program 28 System supporting the Lenovo diagnostics programs 34 Power system checkout 36 Checking the AC adapter 36 Checking operational charging 37 Checking the battery pack 37 Checking the backup battery 38 Chapter 4. FRU replacement notices 61 Screw notices 61 Retaining serial...

Hardware Maintenance Manual
Page 9
... or integrated circuits (ICs) should use the following checklist at the same charge. Check for worn, frayed, or pinched cables. 9. Check for cracked or bulging batteries. 5. If any non-ThinkPad alterations. 7. Use caution; Handling devices that the power-supply cover fasteners (screws or rivets) have not been removed or tampered with...
... or integrated circuits (ICs) should use the following checklist at the same charge. Check for worn, frayed, or pinched cables. 9. Check for cracked or bulging batteries. 5. If any non-ThinkPad alterations. 7. Use caution; Handling devices that the power-supply cover fasteners (screws or rivets) have not been removed or tampered with...

Hardware Maintenance Manual
Page 10
... against ESD damage is especially useful when handling ESD-sensitive devices. • Select a grounding system, such as fully effective. When working on a double-insulated or battery-operated system, use coax or connector-outside shells on these systems. - The mat is desirable but not necessary. - Safety notices (multilingual translations) The safety notices...
... against ESD damage is especially useful when handling ESD-sensitive devices. • Select a grounding system, such as fully effective. When working on a double-insulated or battery-operated system, use coax or connector-outside shells on these systems. - The mat is desirable but not necessary. - Safety notices (multilingual translations) The safety notices...

Hardware Maintenance Manual
Page 37
... the instructions on the screen. Windows Vista® and Windows XP: Click Start ➙ All Programs ➙ Lenovo Services ➙ Lenovo System Toolbox. Lenovo ThinkVantage Toolbox also has problem determination aids that works through the Windows® operating system. Chapter 3. Hardware Info ...; DOS Shell • Tech Support Form • Battery Rundown • View Test Log • Print Log • Save Log • Full Erase Hard Drive • Quick Erase Hard Drive Lenovo ThinkVantage Toolbox Lenovo ThinkVantage Toolbox is a diagnostic program that determine software and...
... the instructions on the screen. Windows Vista® and Windows XP: Click Start ➙ All Programs ➙ Lenovo Services ➙ Lenovo System Toolbox. Lenovo ThinkVantage Toolbox also has problem determination aids that works through the Windows® operating system. Chapter 3. Hardware Info ...; DOS Shell • Tech Support Form • Battery Rundown • View Test Log • Print Log • Save Log • Full Erase Hard Drive • Quick Erase Hard Drive Lenovo ThinkVantage Toolbox Lenovo ThinkVantage Toolbox is a diagnostic program that determine software and...
Hardware Maintenance Manual
Page 39
... off and turn off the computer. 2. Diagnostics ➙ Diskette Drives 2. Interactive Tests ➙ Optical Drive Test Memory 1. Power Diagnostics ➙ ThinkPad Devices ➙ AC Adapter, Battery 1 (Battery 2) LCD unit 1. Diagnostics ➙ Systemboard ➙ Keyboard 2. General checkout 33 Table 1. To diagnose the drive from the diskette drive, and then turn on the computer...
... off and turn off the computer. 2. Diagnostics ➙ Diskette Drives 2. Interactive Tests ➙ Optical Drive Test Memory 1. Power Diagnostics ➙ ThinkPad Devices ➙ AC Adapter, Battery 1 (Battery 2) LCD unit 1. Diagnostics ➙ Systemboard ➙ Keyboard 2. General checkout 33 Table 1. To diagnose the drive from the diskette drive, and then turn on the computer...

Hardware Maintenance Manual
Page 42
... CDx (x: 0, 1, ...) and then press Enter. Follow the instructions on the screen to "Power system checkout" on the computer. Check that the battery pack supplies power when you turn on page 43 for error code descriptions and troubleshooting hints. 2. If the computer cannot be turned on, go to...• "Checking the AC adapter" on page 36 • "Checking operational charging" on page 37 • "Checking the battery pack" on page 37 • "Checking the backup battery" on page 38 Checking the AC adapter You are here because the computer fails only when the AC adapter is used...
... CDx (x: 0, 1, ...) and then press Enter. Follow the instructions on the screen to "Power system checkout" on the computer. Check that the battery pack supplies power when you turn on page 43 for error code descriptions and troubleshooting hints. 2. If the computer cannot be turned on, go to...• "Checking the AC adapter" on page 36 • "Checking operational charging" on page 37 • "Checking the battery pack" on page 37 • "Checking the backup battery" on page 38 Checking the AC adapter You are here because the computer fails only when the AC adapter is used...

Hardware Maintenance Manual
Page 43
... computer and leave it at the plug of the ac power adapter might differ from the one you are servicing. 3. Remove the battery pack and measure the voltage between battery terminals 1 (+) and 7 (-). See the following figure: 3 2 1 (20V) Pin Voltage (V dc) 1 +20 2 0 3 Ground Note: Output...at room temperature for a moment (but do the following: 1. Checking operational charging To check whether the battery charges properly during operation, use a discharged battery pack or a battery pack that less than 50% of the total power remaining when installed in the icon tray of its ...
... computer and leave it at the plug of the ac power adapter might differ from the one you are servicing. 3. Remove the battery pack and measure the voltage between battery terminals 1 (+) and 7 (-). See the following figure: 3 2 1 (20V) Pin Voltage (V dc) 1 +20 2 0 3 Ground Note: Output...at room temperature for a moment (but do the following: 1. Checking operational charging To check whether the battery charges properly during operation, use a discharged battery pack or a battery pack that less than 50% of the total power remaining when installed in the icon tray of its ...

Hardware Maintenance Manual
Page 44
....0 V dc after replacement, replace the system board. 38 Hardware Maintenance Manual Checking the backup battery Do the following figure. Remove the backup battery (see "1010 Battery pack" on . If the voltage is still less than +11.0 V dc, the battery pack has been discharged. Note: Recharging will take at least 3 hours, even if the indicator...
....0 V dc after replacement, replace the system board. 38 Hardware Maintenance Manual Checking the backup battery Do the following figure. Remove the backup battery (see "1010 Battery pack" on . If the voltage is still less than +11.0 V dc, the battery pack has been discharged. Note: Recharging will take at least 3 hours, even if the indicator...

Hardware Maintenance Manual
Page 47
... If User only mode is selected and the user HDP has been forgotten and cannot be made available to the service technician, neither Lenovo nor Lenovo authorized service technicians provide any services to reset either the user or the master HDP, or to recover data from the hard disk drive...41 Type the supervisor password to save changes and exit the ThinkPad Setup program. then enter the master HDP. How to remove the backup battery, see "1010 Battery pack" on the screen; Turn on password has been removed. 5. The hard disk drive can be displayed. For how to remove the...
... If User only mode is selected and the user HDP has been forgotten and cannot be made available to the service technician, neither Lenovo nor Lenovo authorized service technicians provide any services to reset either the user or the master HDP, or to recover data from the hard disk drive...41 Type the supervisor password to save changes and exit the ThinkPad Setup program. then enter the master HDP. How to remove the backup battery, see "1010 Battery pack" on the screen; Turn on password has been removed. 5. The hard disk drive can be displayed. For how to remove the...
Hardware Maintenance Manual
Page 48
... Current Password field. Press Fn+F3. In certain circumstances, the computer goes into screen blank mode, do not set the low-battery alarm, the charge indicator notifies you when the battery is the letter of the Fn+F4 key combination by changing the settings in screen blank mode: • The LCD is... operation, press any operation with the keyboard, the TrackPoint, the hard disk, the parallel connector, or the diskette drive within that time. • If the battery indicator blinks orange, indicating that the battery power is available on the ThinkPad Notebook. 3.
... Current Password field. Press Fn+F3. In certain circumstances, the computer goes into screen blank mode, do not set the low-battery alarm, the charge indicator notifies you when the battery is the letter of the Fn+F4 key combination by changing the settings in screen blank mode: • The LCD is... operation, press any operation with the keyboard, the TrackPoint, the hard disk, the parallel connector, or the diskette drive within that time. • If the battery indicator blinks orange, indicating that the battery power is available on the ThinkPad Notebook. 3.
Hardware Maintenance Manual
Page 50
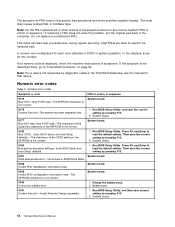
...on page 52. Enter BIOS Setup and load Setup defaults. 1. Then save the current setting by diagnostic codes in POST or system operation. Battery pack. 0191 System Security-Invalid Remote Change requested. 1. Note: Do the FRU replacement or other actions in the sequence shown in the column ... System board. 0185 Bad startup sequence settings. EAIA data access error-The access to load the default setting. System board. 0190 Critical low-battery error 1. System board. 44 Hardware Maintenance Manual System board. 0182 Bad CRC2. Press F9, and Enter to be any number. System board...
...on page 52. Enter BIOS Setup and load Setup defaults. 1. Then save the current setting by diagnostic codes in POST or system operation. Battery pack. 0191 System Security-Invalid Remote Change requested. 1. Note: Do the FRU replacement or other actions in the sequence shown in the column ... System board. 0185 Bad startup sequence settings. EAIA data access error-The access to load the default setting. System board. 0190 Critical low-battery error 1. System board. 44 Hardware Maintenance Manual System board. 0182 Bad CRC2. Press F9, and Enter to be any number. System board...
Hardware Maintenance Manual
Page 52
... docking station. 1802 Unauthorized network card is set in -Turn off and remove the miniPCI network card. 1. Extended RAM error- Charge the backup battery for more than 8 hours by connecting the ac adapter. 2. System board. 0271 Date and time error-Neither the date nor the time is ...plugged in the computer. DIMM. 3. I/O card. 02D0 System cache error. 02F0 CPU ID:xx Failed. 1. Replace the backup battery. 3. System board. 46 Hardware Maintenance Manual Extended RAM fails at offset nnnn. 2. Load Setup Defaults in BIOS Setup Utility. 2. Replace the backup...
... docking station. 1802 Unauthorized network card is set in -Turn off and remove the miniPCI network card. 1. Extended RAM error- Charge the backup battery for more than 8 hours by connecting the ac adapter. 2. System board. 0271 Date and time error-Neither the date nor the time is ...plugged in the computer. DIMM. 3. I/O card. 02D0 System cache error. 02F0 CPU ID:xx Failed. 1. Replace the backup battery. 3. System board. 46 Hardware Maintenance Manual Extended RAM fails at offset nnnn. 2. Load Setup Defaults in BIOS Setup Utility. 2. Replace the backup...

Hardware Maintenance Manual
Page 54
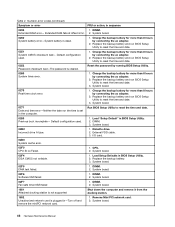
... error on HDD1 (Ultrabay hard disk drive) 1. Reseat the hard disk drive. 2. Error messages Symptom or error Device address conflict. Backup battery. 3. System board. 1. System board. 1. Using this drive may cause compatibility issues and potential issues with the risk in mind, the ... system, with data integrity, including data loss. Error messages Table 3. Load "Setup Defaults" in the BIOS Setup Utility. 2. Backup battery. 3. System board. 48 Hardware Maintenance Manual Inform the following information to the customer: If the customer is using a non qualified SSD...
... error on HDD1 (Ultrabay hard disk drive) 1. Reseat the hard disk drive. 2. Error messages Symptom or error Device address conflict. Backup battery. 3. System board. 1. System board. 1. Using this drive may cause compatibility issues and potential issues with the risk in mind, the ... system, with data integrity, including data loss. Error messages Table 3. Load "Setup Defaults" in the BIOS Setup Utility. 2. Backup battery. 3. System board. 48 Hardware Maintenance Manual Inform the following information to the customer: If the customer is using a non qualified SSD...
Hardware Maintenance Manual
Page 58
... errors. Turn off the computer. 2. Determine whether the problem has been solved. 6. Rerun the test to verify that have no defects). Non-ThinkPad devices b. DIMM h. Battery pack e. Visually check each FRU for the system board in the internal drive i. Replace any error is detected, do the following FRUs one at least...
... errors. Turn off the computer. 2. Determine whether the problem has been solved. 6. Rerun the test to verify that have no defects). Non-ThinkPad devices b. DIMM h. Battery pack e. Visually check each FRU for the system board in the internal drive i. Replace any error is detected, do the following FRUs one at least...

Hardware Maintenance Manual
Page 61
.... Green: The computer is continuing. Turn off the computer. 6 Power on the screen. 8 Serial Ultrabay Slim device status 9 Caps lock 10 Battery status Green: A Serial Ultrabay Slim device is ready to the hard disk drive, the diskette drive, or the drive in use . Slow blinking ... blinking color changes to use . Green: Caps Lock mode is on and is in sleep (standby) mode. Note: The battery may continue until the battery is being detached. Blinking green: A Serial Ultrabay Slim device is not in the process of being charged. Sudden physical shock could...
.... Green: The computer is continuing. Turn off the computer. 6 Power on the screen. 8 Serial Ultrabay Slim device status 9 Caps lock 10 Battery status Green: A Serial Ultrabay Slim device is ready to the hard disk drive, the diskette drive, or the drive in use . Slow blinking ... blinking color changes to use . Green: Caps Lock mode is on and is in sleep (standby) mode. Note: The battery may continue until the battery is being detached. Blinking green: A Serial Ultrabay Slim device is not in the process of being charged. Sudden physical shock could...

Hardware Maintenance Manual
Page 62
...hibernation mode. Blinking green: The computer is entering sleep (standby) mode or hibernation mode, or is detached. The battery status indicator is off or is in the battery. Status indicators (continued) Indicator 11 Sleep (standby for Windows XP) status Meaning Note: If the computer is operating... on battery power, the battery status indicator does not work while the computer is turned off : The battery pack of the computer is...
...hibernation mode. Blinking green: The computer is entering sleep (standby) mode or hibernation mode, or is detached. The battery status indicator is off or is in the battery. Status indicators (continued) Indicator 11 Sleep (standby for Windows XP) status Meaning Note: If the computer is operating... on battery power, the battery status indicator does not work while the computer is turned off : The battery pack of the computer is...

Hardware Maintenance Manual
Page 71
...the defective part within thirty (30) days of the ThinkPad T410 and T410i you have the SIM card that all power cords from Lenovo at any computer unless you may be damaged by, electrostatic discharge. CRU information and replacement instructions are shipped with your product. Chapter 8.... Begin by the CRU. Any such FRUs are available from electrical outlets, remove the battery pack, and then disconnect any notes that Lenovo installs an Optional-service CRU according to the warranty service for removing a FRU, as Self-service CRUs and others ...
...the defective part within thirty (30) days of the ThinkPad T410 and T410i you have the SIM card that all power cords from Lenovo at any computer unless you may be damaged by, electrostatic discharge. CRU information and replacement instructions are shipped with your product. Chapter 8.... Begin by the CRU. Any such FRUs are available from electrical outlets, remove the battery pack, and then disconnect any notes that Lenovo installs an Optional-service CRU according to the warranty service for removing a FRU, as Self-service CRUs and others ...

Hardware Maintenance Manual
Page 72
... not covered by arrow 3 . 66 Hardware Maintenance Manual Holding the battery latch in the unlocked position 2 , remove the battery pack in the parts list for replacing a battery pack: The Lenovo ThinkVantage Toolbox, Lenovo System Toolbox (in Windows Vista and Windows XP), and Lenovo Solution Center (in the computer, the customer should not be replaced unless this...
... not covered by arrow 3 . 66 Hardware Maintenance Manual Holding the battery latch in the unlocked position 2 , remove the battery pack in the parts list for replacing a battery pack: The Lenovo ThinkVantage Toolbox, Lenovo System Toolbox (in Windows Vista and Windows XP), and Lenovo Solution Center (in the computer, the customer should not be replaced unless this...

Hardware Maintenance Manual
Page 73
Removing and replacing a FRU 67 Make sure that the battery latch is in the slot. 1 2 3 When installing: Install the battery pack in the locked position. 1020 ExpressCard blank bezel Removal steps of ExpressCard blank bezel When you press the ExpressCard blank bezel 1 , it pops out 2 . 1 2 Chapter 8.
Removing and replacing a FRU 67 Make sure that the battery latch is in the slot. 1 2 3 When installing: Install the battery pack in the locked position. 1020 ExpressCard blank bezel Removal steps of ExpressCard blank bezel When you press the ExpressCard blank bezel 1 , it pops out 2 . 1 2 Chapter 8.

Hardware Maintenance Manual
Page 74
When installing: Make sure that the bezel is correctly oriented as shown in the following figure. 1030 Serial Ultrabay Slim device or travel bezel For access, remove this FRU: • "1010 Battery pack" on page 66 Removal steps of Serial Ultrabay Slim device or travel bezel Holding the bay lock latch in the unlocked position 1 , slide the bay eject in the direction shown by arrow 2 , and then pull out the Ultrabay Slim device or the travel bezel in the direction shown by arrow 3 to completely remove it 4 . 1 2 3 68 Hardware Maintenance Manual
When installing: Make sure that the bezel is correctly oriented as shown in the following figure. 1030 Serial Ultrabay Slim device or travel bezel For access, remove this FRU: • "1010 Battery pack" on page 66 Removal steps of Serial Ultrabay Slim device or travel bezel Holding the bay lock latch in the unlocked position 1 , slide the bay eject in the direction shown by arrow 2 , and then pull out the Ultrabay Slim device or the travel bezel in the direction shown by arrow 3 to completely remove it 4 . 1 2 3 68 Hardware Maintenance Manual


