Hardware Maintenance Manual
Page 1
ThinkPad® T60 and T60p (14.1-inch and 15.0-inch) Hardware Maintenance Manual September 2008 This manual supports: ThinkPad T60 and T60p (14.1-inch and 15.0-inch) (MT 1951, 1952, 1953, 1954, 1955, 1956, 2007, 2008, 2009, 2613, 2623, and 2637)
ThinkPad® T60 and T60p (14.1-inch and 15.0-inch) Hardware Maintenance Manual September 2008 This manual supports: ThinkPad T60 and T60p (14.1-inch and 15.0-inch) (MT 1951, 1952, 1953, 1954, 1955, 1956, 2007, 2008, 2009, 2613, 2623, and 2637)

Hardware Maintenance Manual
Page 3
ThinkPad® T60 and T60p (14.1-inch and 15.0-inch) Hardware Maintenance Manual
ThinkPad® T60 and T60p (14.1-inch and 15.0-inch) Hardware Maintenance Manual

Hardware Maintenance Manual
Page 5
...management 28 Checkout guide 31 Testing the computer 31 Detecting system information with PC-Doctor . . 33 Power system checkout 34 ThinkPad T60 and T60p (14.1-inch and 15.0-inch 37 Product overview 38 Specifications 38 Status indicators 41 FRU tests 44 Fn key combinations 46 Symptom...Error messages 53 Beep symptoms 54 No-beep symptoms 54 LCD-related symptoms 55 Intermittent problems 56 Undetermined problems 56 © Copyright Lenovo 2006, 2008 FRU replacement notices 57 Screw notices 57 Retaining serial numbers 57 Removing and replacing a FRU 60 FRU compatibility matrix ...
...management 28 Checkout guide 31 Testing the computer 31 Detecting system information with PC-Doctor . . 33 Power system checkout 34 ThinkPad T60 and T60p (14.1-inch and 15.0-inch 37 Product overview 38 Specifications 38 Status indicators 41 FRU tests 44 Fn key combinations 46 Symptom...Error messages 53 Beep symptoms 54 No-beep symptoms 54 LCD-related symptoms 55 Intermittent problems 56 Undetermined problems 56 © Copyright Lenovo 2006, 2008 FRU replacement notices 57 Screw notices 57 Retaining serial numbers 57 Removing and replacing a FRU 60 FRU compatibility matrix ...
Hardware Maintenance Manual
Page 7
...and product-specific parts information. Use this manual along with the advanced diagnostic tests to troubleshoot problems. The manual is intended for ThinkPad® T60 and T60p (14.1-inch and 15.0-inch) (MT 1951, 1952, 1953, 1954, 1955, 1956, 2007, 2008, 2009, 2613, ...Laser compliance statement" on page 20. © Copyright Lenovo 2006, 2008 1 About this manual This manual contains service and reference information for trained service personnel who are familiar with ThinkPad products. Before servicing a ThinkPad product, be sure to troubleshoot problems effectively. Important This ...
...and product-specific parts information. Use this manual along with the advanced diagnostic tests to troubleshoot problems. The manual is intended for ThinkPad® T60 and T60p (14.1-inch and 15.0-inch) (MT 1951, 1952, 1953, 1954, 1955, 1956, 2007, 2008, 2009, 2613, ...Laser compliance statement" on page 20. © Copyright Lenovo 2006, 2008 1 About this manual This manual contains service and reference information for trained service personnel who are familiar with ThinkPad products. Before servicing a ThinkPad product, be sure to troubleshoot problems effectively. Important This ...

Hardware Maintenance Manual
Page 43
ThinkPad T60 and T60p (14.1-inch and 15.0-inch) Product overview 38 Specifications 38 Status indicators 41 FRU tests 44 Fn key combinations 46 Symptom-to-FRU index 49 ... (32 bit) DVDs . . . 212 Miscellaneous parts 213 AC adapters 215 Common parts list 215 Tools 215 Power cords 216 Notices 217 Trademarks 218 © Copyright Lenovo 2006, 2008 37 XGA TFT 172 14.1-in . XGA TFT 188 15.0-in . SXGA+ TFT 180 15.0-in.
ThinkPad T60 and T60p (14.1-inch and 15.0-inch) Product overview 38 Specifications 38 Status indicators 41 FRU tests 44 Fn key combinations 46 Symptom-to-FRU index 49 ... (32 bit) DVDs . . . 212 Miscellaneous parts 213 AC adapters 215 Common parts list 215 Tools 215 Power cords 216 Notices 217 Trademarks 218 © Copyright Lenovo 2006, 2008 37 XGA TFT 172 14.1-in . XGA TFT 188 15.0-in . SXGA+ TFT 180 15.0-in.

Hardware Maintenance Manual
Page 44
... indicators" on page 41 v "FRU tests" on page 44 v "Fn key combinations" on page 46 Specifications The following table lists the specifications of the ThinkPad T60 and T60p (14.1-inch and 15.0-inch): Feature Processor Bus architecture Graphic memory chip Description v Intel ® Core™ Solo processor T1300 (1.6 GHz), 2-MB L2 cache...
... indicators" on page 41 v "FRU tests" on page 44 v "Fn key combinations" on page 46 Specifications The following table lists the specifications of the ThinkPad T60 and T60p (14.1-inch and 15.0-inch): Feature Processor Bus architecture Graphic memory chip Description v Intel ® Core™ Solo processor T1300 (1.6 GHz), 2-MB L2 cache...

Hardware Maintenance Manual
Page 45
... the current 32-bit PC architecture, actual usable memory size is limited to 3 GB even though the physical installable memory size is 4 GB in ThinkPad T60 and T60p (14.1-inch and 15.0-inch) computers. v 242 bytes v 40 GB, 5400 rpm, 9.5 mm high, Serial ATA (SATA) interface v 60 GB, 5400 rpm, 9.5 mm high... drives are depend on the model. v DVD drive, 9.5 mm high v DVD/CD-RW combo drive, 9.5 mm high v DVD-RAM/RW drive, 9.5 mm high Some models ThinkPad T60 and T60p (14.1-inch and 15.0-inch) 39
... the current 32-bit PC architecture, actual usable memory size is limited to 3 GB even though the physical installable memory size is 4 GB in ThinkPad T60 and T60p (14.1-inch and 15.0-inch) computers. v 242 bytes v 40 GB, 5400 rpm, 9.5 mm high, Serial ATA (SATA) interface v 60 GB, 5400 rpm, 9.5 mm high... drives are depend on the model. v DVD drive, 9.5 mm high v DVD/CD-RW combo drive, 9.5 mm high v DVD-RAM/RW drive, 9.5 mm high Some models ThinkPad T60 and T60p (14.1-inch and 15.0-inch) 39
Hardware Maintenance Manual
Page 47
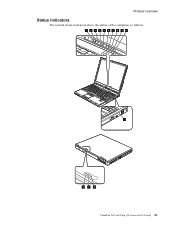
Product overview Status indicators The system status indicators show the status of the computer, as follows: 1 2 3 4 5 6 7 8 9 10 11 10 9 8 ThinkPad T60 and T60p (14.1-inch and 15.0-inch) 41
Product overview Status indicators The system status indicators show the status of the computer, as follows: 1 2 3 4 5 6 7 8 9 10 11 10 9 8 ThinkPad T60 and T60p (14.1-inch and 15.0-inch) 41
Hardware Maintenance Manual
Page 49
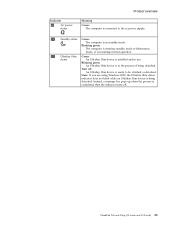
...: status An Ultrabay Slim device is in the process of being detached. Blinking green: An Ultrabay Slim device is installed and in standby mode. ThinkPad T60 and T60p (14.1-inch and 15.0-inch) 43 then the indicator turns off : An Ultrabay Slim device is ready to the ac power supply. 10 Standby...
...: status An Ultrabay Slim device is in the process of being detached. Blinking green: An Ultrabay Slim device is installed and in standby mode. ThinkPad T60 and T60p (14.1-inch and 15.0-inch) 43 then the indicator turns off : An Ultrabay Slim device is ready to the ac power supply. 10 Standby...

Hardware Maintenance Manual
Page 51
...the air turbulence at the louver near the PC Card slot. 2. If the touch pad is applied to enable it . Run Diagnostics --> ThinkPad Devices --> Fan. This drift can occur when a slight, steady pressure is disabled, select Automatic to the TrackPoint pointer. Diagnostics --> Other... TrackPoint is necessary. If enabling the touch pad does not correct the problem, continue with the following : v Interactive Tests --> Mouse ThinkPad T60 and T60p (14.1-inch and 15.0-inch) 45 Touch pad If enabling the TrackPoint does not correct the problem, continue with the following : ...
...the air turbulence at the louver near the PC Card slot. 2. If the touch pad is applied to enable it . Run Diagnostics --> ThinkPad Devices --> Fan. This drift can occur when a slight, steady pressure is disabled, select Automatic to the TrackPoint pointer. Diagnostics --> Other... TrackPoint is necessary. If enabling the touch pad does not correct the problem, continue with the following : v Interactive Tests --> Mouse ThinkPad T60 and T60p (14.1-inch and 15.0-inch) 45 Touch pad If enabling the TrackPoint does not correct the problem, continue with the following : ...

Hardware Maintenance Manual
Page 53
...This button is displayed only if the ThinkPad computer has been attached to a ThinkPad Essential Port Replicator and one or more USB devices have been connected to change the Fn+F7 settings. Buttons for the Fn+F9 function. (continued) ThinkPad T60 and T60p (14.1-inch and 15.0-inch) 47... This function is not supported if different desktop images are displayed: v Eject ThinkPad PC from Mini Dock: This button is displayed only if the ThinkPad computer has been attached to a single operating ...
...This button is displayed only if the ThinkPad computer has been attached to a ThinkPad Essential Port Replicator and one or more USB devices have been connected to change the Fn+F7 settings. Buttons for the Fn+F9 function. (continued) ThinkPad T60 and T60p (14.1-inch and 15.0-inch) 47... This function is not supported if different desktop images are displayed: v Eject ThinkPad PC from Mini Dock: This button is displayed only if the ThinkPad computer has been attached to a single operating ...

Hardware Maintenance Manual
Page 55
... index can be replaced next. System board. 0176 System Security-The system has been tampered with. 1. Run BIOS Setup Utility. in the ThinkPad notebook computers, see the manual for each error detected in boldface type. Invalid RFID Serialization Information Area. 0189 System board. Note For a device...current setting by diagnostic codes in the EEPROM is not correct. Enter BIOS Setup and load Setup Enter to load the default setting. ThinkPad T60 and T60p (14.1-inch and 15.0-inch) 49 Note: Do the FRU replacement or other actions in the sequence shown in the column headed ...
... index can be replaced next. System board. 0176 System Security-The system has been tampered with. 1. Run BIOS Setup Utility. in the ThinkPad notebook computers, see the manual for each error detected in boldface type. Invalid RFID Serialization Information Area. 0189 System board. Note For a device...current setting by diagnostic codes in the EEPROM is not correct. Enter BIOS Setup and load Setup Enter to load the default setting. ThinkPad T60 and T60p (14.1-inch and 15.0-inch) 49 Note: Do the FRU replacement or other actions in the sequence shown in the column headed ...

Hardware Maintenance Manual
Page 57
... run BIOS Setup Utility to reset the time and date. 3. Load "Setup Default" in BIOS Setup Utility. 2. System board. 02F4 EISA CMOS not writable. 1. ThinkPad T60 and T60p (14.1-inch and 15.0-inch) 51 Replace the backup battery and run BIOS Setup Utility to reset the time and date. 0280 Previous boot...
... run BIOS Setup Utility to reset the time and date. 3. Load "Setup Default" in BIOS Setup Utility. 2. System board. 02F4 EISA CMOS not writable. 1. ThinkPad T60 and T60p (14.1-inch and 15.0-inch) 51 Replace the backup battery and run BIOS Setup Utility to reset the time and date. 0280 Previous boot...

Hardware Maintenance Manual
Page 59
.... 1. Fan. 2. System board. Excluded from any device. Check the status of device which you want to boot from . 2. Reinstall the operation system. Device Error. 1. ThinkPad T60 and T60p (14.1-inch and 15.0-inch) 53 Error messages Symptom or error Device address conflict. System board. 1. Failing bits: nnnn. Thermal sensing error. Cannot boot...
.... 1. Fan. 2. System board. Excluded from any device. Check the status of device which you want to boot from . 2. Reinstall the operation system. Device Error. 1. ThinkPad T60 and T60p (14.1-inch and 15.0-inch) 53 Error messages Symptom or error Device address conflict. System board. 1. Failing bits: nnnn. Thermal sensing error. Cannot boot...
Hardware Maintenance Manual
Page 61
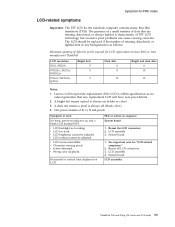
...displayed. System board. 1. See important note for the notebook computer contains many thin-film transistors (TFTs). ThinkPad T60 and T60p (14.1-inch and 15.0-inch) 55 Lenovo will not provide replacement if the LCD is within specification as we cannot guarantee that are missing, discolored... LCD connectors. 2. A dark dot means a pixel is characteristic of R, G, B sub-pixels. Horizontal or vertical lines displayed on June 2006 or later manufactured ThinkPad LCD resolution XGA, WXGA WXGA+, SXGA+, WSXGA+ UXGA, WUXGA, QXGA Bright dots 5 5 5 Dark dots 6 8 13 Bright and dark dots 6 10 ...
...displayed. System board. 1. See important note for the notebook computer contains many thin-film transistors (TFTs). ThinkPad T60 and T60p (14.1-inch and 15.0-inch) 55 Lenovo will not provide replacement if the LCD is within specification as we cannot guarantee that are missing, discolored... LCD connectors. 2. A dark dot means a pixel is characteristic of R, G, B sub-pixels. Horizontal or vertical lines displayed on June 2006 or later manufactured ThinkPad LCD resolution XGA, WXGA WXGA+, SXGA+, WSXGA+ UXGA, WUXGA, QXGA Bright dots 5 5 5 Dark dots 6 8 13 Bright and dark dots 6 10 ...

Hardware Maintenance Manual
Page 63
...kit (for each step. v Each one . v Always use the correct screw. v Use a torque screwdriver if you have one. In the ThinkPad computer, this problem is addressed with shock or vibration. v Ensure torque screwdrivers are harder to the "Torque" column for the P/N, see "Miscellaneous parts..." on page 58 ThinkPad T60 and T60p (14.1-inch and 15.0-inch) 57 v They are calibrated correctly following descriptions: v "Restoring the serial number of the screws are...
...kit (for each step. v Each one . v Always use the correct screw. v Use a torque screwdriver if you have one. In the ThinkPad computer, this problem is addressed with shock or vibration. v Ensure torque screwdrivers are harder to the "Torque" column for the P/N, see "Miscellaneous parts..." on page 58 ThinkPad T60 and T60p (14.1-inch and 15.0-inch) 57 v They are calibrated correctly following descriptions: v "Restoring the serial number of the screws are...
Hardware Maintenance Manual
Page 65
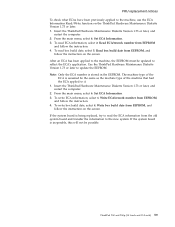
... ECA information from EEPROM, and follow the instruction on the ThinkPad Hardware Maintenance Diskette Version 1.73 or later. 1. Insert the ThinkPad Hardware Maintenance Diskette Version 1.73 or later, and restart the computer. 2. ThinkPad T60 and T60p (14.1-inch and 15.0-inch) 59 Set ECA Information....new system. Write ECA/rework number from the old system board and transfer the information to reflect the ECA's application. Insert the ThinkPad Hardware Maintenance Diskette Version 1.73 or later, and restart the computer. 2. To read ECA information, select 2. From the main menu...
... ECA information from EEPROM, and follow the instruction on the ThinkPad Hardware Maintenance Diskette Version 1.73 or later. 1. Insert the ThinkPad Hardware Maintenance Diskette Version 1.73 or later, and restart the computer. 2. ThinkPad T60 and T60p (14.1-inch and 15.0-inch) 59 Set ECA Information....new system. Write ECA/rework number from the old system board and transfer the information to reflect the ECA's application. Insert the ThinkPad Hardware Maintenance Diskette Version 1.73 or later, and restart the computer. 2. To read ECA information, select 2. From the main menu...
Hardware Maintenance Manual
Page 67
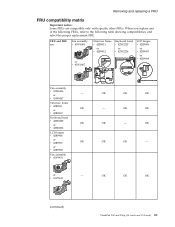
... replace any of the following FRUs, refer to the following table showing compatibilities, and select the proper replacement FRU. OK OK OK v 41V9932 (continued) ThinkPad T60 and T60p (14.1-inch and 15.0-inch) 61 FRU and FRU Fan assembly no. v 41W6406 or v 41W0467 Structure frame v 42R9911 or v 42R9912 Keyboard bezel v 42W2225 or...
... replace any of the following FRUs, refer to the following table showing compatibilities, and select the proper replacement FRU. OK OK OK v 41V9932 (continued) ThinkPad T60 and T60p (14.1-inch and 15.0-inch) 61 FRU and FRU Fan assembly no. v 41W6406 or v 41W0467 Structure frame v 42R9911 or v 42R9912 Keyboard bezel v 42W2225 or...

Hardware Maintenance Manual
Page 69
Unlock the battery release lever 1 . Holding the battery release lever in the unlocked position 2 , remove the battery pack in this figure. ThinkPad T60 and T60p (14.1-inch and 15.0-inch) 63 Then make sure that the battery release lever is in the locked position as in the direction shown by arrow 3. 1 2 3 When installing: Install the battery pack along the slide rails of the slot. Any other battery could ignite or explode. 1010 Battery pack DANGER Removing and replacing a FRU Use only the battery specified in the parts list for your computer.
Unlock the battery release lever 1 . Holding the battery release lever in the unlocked position 2 , remove the battery pack in this figure. ThinkPad T60 and T60p (14.1-inch and 15.0-inch) 63 Then make sure that the battery release lever is in the locked position as in the direction shown by arrow 3. 1 2 3 When installing: Install the battery pack along the slide rails of the slot. Any other battery could ignite or explode. 1010 Battery pack DANGER Removing and replacing a FRU Use only the battery specified in the parts list for your computer.

Hardware Maintenance Manual
Page 71
The hard disk drive is in suspend mode. 1 Step 1 Screw (quantity) Hard disk drive screw, nylon-coated (1) (continued) Color Black Torque 0.167 Nm (1.7 kgfcm) ThinkPad T60 and T60p (14.1-inch and 15.0-inch) 65 v Before removing the drive, have the user make a backup copy of data. v Never remove the drive while the system...
The hard disk drive is in suspend mode. 1 Step 1 Screw (quantity) Hard disk drive screw, nylon-coated (1) (continued) Color Black Torque 0.167 Nm (1.7 kgfcm) ThinkPad T60 and T60p (14.1-inch and 15.0-inch) 65 v Before removing the drive, have the user make a backup copy of data. v Never remove the drive while the system...


