

User Manual
Page 5
... and GAV products 41 General checkout 43 What to do first 44 Checkout guide 45 Diagnostics using PC-Doctor for DOS . . . . 45 Lenovo ThinkVantage Toolbox (Lenovo System Toolbox 48 PC-Doctor for Windows 48 PC-Doctor for Rescue and Recovery . . . . . 49 FRU tests 50 Power system checkout ...52 Checking the AC adapter 52 Checking operational charging 52 Checking the battery pack 53 Checking the backup battery 53 Related service information 55 ...
... and GAV products 41 General checkout 43 What to do first 44 Checkout guide 45 Diagnostics using PC-Doctor for DOS . . . . 45 Lenovo ThinkVantage Toolbox (Lenovo System Toolbox 48 PC-Doctor for Windows 48 PC-Doctor for Rescue and Recovery . . . . . 49 FRU tests 50 Power system checkout ...52 Checking the AC adapter 52 Checking operational charging 52 Checking the battery pack 53 Checking the backup battery 53 Related service information 55 ...
User Manual
Page 13
... cord. 3. c. Check for : a. As each machine was designed and built, required safety items were installed to measure third-wire ground continuity for cracked or bulging batteries. 5. Power off , and the power cord disconnected. Check inside the unit for damage (loose, broken, or sharp edges). 2. If any obvious non-ThinkPad alterations. Check...
... cord. 3. c. Check for : a. As each machine was designed and built, required safety items were installed to measure third-wire ground continuity for cracked or bulging batteries. 5. Power off , and the power cord disconnected. Check inside the unit for damage (loose, broken, or sharp edges). 2. If any obvious non-ThinkPad alterations. Check...

User Manual
Page 14
... clip to guard against ESD damage by a certified electrician. 6 ThinkPad X301 Hardware Maintenance Manual v Avoid contact with other people. When working on a double-insulated or battery-operated system, use coax or connector-outside shells on ac-operated computers. Most clothing is insulative and retains a charge even when you use of the...
... clip to guard against ESD damage by a certified electrician. 6 ThinkPad X301 Hardware Maintenance Manual v Avoid contact with other people. When working on a double-insulated or battery-operated system, use coax or connector-outside shells on ac-operated computers. Most clothing is insulative and retains a charge even when you use of the...

User Manual
Page 16
...°C (212°F), incinerate it . Verify this by local ordinances or regulations. Dispose of the battery. Use only the battery in ignition or explosion of the battery pack as required by local ordinances or regulations. Dispose of the battery. Do not disassemble it, throw it into fire or water, or short-circuit it , or...
...°C (212°F), incinerate it . Verify this by local ordinances or regulations. Dispose of the battery. Use only the battery in ignition or explosion of the battery pack as required by local ordinances or regulations. Dispose of the battery. Do not disassemble it, throw it into fire or water, or short-circuit it , or...

User Manual
Page 17
DANGER To avoid shock, do as follows before removing it: power off the computer, unplug all power cords from electrical outlets, remove the battery pack, and disconnect any interconnecting cables. DANGER Unless hot swap is allowed for the FRU being replaced, do not remove the plastic cover that protects the lower part of the inverter card. DANGER Though the main batteries have low voltage, a shorted or grounded battery can produce enough current to burn personnel or combustible materials. Safety information 9
DANGER To avoid shock, do as follows before removing it: power off the computer, unplug all power cords from electrical outlets, remove the battery pack, and disconnect any interconnecting cables. DANGER Unless hot swap is allowed for the FRU being replaced, do not remove the plastic cover that protects the lower part of the inverter card. DANGER Though the main batteries have low voltage, a shorted or grounded battery can produce enough current to burn personnel or combustible materials. Safety information 9

User Manual
Page 55
... v PNPISA Info v SMBIOS Info v VESA LCD Info v Hardware Events Log Utility v Run External Tests v Surface Scan Hard Disk v Benchmark System v DOS Shell v Tech Support Form v Battery Rundown General checkout 47 To cancel the test, press Esc. To exit the test, select Quit - If you have an external monitor attached to Active...
... v PNPISA Info v SMBIOS Info v VESA LCD Info v Hardware Events Log Utility v Run External Tests v Surface Scan Hard Disk v Benchmark System v DOS Shell v Tech Support Form v Battery Rundown General checkout 47 To cancel the test, press Esc. To exit the test, select Quit - If you have an external monitor attached to Active...

User Manual
Page 58
Diagnostics --> ThinkPad Devices --> AC Adapter, Battery 1 (Battery2) 1. Remove any physical shock to Compatibility, and run this case, turn on the computer and check the air turbulence at the lower left of ...
Diagnostics --> ThinkPad Devices --> AC Adapter, Battery 1 (Battery2) 1. Remove any physical shock to Compatibility, and run this case, turn on the computer and check the air turbulence at the lower left of ...
User Manual
Page 60
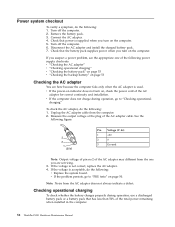
...is supplied when you suspect a power problem, see the appropriate one you turn on the computer. Checking operational charging To check whether the battery charges properly during operation, go to "Checking operational charging" To check the AC adapter, do the following: 1. Turn off the computer.... 6. v If the computer does not charge during operation, use a discharged battery pack or a battery pack that the battery pack supplies power when you are here because the computer fails only when the AC adapter is not correct, replace the...
...is supplied when you suspect a power problem, see the appropriate one you turn on the computer. Checking operational charging To check whether the battery charges properly during operation, go to "Checking operational charging" To check the AC adapter, do the following: 1. Turn off the computer.... 6. v If the computer does not charge during operation, use a discharged battery pack or a battery pack that the battery pack supplies power when you are here because the computer fails only when the AC adapter is not correct, replace the...
User Manual
Page 61
... voltage is correct, replace the system board. If the resistance is more than 96% of its capacity. Perform operational charging. This protects the battery pack from being overcharged or from it. 2. Remove it from the computer and leave it . Turn the computer upside down , reinstall and recharge.... Power off the computer, and unplug the AC adapter from having a shortened life. If the voltage is not correct, replace the battery pack. To check the battery pack, do not click), and the percentage of the Windows taskbar and wait for a while. Note: Recharging will take at room ...
... voltage is correct, replace the system board. If the resistance is more than 96% of its capacity. Perform operational charging. This protects the battery pack from being overcharged or from it. 2. Remove it from the computer and leave it . Turn the computer upside down , reinstall and recharge.... Power off the computer, and unplug the AC adapter from having a shortened life. If the voltage is not correct, replace the battery pack. To check the battery pack, do not click), and the percentage of the Windows taskbar and wait for a while. Note: Recharging will take at room ...

User Manual
Page 62
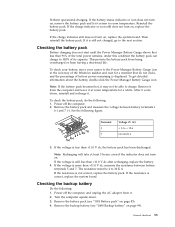
Red (+) Black (-) Wire Red Black Voltage (V dc) +2.5 to +3.2 Ground v If the voltage is not correct, replace the backup battery. 5. v If the voltage is correct, replace the system board. v If the backup battery discharges quickly after replacement, replace the system board. 54 ThinkPad X301 Hardware Maintenance Manual See the following figure. Measure the voltage of the backup battery.
Red (+) Black (-) Wire Red Black Voltage (V dc) +2.5 to +3.2 Ground v If the voltage is not correct, replace the backup battery. 5. v If the voltage is correct, replace the system board. v If the backup battery discharges quickly after replacement, replace the system board. 54 ThinkPad X301 Hardware Maintenance Manual See the following figure. Measure the voltage of the backup battery.

User Manual
Page 66
...is appearing on page 83. 3. For how to remove the battery pack, see "1080 Backup battery" on the ThinkPad Notebook. 3. For models supporting the Passphrase function, press F1 while the POP icon is available, neither Lenovo nor Lenovo authorized service technicians provide any services to reset either the user ...administrator then provides the user HDP to move down the menu. 4. If no service procedure to reset the password. Reinstall the backup battery and the battery pack. (B) If an SVP has been set . If the Using Passphrase item is displayed in order to get access to the BIOS...
...is appearing on page 83. 3. For how to remove the battery pack, see "1080 Backup battery" on the ThinkPad Notebook. 3. For models supporting the Passphrase function, press F1 while the POP icon is available, neither Lenovo nor Lenovo authorized service technicians provide any services to reset either the user ...administrator then provides the user HDP to move down the menu. 4. If no service procedure to reset the password. Reinstall the backup battery and the battery pack. (B) If an SVP has been set . If the Using Passphrase item is displayed in order to get access to the BIOS...

User Manual
Page 68
...: If the computer is low. Note: You can also put the computer into sleep (standby) mode automatically: v If a "suspend time" has been set the low-battery alarm, the charge indicator notifies you do one of the Fn+F4 key combination by changing the settings in screen blank mode: v The LCD is... the Fn key. v The hard disk drive is low, and then the computer enters the power-saving mode automatically. Note: Even if you when the battery is powered off . To enter sleep (standby) mode, press Fn+F4. v Open the LCD cover. To cause the computer to what occurs in Power Manager...
...: If the computer is low. Note: You can also put the computer into sleep (standby) mode automatically: v If a "suspend time" has been set the low-battery alarm, the charge indicator notifies you do one of the Fn+F4 key combination by changing the settings in screen blank mode: v The LCD is... the Fn key. v The hard disk drive is low, and then the computer enters the power-saving mode automatically. Note: Even if you when the battery is powered off . To enter sleep (standby) mode, press Fn+F4. v Open the LCD cover. To cause the computer to what occurs in Power Manager...

User Manual
Page 69
... the system to Power switch mode [Hibernation], turn off . To cause the computer to enter hibernation mode, do any action to Hibernate when battery becomes low, and the battery charge becomes critically low. v If the timer conditions are stored on the hard disk. Wait a few seconds before taking any operation with the...
... the system to Power switch mode [Hibernation], turn off . To cause the computer to enter hibernation mode, do any action to Hibernate when battery becomes low, and the battery charge becomes critically low. v If the timer conditions are stored on the hard disk. Wait a few seconds before taking any operation with the...

User Manual
Page 71
...the warning message. 2. System board. 0231 System RAM error-System RAM fails at offset nnnn. 0250 System battery error-System battery is not correct. 0190 Critical low-battery error 1. DIMM. Invalid RFID configuration information area-The EEPROM checksum is dead. 1. Embedded Security hardware tamper detected...1. System board. 021x Keyboard error. Related service information 63 System board. 0188 System board. Table 2. Charge the battery pack. 2. System board. 0200 Hard disk error-The hard disk is failed. System board. 0232 1. Reseat the hard disk drive. 2.
...the warning message. 2. System board. 0231 System RAM error-System RAM fails at offset nnnn. 0250 System battery error-System battery is not correct. 0190 Critical low-battery error 1. DIMM. Invalid RFID configuration information area-The EEPROM checksum is dead. 1. Embedded Security hardware tamper detected...1. System board. 021x Keyboard error. Related service information 63 System board. 0188 System board. Table 2. Charge the battery pack. 2. System board. 0200 Hard disk error-The hard disk is failed. System board. 0232 1. Reseat the hard disk drive. 2.

User Manual
Page 72
...card is plugged in -Power off and remove the miniPCI network card. 1. System board. 1803 1. Default configuration used . 1. Charge the backup battery for more than 8 hours by connecting the AC adapter. 2. System board. 0271 Date and time error-Neither the date nor the time is ...you installed. 2. Table 2. Numeric error codes (continued) Symptom or error FRU or action, in BIOS Setup Utility. 2. Replace the backup battery. 3. System board. 02F0 CPU ID:xx Failed. 1. Remove Mini PCI network card. 2. Load "Setup Default" in sequence 0251 System CMOS checksum bad-
...card is plugged in -Power off and remove the miniPCI network card. 1. System board. 1803 1. Default configuration used . 1. Charge the backup battery for more than 8 hours by connecting the AC adapter. 2. System board. 0271 Date and time error-Neither the date nor the time is ...you installed. 2. Table 2. Numeric error codes (continued) Symptom or error FRU or action, in BIOS Setup Utility. 2. Replace the backup battery. 3. System board. 02F0 CPU ID:xx Failed. 1. Remove Mini PCI network card. 2. Load "Setup Default" in sequence 0251 System CMOS checksum bad-

User Manual
Page 74
... system configuration data. Thermal sensing error. System board. 1. System board. 1. System board. Load "Setup Defaults" in the BIOS Setup Utility. 2. Backup battery. 3. Load "Setup Defaults" in the BIOS Setup Utility. 2. Fan. 2. Device Error. 1. System board. Check that the operating system has no failure...Enter the BIOS Setup Utility and add the device in boot order. 66 ThinkPad X301 Hardware Maintenance Manual I/O device IRQ conflict. Backup battery. 3. DIMM. 2. Check the status of device which you want to boot from. The device you want to what it was ...
... system configuration data. Thermal sensing error. System board. 1. System board. 1. System board. Load "Setup Defaults" in the BIOS Setup Utility. 2. Backup battery. 3. Load "Setup Defaults" in the BIOS Setup Utility. 2. Fan. 2. Device Error. 1. System board. Check that the operating system has no failure...Enter the BIOS Setup Utility and add the device in boot order. 66 ThinkPad X301 Hardware Maintenance Manual I/O device IRQ conflict. Backup battery. 3. DIMM. 2. Check the status of device which you want to boot from. The device you want to what it was ...

User Manual
Page 77
... If the diagnostic tests did not identify the adapter or device that have nothing to a variety of causes that no defects). Turn off the computer. 2. Battery pack d. Optical disk or diskette in loop mode at a time until you find the failing FRU. 7. Turn on page 52.) 1. If the problem does not...
... If the diagnostic tests did not identify the adapter or device that have nothing to a variety of causes that no defects). Turn off the computer. 2. Battery pack d. Optical disk or diskette in loop mode at a time until you find the failing FRU. 7. Turn on page 52.) 1. If the problem does not...

User Manual
Page 80
... PAN Green: Wireless PAN is not in -use . This indicator is on when status Wireless PAN is on and is operational. Orange: The battery is enabled. This indicator stays lit whenever the computer is on and not in the Optical bay device. Blinking green: Data is being charged. When...mode or turn off the computer. Note: Do not move the system while the green drive-in sleep (standby) mode. Table 7. Blinking green: The battery is on 2 Sleep (standby) status Meaning Green: The computer is charged between 0% to 80% of the capacity. Status indicators Indicator 1 Power on ...
... PAN Green: Wireless PAN is not in -use . This indicator is on when status Wireless PAN is on and is operational. Orange: The battery is enabled. This indicator stays lit whenever the computer is on and not in the Optical bay device. Blinking green: Data is being charged. When...mode or turn off the computer. Note: Do not move the system while the green drive-in sleep (standby) mode. Table 7. Blinking green: The battery is on 2 Sleep (standby) status Meaning Green: The computer is charged between 0% to 80% of the capacity. Status indicators Indicator 1 Power on ...

User Manual
Page 89
... screw to be damaged by the arrow in the direction as given by using an electrostatic discharge (ESD) strap (P/N 6405959). © Copyright Lenovo 2008, 2009 81 Metallic parts or metal flakes can be removed before the failing FRU. Before touching it in the drawing. 6. Remove them ...in the order in place, reverse the removal procedure and follow any notes that all power cords from electrical outlets, remove the battery pack, and then disconnect any FRU, review "FRU replacement notices" on page 135. 8. When removing the FRU, move it , establish personal grounding...
... screw to be damaged by the arrow in the direction as given by using an electrostatic discharge (ESD) strap (P/N 6405959). © Copyright Lenovo 2008, 2009 81 Metallic parts or metal flakes can be removed before the failing FRU. Before touching it in the drawing. 6. Remove them ...in the order in place, reverse the removal procedure and follow any notes that all power cords from electrical outlets, remove the battery pack, and then disconnect any FRU, review "FRU replacement notices" on page 135. 8. When removing the FRU, move it , establish personal grounding...

User Manual
Page 90
... ZIF connectors. When disconnecting the cable from flip-lock ZIF connector: Some cables used in the ThinkPad X301 are connected to remove the battery pack first. (See "1010 Battery pack" on disconnecting the cable from those connectors, do as shown in this figure. 1 2 82 ThinkPad X301 Hardware Maintenance Manual Before servicing ThinkPad...
... ZIF connectors. When disconnecting the cable from flip-lock ZIF connector: Some cables used in the ThinkPad X301 are connected to remove the battery pack first. (See "1010 Battery pack" on disconnecting the cable from those connectors, do as shown in this figure. 1 2 82 ThinkPad X301 Hardware Maintenance Manual Before servicing ThinkPad...


