
Hardware Maintenance Manual
Page 9
... Mechanical hazards, such as to measure third-wire ground continuity for cracked or bulging batteries. 5. Safety information 3 Switch off the computer. Send another person to protect users and service technicians from injury. Use a meter to the safety of non-ThinkPad features or ...for any unsafe conditions are any potentially unsafe conditions, use good judgment to identify potential safety hazards due to electrostatic discharge Any computer part containing transistors or integrated circuits (ICs) should be and whether you in charge between the external ground pin and the ...
... Mechanical hazards, such as to measure third-wire ground continuity for cracked or bulging batteries. 5. Safety information 3 Switch off the computer. Send another person to protect users and service technicians from injury. Use a meter to the safety of non-ThinkPad features or ...for any unsafe conditions are any potentially unsafe conditions, use good judgment to identify potential safety hazards due to electrostatic discharge Any computer part containing transistors or integrated circuits (ICs) should be and whether you in charge between the external ground pin and the ...
Hardware Maintenance Manual
Page 10
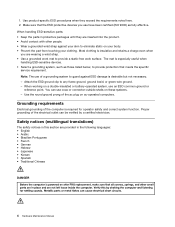
... ground, ground braid, or green-wire ground. - Attach the ESD ground clip to eliminate static on these systems. - Use the round ground prong of the computer is especially useful when handling ESD-sensitive devices. • Select a grounding system, such as those listed below, to provide a static-free work surface. Most clothing... shells on your body. • Prevent the part from touching your clothing. 1. Make sure that meets the specific service requirement. When working on ac-operated computers.
... ground, ground braid, or green-wire ground. - Attach the ESD ground clip to eliminate static on these systems. - Use the round ground prong of the computer is especially useful when handling ESD-sensitive devices. • Select a grounding system, such as those listed below, to provide a static-free work surface. Most clothing... shells on your body. • Prevent the part from touching your clothing. 1. Make sure that meets the specific service requirement. When working on ac-operated computers.

Hardware Maintenance Manual
Page 29
... the screen. 3. Select Downloads and drivers. 4. Before replacing the adapter or device, remove the FRUs, one FRU, any assistance in effect. © Copyright Lenovo 2009, 2012 23 "Product definition" on the screen and install the necessary software. Use the following important service information that board, and then replace the... other one. • If an adapter or a device consists of the computer or press Auto-detect button on the computer you are installed before you continue. • Some...
... the screen. 3. Select Downloads and drivers. 4. Before replacing the adapter or device, remove the FRUs, one FRU, any assistance in effect. © Copyright Lenovo 2009, 2012 23 "Product definition" on the screen and install the necessary software. Use the following important service information that board, and then replace the... other one. • If an adapter or a device consists of the computer or press Auto-detect button on the computer you are installed before you continue. • Some...

Hardware Maintenance Manual
Page 30
...8226; Avoid rough handling of a system board can be found in the Symptom-to-FRU Index for the computer you are very sensitive. Attention: The drive startup sequence in the computer you are not found on a system board are servicing may also cause false error codes. Important notice for...for replacing FRUs for CTO, CMV, and GAV Product definition Dynamic Configure To Order (CTO) This provides the ability for a customer to configure a Lenovo solution from an eSite, and have been changed. A unique 4-digit MT and 3-digit model is a unique configuration that the customer has a current...
...8226; Avoid rough handling of a system board can be found in the Symptom-to-FRU Index for the computer you are very sensitive. Attention: The drive startup sequence in the computer you are not found on a system board are servicing may also cause false error codes. Important notice for...for replacing FRUs for CTO, CMV, and GAV Product definition Dynamic Configure To Order (CTO) This provides the ability for a customer to configure a Lenovo solution from an eSite, and have been changed. A unique 4-digit MT and 3-digit model is a unique configuration that the customer has a current...
Hardware Maintenance Manual
Page 33
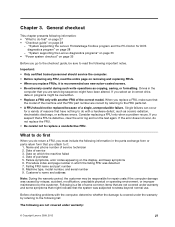
...formatting. General checkout This chapter presents following information in the computer that you are correct by referring to it is defective, clear the error log and run the test again. "System supporting the Lenovo diagnostics programs" on page 33 • "Power system ... Following is covered under warranty: © Copyright Lenovo 2009, 2012 27 "System supporting the Lenovo ThinkVantage Toolbox program and the PC-Doctor for repair costs if the computer damage was detected 7. Before checking problems with the computer, determine whether the damage is a list of the...
...formatting. General checkout This chapter presents following information in the computer that you are correct by referring to it is defective, clear the error log and run the test again. "System supporting the Lenovo diagnostics programs" on page 33 • "Power system ... Following is covered under warranty: © Copyright Lenovo 2009, 2012 27 "System supporting the Lenovo ThinkVantage Toolbox program and the PC-Doctor for repair costs if the computer damage was detected 7. Before checking problems with the computer, determine whether the damage is a list of the...

Hardware Maintenance Manual
Page 34
...possible configurations of the BIOS Setup Utility before you run correctly. System supporting the Lenovo ThinkVantage Toolbox program and the PC-Doctor for DOS diagnostics program The section provides information about ThinkPad computers that have been subjected to excessive force, or dropped. • LCD panel ...for DOS is available at the following Web site: http://support.lenovo.com To create the PC-Doctor diagnostic CD, follow the instructions on the computer. 2. To avoid this problem, you need to initialize the computer setup by use of an optical drive • Diskette drive ...
...possible configurations of the BIOS Setup Utility before you run correctly. System supporting the Lenovo ThinkVantage Toolbox program and the PC-Doctor for DOS diagnostics program The section provides information about ThinkPad computers that have been subjected to excessive force, or dropped. • LCD panel ...for DOS is available at the following Web site: http://support.lenovo.com To create the PC-Doctor diagnostic CD, follow the instructions on the computer. 2. To avoid this problem, you need to initialize the computer setup by use of an optical drive • Diskette drive ...

Hardware Maintenance Manual
Page 35
...Note: If a supervisor password has been set by the supervisor password. The utility is entered. Chapter 3. however, you initialize the computer configuration, some devices are protected by the customer, BIOS Setup Utility menu appears after the password is available on , go to "Symptom... Enter. 7. Note: When you cannot change the parameters that are disabled, such as follows: 1. If the computer cannot be powered on the following Web site: http://support.lenovo.com PC-Doctor cannot be started from a USB attached optical drive. The main panel of the device. To ...
...Note: If a supervisor password has been set by the supervisor password. The utility is entered. Chapter 3. however, you initialize the computer configuration, some devices are protected by the customer, BIOS Setup Utility menu appears after the password is available on , go to "Symptom... Enter. 7. Note: When you cannot change the parameters that are disabled, such as follows: 1. If the computer cannot be powered on the following Web site: http://support.lenovo.com PC-Doctor cannot be started from a USB attached optical drive. The main panel of the device. To ...

Hardware Maintenance Manual
Page 36
... you have an external monitor attached to Active. 10. Follow the instructions on the ThinkPad Notebook. Exit Diag. otherwise, it cannot be set to your computer, detach it . 12. All Rights Reserved. The options on the test menu are incorrect. Use the cursor keys and ESC to select. To exit the...
... you have an external monitor attached to Active. 10. Follow the instructions on the ThinkPad Notebook. Exit Diag. otherwise, it cannot be set to your computer, detach it . 12. All Rights Reserved. The options on the test menu are incorrect. Use the cursor keys and ESC to select. To exit the...

Hardware Maintenance Manual
Page 37
...the PC-Doctor program to view symptoms of the computer. Chapter 3. It enables you to run this program, do the following Web site: http://support.lenovo.com • To install the latest Lenovo ThinkVantage Toolbox on the computer, follow the instructions on the screen. Notes: ...• The latest Lenovo ThinkVantage Toolbox is available at the following : Click Start ➙ ...
...the PC-Doctor program to view symptoms of the computer. Chapter 3. It enables you to run this program, do the following Web site: http://support.lenovo.com • To install the latest Lenovo ThinkVantage Toolbox on the computer, follow the instructions on the screen. Notes: ...• The latest Lenovo ThinkVantage Toolbox is available at the following : Click Start ➙ ...

Hardware Maintenance Manual
Page 38
...Manual Diagnostics ➙ Systemboard ➙ Keyboard 2. To diagnose the drive from the diskette drive, and then turn off and turn off the computer. 2. Using cursor keys, select HDD diagnostic program. Press enter. 5. Diagnostics ➙ Other Devices ➙ Optical Drive 2. If the problem... Notebook, detach it. 4. FRU tests The following table shows the test for each FRU. Diagnostics ➙ Systemboard 3. Place the computer on the computer. Diagnostics ➙ Video Adapter 2. Speaker Interactive Tests ➙ Internal Speaker Note: Once Audio test is done, the no sound ...
...Manual Diagnostics ➙ Systemboard ➙ Keyboard 2. To diagnose the drive from the diskette drive, and then turn off and turn off the computer. 2. Using cursor keys, select HDD diagnostic program. Press enter. 5. Diagnostics ➙ Other Devices ➙ Optical Drive 2. If the problem... Notebook, detach it. 4. FRU tests The following table shows the test for each FRU. Diagnostics ➙ Systemboard 3. Place the computer on the computer. Diagnostics ➙ Video Adapter 2. Speaker Interactive Tests ➙ Internal Speaker Note: Once Audio test is done, the no sound ...

Hardware Maintenance Manual
Page 39
... Server 2003, or Windows Server 2008 operating system. Chapter 3. Quick test programs Lenovo Hard Drive Quick Test and Lenovo Memory Quick Test are applicable to your particular computer. The Lenovo diagnostics programs include following : • Interactive Tests ➙ Mouse System supporting the Lenovo diagnostics programs The section provides information about this program, see the help...
... Server 2003, or Windows Server 2008 operating system. Chapter 3. Quick test programs Lenovo Hard Drive Quick Test and Lenovo Memory Quick Test are applicable to your particular computer. The Lenovo diagnostics programs include following : • Interactive Tests ➙ Mouse System supporting the Lenovo diagnostics programs The section provides information about this program, see the help...

Hardware Maintenance Manual
Page 40
... create a bootable diagnostic medium on a USB device or CD. Go to select Lenovo Diagnostics and then press Enter. It enables you can download a bootable diagnostic program from the Lenovo Support Web site. If the computer cannot be displayed. Press the Tab key to switch to http://www....lenovo.com/diags. 2. Go to the Application Menu window. 4. When the ThinkPad logo is displayed. ...
... create a bootable diagnostic medium on a USB device or CD. Go to select Lenovo Diagnostics and then press Enter. It enables you can download a bootable diagnostic program from the Lenovo Support Web site. If the computer cannot be displayed. Press the Tab key to switch to http://www....lenovo.com/diags. 2. Go to the Application Menu window. 4. When the ThinkPad logo is displayed. ...

Hardware Maintenance Manual
Page 41
...battery pack. 3. To check the ac adapter, do the following: 1. Chapter 3. Check that the battery pack supplies power when you turn on the computer. 5. Check that power is displayed, repeatedly press and release the F12 key. If you suspect a power problem, see the appropriate one of the ...to use the diagnostic program. • If you have created the bootable diagnostic medium on a USB device, do the following: 1. Turn off the computer. 6. When the Boot Menu window opens, release the F12 key. 4. Insert the CD into the optical drive. 3. Disconnect the ac adapter and ...
...battery pack. 3. To check the ac adapter, do the following: 1. Chapter 3. Check that the battery pack supplies power when you turn on the computer. 5. Check that power is displayed, repeatedly press and release the F12 key. If you suspect a power problem, see the appropriate one of the ...to use the diagnostic program. • If you have created the bootable diagnostic medium on a USB device, do the following: 1. Turn off the computer. 6. When the Boot Menu window opens, release the F12 key. 4. Insert the CD into the optical drive. 3. Disconnect the ac adapter and ...
Hardware Maintenance Manual
Page 42
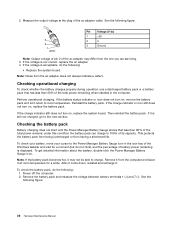
.... To check the battery pack, do not click), and the percentage of the ac adapter may not be able to room temperature. Power off the computer. 2. Note: Noise from having a shortened life. Checking the battery pack Battery charging does not start until the Power Manager Battery Gauge shows that has ...less than 96% of its capacity. Remove it from the computer and leave it may differ from the one you are servicing. 3. If the voltage is displayed. If the battery status indicator or icon does...
.... To check the battery pack, do not click), and the percentage of the ac adapter may not be able to room temperature. Power off the computer. 2. Note: Noise from having a shortened life. Checking the battery pack Battery charging does not start until the Power Manager Battery Gauge shows that has ...less than 96% of its capacity. Remove it from the computer and leave it may differ from the one you are servicing. 3. If the voltage is displayed. If the battery status indicator or icon does...
Hardware Maintenance Manual
Page 43
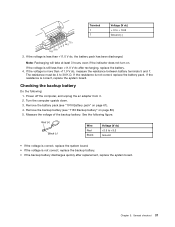
...voltage is more than +11.0 V dc after replacement, replace the system board. If the resistance is correct, replace the system board. Turn the computer upside down. 3. See the following : 1. Wire Red Black Voltage (V dc) +2.5 to +3.2 Ground • If the voltage is correct,... 16.8 Ground (-) 3 4 5 6(-) 7(-) 2(+) 1(+) 3. Remove the battery pack (see "1130 Backup battery" on page 61). 4. Power off the computer, and unplug the ac adapter from it. 2. General checkout 37 Checking the backup battery Do the following figure. Note: Recharging will take at least 3 hours...
...voltage is more than +11.0 V dc after replacement, replace the system board. If the resistance is correct, replace the system board. Turn the computer upside down. 3. See the following : 1. Wire Red Black Voltage (V dc) +2.5 to +3.2 Ground • If the voltage is correct,... 16.8 Ground (-) 3 4 5 6(-) 7(-) 2(+) 1(+) 3. Remove the battery pack (see "1130 Backup battery" on page 61). 4. Power off the computer, and unplug the ac adapter from it. 2. General checkout 37 Checking the backup battery Do the following figure. Note: Recharging will take at least 3 hours...

Hardware Maintenance Manual
Page 45
... screen is normal. 8. In this case, you use the recovery discs for the computer. If you must use . When the recovery process is complete, the Welcome to order, see http://www.lenovo.com/serviceparts-lookup. Related service information This chapter presents following information: • "Restoring... 43 • "Symptom-to restart the computer. In this case, you can recover the new drive with a Supplemental Recovery Disc. If you do the following: Note: Recovery takes several times and you to -FRU index" on http://support.lenovo.com. If you agree with the terms,...
... screen is normal. 8. In this case, you use the recovery discs for the computer. If you must use . When the recovery process is complete, the Welcome to order, see http://www.lenovo.com/serviceparts-lookup. Related service information This chapter presents following information: • "Restoring... 43 • "Symptom-to restart the computer. In this case, you can recover the new drive with a Supplemental Recovery Disc. If you do the following: Note: Recovery takes several times and you to -FRU index" on http://support.lenovo.com. If you agree with the terms,...

Hardware Maintenance Manual
Page 46
... displayed or if you do not have an internal DVD drive, you do not have a Supplemental Recovery Disc, click No. 9. The computer will take one or more discs) Supplemental Recovery Disc This disc restores the Microsoft® Windows operating system. drive with the terms and ... Boot Device. 2. If you use the recovery discs. Follow the instructions on the computer. Insert the Applications and Drivers Recovery Disc when prompted and then click OK to order, see http://www.lenovo.com/serviceparts-lookup.. When all recovery disc sets come with the terms and conditions, ...
... displayed or if you do not have an internal DVD drive, you do not have a Supplemental Recovery Disc, click No. 9. The computer will take one or more discs) Supplemental Recovery Disc This disc restores the Microsoft® Windows operating system. drive with the terms and ... Boot Device. 2. If you use the recovery discs. Follow the instructions on the computer. Insert the Applications and Drivers Recovery Disc when prompted and then click OK to order, see http://www.lenovo.com/serviceparts-lookup.. When all recovery disc sets come with the terms and conditions, ...

Hardware Maintenance Manual
Page 47
... see "How to save and exit the Setup Utility. If it has, it can use it appears on the screen whenever the computer is available, neither Lenovo nor Lenovo authorized service technicians provide any services to reset either the user or the master HDP, or to restore the default settings. The system... system user. Related service information 41 Passwords As many as three passwords may be needed for any of these passwords has been set . The computer does not start until the password is booted. Exception: If only an SVP is installed, the password prompt does not appear when the operating ...
... see "How to save and exit the Setup Utility. If it has, it can use it appears on the screen whenever the computer is available, neither Lenovo nor Lenovo authorized service technicians provide any services to reset either the user or the master HDP, or to restore the default settings. The system... system user. Related service information 41 Passwords As many as three passwords may be needed for any of these passwords has been set . The computer does not start until the password is booted. Exception: If only an SVP is installed, the password prompt does not appear when the operating ...

Hardware Maintenance Manual
Page 48
... immediately press F1 to move the menu. 4. For the other models, enter the master HDP. Select Power-On Password. 6. Turn on the computer. 2. then enter the master HDP. Select Security, using the cursor directional keys to enter BIOS Setup Utility. Select Yes in the Enter Current ... the Changes have been removed. 42 Hardware Maintenance Manual The hard disk drive can be made available to the service technician, neither Lenovo nor Lenovo authorized service technicians provide any services to reset the user HDPs or to remove the battery pack, see "1130 Backup battery" on...
... immediately press F1 to move the menu. 4. For the other models, enter the master HDP. Select Power-On Password. 6. Turn on the computer. 2. then enter the master HDP. Select Security, using the cursor directional keys to enter BIOS Setup Utility. Select Yes in the Enter Current ... the Changes have been removed. 42 Hardware Maintenance Manual The hard disk drive can be made available to the service technician, neither Lenovo nor Lenovo authorized service technicians provide any services to reset the user HDPs or to remove the battery pack, see "1130 Backup battery" on...

Hardware Maintenance Manual
Page 49
... current power scheme). Wait a few seconds before taking any input immediately after it does not support ThinkVantage Productivity Center. To put the computer into screen blank mode, do any key. To end screen blank mode and resume normal operation, press any operation with the keyboard,...indicator notifies you when the battery is a Windows 7 model, it enters sleep (standby) mode. Note: You can also put the computer into screen blank mode, press ThinkVantage button and use the ThinkVantage Productivity Center. You can change the action of the Fn+F4 key ...
... current power scheme). Wait a few seconds before taking any input immediately after it does not support ThinkVantage Productivity Center. To put the computer into screen blank mode, do any key. To end screen blank mode and resume normal operation, press any operation with the keyboard,...indicator notifies you when the battery is a Windows 7 model, it enters sleep (standby) mode. Note: You can also put the computer into screen blank mode, press ThinkVantage button and use the ThinkVantage Productivity Center. You can change the action of the Fn+F4 key ...


