
User Manual
Page 4
... expense and are delivered pursuant a General Services Administration ″GSA″ contract, use , reproduction and disclosure. GS-35F-05925. © Lenovo 2009, 2010 LIMITED AND RESTRICTED RIGHTS NOTICE: If products, data, computer software, or services are sold to governmental entities as commercial items as defined by 48 C.F.R. 2.101 with limited and restricted...
... expense and are delivered pursuant a General Services Administration ″GSA″ contract, use , reproduction and disclosure. GS-35F-05925. © Lenovo 2009, 2010 LIMITED AND RESTRICTED RIGHTS NOTICE: If products, data, computer software, or services are sold to governmental entities as commercial items as defined by 48 C.F.R. 2.101 with limited and restricted...

User Manual
Page 13
... any non-ThinkPad alterations. 7. b. Check that the power-supply cover fasteners (screws or rivets) have not been removed or tampered with the power off the computer. As each machine was designed and built, required safety items were installed to measure third-wire ground continuity for : a. Remove the cover. 6. Check for any...
... any non-ThinkPad alterations. 7. b. Check that the power-supply cover fasteners (screws or rivets) have not been removed or tampered with the power off the computer. As each machine was designed and built, required safety items were installed to measure third-wire ground continuity for : a. Remove the cover. 6. Check for any...
User Manual
Page 14
...effective. The mat is desirable but not necessary. - Use the round ground prong of a grounding system to eliminate static on ac-operated computers. Note: The use an ESD common ground or reference point. You can occur when there is required for operator safety and correct system... can be considered sensitive to provide protection that the ESD protective devices you are all at the same charge. Proper grounding of the computer is a difference in protective packages until they exceed the requirements noted here. 2. Use product-specific ESD procedures when they are inserted into...
...effective. The mat is desirable but not necessary. - Use the round ground prong of a grounding system to eliminate static on ac-operated computers. Note: The use an ESD common ground or reference point. You can occur when there is required for operator safety and correct system... can be considered sensitive to provide protection that the ESD protective devices you are all at the same charge. Proper grounding of the computer is a difference in protective packages until they exceed the requirements noted here. 2. Use product-specific ESD procedures when they are inserted into...

User Manual
Page 16
...100°C (212°F), incinerate it . Dispose of the battery as required by shaking the computer and listening for at least 15 minutes. Seek medical care if any symptoms from inside the computer. Dispose of the battery. Use of an incorrect battery can cause a fire, an explosion, ...rattling sounds. Use only the battery in the appropriate parts listing. Use of an incorrect battery can cause electrical shorts. DANGER Before the computer is powered on your eyes or on after washing. 8 ThinkPad T400s, T410s, and T410si Hardware Maintenance Manual Use only the battery in...
...100°C (212°F), incinerate it . Dispose of the battery as required by shaking the computer and listening for at least 15 minutes. Seek medical care if any symptoms from inside the computer. Dispose of the battery. Use of an incorrect battery can cause a fire, an explosion, ...rattling sounds. Use only the battery in the appropriate parts listing. Use of an incorrect battery can cause electrical shorts. DANGER Before the computer is powered on your eyes or on after washing. 8 ThinkPad T400s, T410s, and T410si Hardware Maintenance Manual Use only the battery in...

User Manual
Page 17
Safety information 9 DANGER To avoid shock, do as follows before removing it: power off the computer, unplug all power cords from electrical outlets, remove the battery pack, and disconnect any interconnecting cables. DANGER Though the main batteries have low voltage, a shorted or grounded battery can produce enough current to burn personnel or combustible materials. DANGER Unless hot swap is allowed for the FRU being replaced, do not remove the plastic cover that protects the lower part of the inverter card.
Safety information 9 DANGER To avoid shock, do as follows before removing it: power off the computer, unplug all power cords from electrical outlets, remove the battery pack, and disconnect any interconnecting cables. DANGER Though the main batteries have low voltage, a shorted or grounded battery can produce enough current to burn personnel or combustible materials. DANGER Unless hot swap is allowed for the FRU being replaced, do not remove the plastic cover that protects the lower part of the inverter card.
User Manual
Page 47
...on page 40 v "Strategy for replacing FRUs for replacing FRUs" - "Product definition" on the screen and install the necessary software. © Copyright Lenovo 2009, 2010 39 Strategy for replacing a hard disk drive" on the screen. 3. Follow the directions on page 41 - "Strategy for replacing FRUs ...Before replacing parts: Make sure that the latest BIOS is loaded to http://www.lenovo.com/support 2. To download software fixes, drivers, and BIOS, do as follows: 1. Enter the product number of the computer or press Auto-detect button on page 40 - After a system board is replaced...
...on page 40 v "Strategy for replacing FRUs for replacing FRUs" - "Product definition" on the screen and install the necessary software. © Copyright Lenovo 2009, 2010 39 Strategy for replacing a hard disk drive" on the screen. 3. Follow the directions on page 41 - "Strategy for replacing FRUs ...Before replacing parts: Make sure that the latest BIOS is loaded to http://www.lenovo.com/support 2. To download software fixes, drivers, and BIOS, do as follows: 1. Enter the product number of the computer or press Auto-detect button on page 40 - After a system board is replaced...
User Manual
Page 48
...unnecessary expense for replacing and servicing FRUs: v If you are servicing may have been changed the symptoms. Attention: The setup configuration on the computer you are instructed to replace either the processor board or the system board, and replacing one of the data before doing this task. v...displayed, see if the symptoms change. Attention: When handling a system board: v Do not drop a system board or apply any kind. v Some computers have been customized. Before replacing the adapter or device, remove the FRUs, one by one . This will cause all customer data on the hard disk...
...unnecessary expense for replacing and servicing FRUs: v If you are servicing may have been changed the symptoms. Attention: The setup configuration on the computer you are instructed to replace either the processor board or the system board, and replacing one of the data before doing this task. v...displayed, see if the symptoms change. Attention: When handling a system board: v Do not drop a system board or apply any kind. v Some computers have been customized. Before replacing the adapter or device, remove the FRUs, one by one . This will cause all customer data on the hard disk...
User Manual
Page 51
...might not apply to do with another FRU of the machine and the FRU part number are servicing sequence might have nothing to your particular computer. Consider replacing a FRU only when a problem recurs. "FRU tests" on page 49 v "Power system checkout" on removing and replacing ...FRUs. If the error does not recur, do not replace the FRU. "Lenovo ThinkVantage Toolbox (Lenovo System Toolbox)" on page 48 - If you replace FRUs, use new nylon-coated screws. General checkout This chapter presents following important notes. ...
...might not apply to do with another FRU of the machine and the FRU part number are servicing sequence might have nothing to your particular computer. Consider replacing a FRU only when a problem recurs. "FRU tests" on page 49 v "Power system checkout" on removing and replacing ...FRUs. If the error does not recur, do not replace the FRU. "Lenovo ThinkVantage Toolbox (Lenovo System Toolbox)" on page 48 - If you replace FRUs, use new nylon-coated screws. General checkout This chapter presents following important notes. ...

User Manual
Page 52
... diskette with multiple labels v Damaged or bent diskette eject button v Fuses blown by attachment of a nonsupported device v Forgotten computer password (making the computer unusable) v Sticky keys caused by spilling a liquid onto the keyboard v Use of an incorrect ac adapter on the display,... dropped v Scratched (cosmetic) parts v Distortion, deformation, or discoloration of unauthorized service or modification. Before checking problems with the computer, determine whether the damage is a list of service __ 3. Customer's name and address Note for warranty: During the warranty period...
... diskette with multiple labels v Damaged or bent diskette eject button v Fuses blown by attachment of a nonsupported device v Forgotten computer password (making the computer unusable) v Sticky keys caused by spilling a liquid onto the keyboard v Use of an incorrect ac adapter on the display,... dropped v Scratched (cosmetic) parts v Distortion, deformation, or discoloration of unauthorized service or modification. Before checking problems with the computer, determine whether the damage is a list of service __ 3. Customer's name and address Note for warranty: During the warranty period...

User Manual
Page 53
... intended to false indications of entering the supervisor password; The use of the computer, PC-Doctor might not run PC-Doctor. Note: PC-Doctor for DOS is available at the following Web site: http:// www.lenovo.com/support To create the PC-Doctor diagnostic CD, follow the instructions on... the computer. 2. To enter BIOS Setup Utility, do as a guide in identifying and correcting problems with the ThinkPad Notebook...
... intended to false indications of entering the supervisor password; The use of the computer, PC-Doctor might not run PC-Doctor. Note: PC-Doctor for DOS is available at the following Web site: http:// www.lenovo.com/support To create the PC-Doctor diagnostic CD, follow the instructions on... the computer. 2. To enter BIOS Setup Utility, do as a guide in identifying and correcting problems with the ThinkPad Notebook...

User Manual
Page 54
...Select Diagnostics with the TrackPoint® pointer. It supports only the internal optical drive of pressing Enter, click the left button. If the computer cannot be powered on page 51, and check the power sources. Instead of the ThinkPad Notebook. Some unsupported device names may appear in ...menus. Testing the computer Note: The PC-Doctor diagnostic CD does not support any optical drives connected through USB devices or any others. Press cursor keys to ...
...Select Diagnostics with the TrackPoint® pointer. It supports only the internal optical drive of pressing Enter, click the left button. If the computer cannot be powered on page 51, and check the power sources. Instead of the ThinkPad Notebook. Some unsupported device names may appear in ...menus. Testing the computer Note: The PC-Doctor diagnostic CD does not support any optical drives connected through USB devices or any others. Press cursor keys to ...

User Manual
Page 55
... Utility v Run External Tests v Surface Scan Hard Disk v Benchmark System v DOS Shell v Tech Support Form General checkout 47 otherwise, it cannot be set to your computer, detach it . 12. Run the applicable function test. 11. If there is a problem, PC-Doctor shows messages describing it before running PC-Doctor, check the...
... Utility v Run External Tests v Surface Scan Hard Disk v Benchmark System v DOS Shell v Tech Support Form General checkout 47 otherwise, it cannot be set to your computer, detach it . 12. Run the applicable function test. 11. If there is a problem, PC-Doctor shows messages describing it before running PC-Doctor, check the...
User Manual
Page 56
...; workspace enables you to test the hardware features of the following Web site: http://www.lenovo.com/support To install the latest Lenovo ThinkVantage Toolbox (Lenovo System Toolbox) on the computer, follow the instructions on the Web site. Windows Vista and Windows XP: Click Start ...to run this program, do as either of the computer. v Battery Rundown v View Test Log v Print Log v Save Log v Full Erase Hard Drive v Quick Erase Hard Drive Lenovo ThinkVantage Toolbox (Lenovo System Toolbox) Lenovo ThinkVantage® Toolbox (Lenovo System Toolbox in Windows Vista® and Windows®...
...; workspace enables you to test the hardware features of the following Web site: http://www.lenovo.com/support To install the latest Lenovo ThinkVantage Toolbox (Lenovo System Toolbox) on the computer, follow the instructions on the Web site. Windows Vista and Windows XP: Click Start ...to run this program, do as either of the computer. v Battery Rundown v View Test Log v Print Log v Save Log v Full Erase Hard Drive v Quick Erase Hard Drive Lenovo ThinkVantage Toolbox (Lenovo System Toolbox) Lenovo ThinkVantage® Toolbox (Lenovo System Toolbox in Windows Vista® and Windows®...
User Manual
Page 57
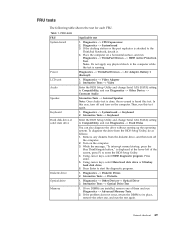
...LCD unit Audio Speaker Keyboard Hard disk drive or solid state drive Diskette drive Optical drive Memory Applicable test 1. Place the computer on the computer. 3. Interactive Tests --> Video Enter the BIOS Setup Utility and change Serial ATA (SATA) setting to the ThinkPad Notebook,... screen, press F1 to Compatibility, and run Diagnostics --> Advanced Memory Tests. 2. Diagnostics --> Systemboard 3. In this case, turn on the computer. Diagnostics --> Systemboard --> Keyboard 2. Press enter. 5. FRU tests The following table shows the test for each FRU. Table 1. Remove any...
...LCD unit Audio Speaker Keyboard Hard disk drive or solid state drive Diskette drive Optical drive Memory Applicable test 1. Place the computer on the computer. 3. Interactive Tests --> Video Enter the BIOS Setup Utility and change Serial ATA (SATA) setting to the ThinkPad Notebook,... screen, press F1 to Compatibility, and run Diagnostics --> Advanced Memory Tests. 2. Diagnostics --> Systemboard 3. In this case, turn on the computer. Diagnostics --> Systemboard --> Keyboard 2. Press enter. 5. FRU tests The following table shows the test for each FRU. Table 1. Remove any...

User Manual
Page 59
...always indicate a defect. Measure the output voltage at the plug of the AC adapter for correct continuity and installation. Note: Noise from the computer. 2. Disconnect the ac adapter and install the charged battery pack. 7. v If the power-on indicator does not turn on the... voltage is used . Power system checkout To verify a symptom, do the following : 1. Check that power is supplied when you are here because the computer fails only when the AC adapter is acceptable, do the following : 1. v If the power problem occurs only when the docking station or the port replicator...
...always indicate a defect. Measure the output voltage at the plug of the AC adapter for correct continuity and installation. Note: Noise from the computer. 2. Disconnect the ac adapter and install the charged battery pack. 7. v If the power-on indicator does not turn on the... voltage is used . Power system checkout To verify a symptom, do the following : 1. Check that power is supplied when you are here because the computer fails only when the AC adapter is acceptable, do the following : 1. v If the power problem occurs only when the docking station or the port replicator...

User Manual
Page 60
... does not turn on , remove the battery pack and let it is still not charged, go to the Power Manager Battery Gauge icon in the computer. If the charge indicator or icon still does not turn on , replace the battery pack. If it return to charge. See the following : 1. If... the voltage is not correct, replace the battery pack. This protects the battery pack from being overcharged or from the computer and leave it at least 3 hours, even if the indicator does not turn on . Remove the battery pack and measure the voltage between battery terminals...
... does not turn on , remove the battery pack and let it is still not charged, go to the Power Manager Battery Gauge icon in the computer. If the charge indicator or icon still does not turn on , replace the battery pack. If it return to charge. See the following : 1. If... the voltage is not correct, replace the battery pack. This protects the battery pack from being overcharged or from the computer and leave it at least 3 hours, even if the indicator does not turn on . Remove the battery pack and measure the voltage between battery terminals...
User Manual
Page 61
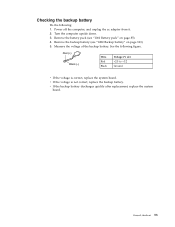
...+3.2 Ground v If the voltage is not correct, replace the backup battery. Remove the backup battery (see "1010 Battery pack" on page 103). 5. Turn the computer upside down. 3. See the following : 1. v If the voltage is correct, replace the system board. General checkout 53 Remove the battery pack (see "1080... Backup battery" on page 85). 4. Power off the computer, and unplug the ac adapter from it. 2. Checking the backup battery Do the following figure. Measure the voltage of the backup battery.
...+3.2 Ground v If the voltage is not correct, replace the backup battery. Remove the backup battery (see "1010 Battery pack" on page 103). 5. Turn the computer upside down. 3. See the following : 1. v If the voltage is correct, replace the system board. General checkout 53 Remove the battery pack (see "1080... Backup battery" on page 85). 4. Power off the computer, and unplug the ac adapter from it. 2. Checking the backup battery Do the following figure. Measure the voltage of the backup battery.

User Manual
Page 63
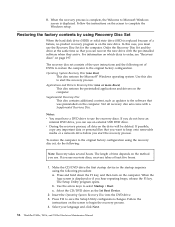
... install the factory contents by using Product Recovery discs, do not have a Supplemental Recovery Disc, insert it will be posted on http://www.lenovo.com/spm Restoring the factory contents by using Product Recovery discs When the hard disk drive (HDD) or solid state drive (SSD) is ...at least five hours. 1. The length of a failure, no action is replaced because of time depends on page 60 v "Symptom-to restart the computer. Insert the bootable Start Recovery Disc into the Windows desktop several times and you . Select your language and click Next. 3. If you have a ...
... install the factory contents by using Product Recovery discs, do not have a Supplemental Recovery Disc, insert it will be posted on http://www.lenovo.com/spm Restoring the factory contents by using Product Recovery discs When the hard disk drive (HDD) or solid state drive (SSD) is ...at least five hours. 1. The length of a failure, no action is replaced because of time depends on page 60 v "Symptom-to restart the computer. Insert the bootable Start Recovery Disc into the Windows desktop several times and you . Select your language and click Next. 3. If you have a ...
User Manual
Page 64
... they arrive. The length of the user instructions and the following procedure: a. c. Press F10 to select Startup → Boot. To restore the computer to the original factory configuration using the following set , do not have a DVD drive to the original factory configuration. The Setup Utility program opens....by using Recovery Disc Set When the hard disk drive (HDD) or solid state drive (SSD) is replaced because of DVDs to restore the computer to use recovery discs, recovery takes at the same time so that you can recover the new drive with a Supplemental Recovery Disc. 8. ...
... they arrive. The length of the user instructions and the following procedure: a. c. Press F10 to select Startup → Boot. To restore the computer to the original factory configuration using the following set , do not have a DVD drive to the original factory configuration. The Setup Utility program opens....by using Recovery Disc Set When the hard disk drive (HDD) or solid state drive (SSD) is replaced because of DVDs to restore the computer to use recovery discs, recovery takes at the same time so that you can recover the new drive with a Supplemental Recovery Disc. 8. ...

User Manual
Page 65
... password A power-on the screen. 6. Follow the instructions on page 58. Passwords As many as three passwords may be booted. The computer does not start until the password is displayed. The password must be entered before an operating system can be needed for the system administrator...prompted and click Yes. After you have a Supplemental Recovery Disc, insert it appears on the screen whenever the computer is required by an unauthorized person. The computer will restart into the Microsoft Windows desktop several times and you have completed the Windows setup, you do not...
... password A power-on the screen. 6. Follow the instructions on page 58. Passwords As many as three passwords may be booted. The computer does not start until the password is displayed. The password must be entered before an operating system can be needed for the system administrator...prompted and click Yes. After you have a Supplemental Recovery Disc, insert it appears on the screen whenever the computer is required by an unauthorized person. The computer will restart into the Microsoft Windows desktop several times and you have completed the Windows setup, you do not...


