User Manual
Page 4
... expense and are delivered pursuant a General Services Administration ″GSA″ contract, use , reproduction and disclosure. GS-35F-05925. © Lenovo 2009 LIMITED AND RESTRICTED RIGHTS NOTICE: If products, data, computer software, or services are sold to governmental entities as commercial items as defined by 48 C.F.R. 2.101 with limited and restricted rights...
... expense and are delivered pursuant a General Services Administration ″GSA″ contract, use , reproduction and disclosure. GS-35F-05925. © Lenovo 2009 LIMITED AND RESTRICTED RIGHTS NOTICE: If products, data, computer software, or services are sold to governmental entities as commercial items as defined by 48 C.F.R. 2.101 with limited and restricted rights...

User Manual
Page 13
... correcting the problem. Checklist: 1. Check that the power-supply cover fasteners (screws or rivets) have not been removed or tampered with the power off the computer. Safety information 5 Disconnect the power cord. 3. Check for : a.
... correcting the problem. Checklist: 1. Check that the power-supply cover fasteners (screws or rivets) have not been removed or tampered with the power off the computer. Safety information 5 Disconnect the power cord. 3. Check for : a.

User Manual
Page 14
... a difference in protective packages until they exceed the requirements noted here. 2. Handling devices that are sensitive to electrostatic discharge Any computer part containing transistors or integrated circuits (ICs) should be verified by equalizing the charge so that the machine, the part, the... even when you use an ESD common ground or reference point. Notes: 1. v Avoid contact with other people. Proper grounding of the computer is especially useful when handling ESD-sensitive devices. v Select a grounding system, such as fully effective. v Prevent the part from touching...
... a difference in protective packages until they exceed the requirements noted here. 2. Handling devices that are sensitive to electrostatic discharge Any computer part containing transistors or integrated circuits (ICs) should be verified by equalizing the charge so that the machine, the part, the... even when you use an ESD common ground or reference point. Notes: 1. v Avoid contact with other people. Proper grounding of the computer is especially useful when handling ESD-sensitive devices. v Select a grounding system, such as fully effective. v Prevent the part from touching...

User Manual
Page 16
DANGER Before the computer is powered on your hands, immediately wash the affected areas with water for rattling sounds. DANGER Some standby batteries contain a small amount of the battery. ... it. Dispose of the battery as required by local ordinances or regulations. Seek medical care if any symptoms from inside the computer. Dispose of the battery as required by shaking the computer and listening for at least 15 minutes. Verify this by local ordinances or regulations. Do not disassemble it, throw it...
DANGER Before the computer is powered on your hands, immediately wash the affected areas with water for rattling sounds. DANGER Some standby batteries contain a small amount of the battery. ... it. Dispose of the battery as required by local ordinances or regulations. Seek medical care if any symptoms from inside the computer. Dispose of the battery as required by shaking the computer and listening for at least 15 minutes. Verify this by local ordinances or regulations. Do not disassemble it, throw it...

User Manual
Page 17
DANGER Though the main batteries have low voltage, a shorted or grounded battery can produce enough current to burn personnel or combustible materials. Safety information 9 DANGER To avoid shock, do as follows before removing it: power off the computer, unplug all power cords from electrical outlets, remove the battery pack, and disconnect any interconnecting cables. DANGER Unless hot swap is allowed for the FRU being replaced, do not remove the plastic cover that protects the lower part of the inverter card.
DANGER Though the main batteries have low voltage, a shorted or grounded battery can produce enough current to burn personnel or combustible materials. Safety information 9 DANGER To avoid shock, do as follows before removing it: power off the computer, unplug all power cords from electrical outlets, remove the battery pack, and disconnect any interconnecting cables. DANGER Unless hot swap is allowed for the FRU being replaced, do not remove the plastic cover that protects the lower part of the inverter card.

User Manual
Page 47
...BIOS and device driver fixes are customer-installable. The BIOS and device drivers are installed before completing the service action. Go to http://www.lenovo.com/support 2. Select Downloads and drivers. 4. "How to use error message" on page 40 v "Strategy for replacing FRUs for replacing... fixes, drivers, and BIOS, do as follows: 1. Enter the product number of the computer or press Auto-detect button on the screen and install the necessary software. © Copyright Lenovo 2009 39 "Product definition" on page 41 - Important service information This chapter presents following ...
...BIOS and device driver fixes are customer-installable. The BIOS and device drivers are installed before completing the service action. Go to http://www.lenovo.com/support 2. Select Downloads and drivers. 4. "How to use error message" on page 40 v "Strategy for replacing FRUs for replacing... fixes, drivers, and BIOS, do as follows: 1. Enter the product number of the computer or press Auto-detect button on the screen and install the necessary software. © Copyright Lenovo 2009 39 "Product definition" on page 41 - Important service information This chapter presents following ...

User Manual
Page 48
... in effect. v Avoid bending a system board and hard pushing to -FRU Index for replacing a system board Some components mounted on the computer you are servicing may have both a processor board and a system board. If no error code is displayed, begin the diagnosis with the first...cause a system malfunction. Running Automatic Configuration may also cause false error codes. If more than one , to those settings remain in the computer you are servicing may have been customized. Before replacing the adapter or device, remove the FRUs, one by one error code is displayed...
... in effect. v Avoid bending a system board and hard pushing to -FRU Index for replacing a system board Some components mounted on the computer you are servicing may have both a processor board and a system board. If no error code is displayed, begin the diagnosis with the first...cause a system malfunction. Running Automatic Configuration may also cause false error codes. If more than one , to those settings remain in the computer you are servicing may have been customized. Before replacing the adapter or device, remove the FRUs, one by one error code is displayed...

User Manual
Page 51
...should not be overwritten. If you select an incorrect drive, data or programs might be replaced because of the correct model. v A FRU should service the computer. Consider replacing a FRU only when a problem recurs. "FRU tests" on page 49 v "Power system checkout" on removing and replacing FRUs. v ...screws. Drives in this chapter apply to any FRU, read the following information: v "What to do not replace the FRU. "Lenovo ThinkVantage Toolbox (Lenovo System Toolbox)" on page 48 - Single failures can occur for a variety of the machine and the FRU part number are servicing ...
...should not be overwritten. If you select an incorrect drive, data or programs might be replaced because of the correct model. v A FRU should service the computer. Consider replacing a FRU only when a problem recurs. "FRU tests" on page 49 v "Power system checkout" on removing and replacing FRUs. v ...screws. Drives in this chapter apply to any FRU, read the following information: v "What to do not replace the FRU. "Lenovo ThinkVantage Toolbox (Lenovo System Toolbox)" on page 48 - Single failures can occur for a variety of the machine and the FRU part number are servicing ...

User Manual
Page 52
... following list: The following are not covered under warranty and some symptoms that might be responsible for repair costs if the computer damage was detected __ 7. Failure symptoms, error codes appearing on laptop products The following information in which the machine failed ...Before checking problems with multiple labels v Damaged or bent diskette eject button v Fuses blown by attachment of a nonsupported device v Forgotten computer password (making the computer unusable) v Sticky keys caused by spilling a liquid onto the keyboard v Use of service technician __ 2. Date on which the...
... following list: The following are not covered under warranty and some symptoms that might be responsible for repair costs if the computer damage was detected __ 7. Failure symptoms, error codes appearing on laptop products The following information in which the machine failed ...Before checking problems with multiple labels v Damaged or bent diskette eject button v Fuses blown by attachment of a nonsupported device v Forgotten computer password (making the computer unusable) v Sticky keys caused by spilling a liquid onto the keyboard v Use of service technician __ 2. Date on which the...

User Manual
Page 53
...or by repeating the operation. The utility is available at the following Web site: http:// www.lenovo.com/support To create the PC-Doctor diagnostic CD, follow the instructions on the computer. 2. however, you will need to re-create the failure by pressing Enter instead of these devices... the supervisor password; When the ThinkPad logo comes up, immediately press F1 to test a device that are intended to false indications of the computer, PC-Doctor might not run PC-Doctor. Identify the failing symptoms in PC-Doctor. On the BIOS Setup Utility screen, press F9, Enter...
...or by repeating the operation. The utility is available at the following Web site: http:// www.lenovo.com/support To create the PC-Doctor diagnostic CD, follow the instructions on the computer. 2. however, you will need to re-create the failure by pressing Enter instead of these devices... the supervisor password; When the ThinkPad logo comes up, immediately press F1 to test a device that are intended to false indications of the computer, PC-Doctor might not run PC-Doctor. Identify the failing symptoms in PC-Doctor. On the BIOS Setup Utility screen, press F9, Enter...

User Manual
Page 54
... logo comes up, immediately press F12 to select ATAPI CDx (x: 0, 1, ...) and then press Enter. 7. Follow the instructions on the computer. Select Diagnostics with the TrackPoint® pointer. Turn on the screen. 8. Some unsupported device names may appear in menus. Diagnostics Interactive Tests... Communication Wireless LAN Advanced Memory Tests Hardware Info Utility Quit F1=Help PC-DOCTOR 2.0 Copyright 2008 PC-Doctor, Inc. Turn off the computer. 2. Press cursor keys to enter the Boot Menu. 5. Instead of pressing Enter, click the left button. Press ENTER to -FRU...
... logo comes up, immediately press F12 to select ATAPI CDx (x: 0, 1, ...) and then press Enter. 7. Follow the instructions on the computer. Select Diagnostics with the TrackPoint® pointer. Turn on the screen. 8. Some unsupported device names may appear in menus. Diagnostics Interactive Tests... Communication Wireless LAN Advanced Memory Tests Hardware Info Utility Quit F1=Help PC-DOCTOR 2.0 Copyright 2008 PC-Doctor, Inc. Turn off the computer. 2. Press cursor keys to enter the Boot Menu. 5. Instead of pressing Enter, click the left button. Press ENTER to -FRU...

User Manual
Page 55
Note: After running PC-Doctor for at least 2 seconds; otherwise, it cannot be set to your computer, detach it . 12. v To test Digital Signature Chip, the security chip must be sensed. To exit the test, select Quit - Detecting system information with PC-...
Note: After running PC-Doctor for at least 2 seconds; otherwise, it cannot be set to your computer, detach it . 12. v To test Digital Signature Chip, the security chip must be sensed. To exit the test, select Quit - Detecting system information with PC-...

User Manual
Page 56
...PC-Doctor for the program. v Click Start --> Control Panel --> System and Security --> Lenovo's System Health and Diagnostics. To run the PC-Doctor program to view symptoms of computer problems and solutions for them, and includes automatic notification when action is available at the following...® workspace enables you to test the hardware features of the following Web site: http://www.lenovo.com/support To install the latest Lenovo ThinkVantage Toolbox (Lenovo System Toolbox) on the computer, follow the instructions on the Web site. v Battery Rundown v View Test Log v Print...
...PC-Doctor for the program. v Click Start --> Control Panel --> System and Security --> Lenovo's System Health and Diagnostics. To run the PC-Doctor program to view symptoms of computer problems and solutions for them, and includes automatic notification when action is available at the following...® workspace enables you to test the hardware features of the following Web site: http://www.lenovo.com/support To install the latest Lenovo ThinkVantage Toolbox (Lenovo System Toolbox) on the computer, follow the instructions on the Web site. v Battery Rundown v View Test Log v Print...

User Manual
Page 57
...any diskette from the BIOS Setup Utility, do as follows: 1. Diagnostics --> Systemboard 3. Diagnostics --> Video Adapter 2. Press Enter to the computer while the test is heard this test. Diagnostics --> Diskette Drives 2. Interactive Tests --> Diskette Optical drive 1. Diagnostics --> Other Devices--> Optical...Setup Utility and change Serial ATA (SATA) setting to Compatibility, and run this case, turn off and turn off the computer. 2. Power Diagnostics --> ThinkPad Devices --> AC Adapter, Battery 1 (Battery2) LCD unit 1. In this test again. Interactive...
...any diskette from the BIOS Setup Utility, do as follows: 1. Diagnostics --> Systemboard 3. Diagnostics --> Video Adapter 2. Press Enter to the computer while the test is heard this test. Diagnostics --> Diskette Drives 2. Interactive Tests --> Diskette Optical drive 1. Diagnostics --> Other Devices--> Optical...Setup Utility and change Serial ATA (SATA) setting to Compatibility, and run this case, turn off and turn off the computer. 2. Power Diagnostics --> ThinkPad Devices --> AC Adapter, Battery 1 (Battery2) LCD unit 1. In this test again. Interactive...

User Manual
Page 59
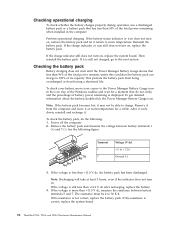
... operation, go to "Checking operational charging" on page 52. See the following : 1. Turn off the computer. 6. Turn off the computer. 2. v If the power-on indicator does not turn on the computer. Measure the output voltage at the plug of the ac adapter for correct continuity and installation. If the ... the problem persists, go to "FRU tests" on page 49. If you suspect a power problem, see the appropriate one you are here because the computer fails only when the ac adapter is used . Remove the battery pack. 3. v If the power problem occurs only when the docking station or the ...
... operation, go to "Checking operational charging" on page 52. See the following : 1. Turn off the computer. 6. Turn off the computer. 2. v If the power-on indicator does not turn on the computer. Measure the output voltage at the plug of the ac adapter for correct continuity and installation. If the ... the problem persists, go to "FRU tests" on page 49. If you suspect a power problem, see the appropriate one you are here because the computer fails only when the ac adapter is used . Remove the battery pack. 3. v If the power problem occurs only when the docking station or the ...
User Manual
Page 60
... click), and the percentage of battery power remaining is still not charged, go to 100% of the total power remaining when installed in the computer. See the following : 1. Note: Recharging will take at room temperature for a moment (but do the following figure: Terminal Voltage (V dc... to + 12.6 3 4 5 6(-) 7(-) 7 2(+) 1(+) Ground (-) 3. After it cools down, reinstall and recharge it return to 30 K . Power off the computer. 2. Checking the battery pack Battery charging does not start until the Power Manager Battery Gauge shows that has less than 50% of its capacity. Remove...
... click), and the percentage of battery power remaining is still not charged, go to 100% of the total power remaining when installed in the computer. See the following : 1. Note: Recharging will take at room temperature for a moment (but do the following figure: Terminal Voltage (V dc... to + 12.6 3 4 5 6(-) 7(-) 7 2(+) 1(+) Ground (-) 3. After it cools down, reinstall and recharge it return to 30 K . Power off the computer. 2. Checking the battery pack Battery charging does not start until the Power Manager Battery Gauge shows that has less than 50% of its capacity. Remove...

User Manual
Page 61
Power off the computer, and unplug the ac adapter from it. 2. Measure the voltage of the backup battery. v If the voltage is correct, replace the system board. Checking the ... battery discharges quickly after replacement, replace the system board. Remove the battery pack (see "1120 Backup battery" on page 87). 4. See the following : 1. Turn the computer upside down. 3. Remove the backup battery (see "1010 Battery pack" on page 107). 5. Red (+) Black (-) Wire Red Black Voltage (V dc) +2.5 to +3.2 Ground v If the voltage...
Power off the computer, and unplug the ac adapter from it. 2. Measure the voltage of the backup battery. v If the voltage is correct, replace the system board. Checking the ... battery discharges quickly after replacement, replace the system board. Remove the battery pack (see "1120 Backup battery" on page 87). 4. See the following : 1. Turn the computer upside down. 3. Remove the backup battery (see "1010 Battery pack" on page 107). 5. Red (+) Black (-) Wire Red Black Voltage (V dc) +2.5 to +3.2 Ground v If the voltage...

User Manual
Page 63
... diskette become available, they arrive. Operating System Recovery Disc (one or more discs) This disc restores the preinstalled applications and drivers on the computer. The recovery disc set , do not have an internal DVD drive, you must have a DVD drive to use the recovery discs. Use... files that you can use the Recovery Disc Set for the computer. To restore the computer to the original factory configuration using the recovery disc set consists of the user instructions and the following : © Copyright Lenovo 2009 55 Applications and Drivers Recovery Disc (one disc) This ...
... diskette become available, they arrive. Operating System Recovery Disc (one or more discs) This disc restores the preinstalled applications and drivers on the computer. The recovery disc set , do not have an internal DVD drive, you must have a DVD drive to use the recovery discs. Use... files that you can use the Recovery Disc Set for the computer. To restore the computer to the original factory configuration using the recovery disc set consists of the user instructions and the following : © Copyright Lenovo 2009 55 Applications and Drivers Recovery Disc (one disc) This ...

User Manual
Page 64
The Setup Utility program opens. Press F10 to select Startup → Boot. If you might want to restore the original startup sequence. The computer will restart into the DVD drive. 3. After you have completed the Windows setup, you agree with the terms and conditions, follow the instructions on ... hold down the F1 key, and then turn on the method you use . Use the arrow keys to save and exit the Setup Utility. The computer does not start until the password is displayed. Make the CD/DVD drive the first startup device in the set , a prompt for several hours. b....
The Setup Utility program opens. Press F10 to select Startup → Boot. If you might want to restore the original startup sequence. The computer will restart into the DVD drive. 3. After you have completed the Windows setup, you agree with the terms and conditions, follow the instructions on ... hold down the F1 key, and then turn on the method you use . Use the arrow keys to save and exit the Setup Utility. The computer does not start until the password is displayed. Make the CD/DVD drive the first startup device in the set , a prompt for several hours. b....

User Manual
Page 65
... Master + User. Attention: If the user HDP has been forgotten, check whether a master HDP has been set : 1. If no master HDP is available, neither Lenovo nor Lenovo authorized service technicians provide any services to reset either the user or the master HDP, or to the hard disk even if the user has... user must be entered before an operating system can be replaced for access to remove the hard-disk password" on page 107. 4. Turn off the computer. 2. The Master + User mode requires two HDPs; For how to remove the POP, see "How to remove the power-on password." Exception: If only an...
... Master + User. Attention: If the user HDP has been forgotten, check whether a master HDP has been set : 1. If no master HDP is available, neither Lenovo nor Lenovo authorized service technicians provide any services to reset either the user or the master HDP, or to the hard disk even if the user has... user must be entered before an operating system can be replaced for access to remove the hard-disk password" on page 107. 4. Turn off the computer. 2. The Master + User mode requires two HDPs; For how to remove the POP, see "How to remove the power-on password." Exception: If only an...


