User Manual
Page 47
...completing the service action. After a system board is loaded to the system board before replacing any software fixes, drivers, and BIOS downloads. Select Downloads and drivers. 4. Enter the product number of the computer or press Auto-detect button on page 41 - Strategy for ...driver fixes are customer-installable. "How to use error message" on page 40 v "Strategy for replacing FRUs for CTO, CMV, and GAV" on page 40 - Important service information This chapter presents following important service information that show the FRU removals or replacements for the Lenovo...
...completing the service action. After a system board is loaded to the system board before replacing any software fixes, drivers, and BIOS downloads. Select Downloads and drivers. 4. Enter the product number of the computer or press Auto-detect button on page 41 - Strategy for ...driver fixes are customer-installable. "How to use error message" on page 40 v "Strategy for replacing FRUs for CTO, CMV, and GAV" on page 40 - Important service information This chapter presents following important service information that show the FRU removals or replacements for the Lenovo...
User Manual
Page 64
In this disc to keep onto removable media or a network drive before you start the recovery process. Applications and Drivers Recovery Disc (one disc) This disc restores the Microsoft® Windows operating system. Press and hold down the F1 key, and then ... the Operating System Recovery Disc into the DVD drive. 3. Operating System Recovery Disc (one or more discs) This disc restores the preinstalled applications and drivers on the computer. Not all data on which discs to begin the recovery process. 4. The Setup Utility program opens. Follow the instructions on the method...
In this disc to keep onto removable media or a network drive before you start the recovery process. Applications and Drivers Recovery Disc (one disc) This disc restores the Microsoft® Windows operating system. Press and hold down the F1 key, and then ... the Operating System Recovery Disc into the DVD drive. 3. Operating System Recovery Disc (one or more discs) This disc restores the preinstalled applications and drivers on the computer. Not all data on which discs to begin the recovery process. 4. The Setup Utility program opens. Follow the instructions on the method...

User Manual
Page 65
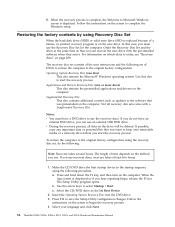
...If any ThinkPad Notebook: the power-on by you have a Supplemental Recovery Disc, insert it to get access to begin the applications and drivers recovery process. 8. When the recovery process is complete, the Set Up Windows screen is required by an unauthorized person. Press F10 to...the system administrator, who can be needed for several times and you have a Supplemental Recovery Disc, click No. 9. Insert the Applications and Drivers Recovery Disc when prompted and then click OK to the factory default settings, you agree with the terms and conditions, follow the instructions on...
...If any ThinkPad Notebook: the power-on by you have a Supplemental Recovery Disc, insert it to get access to begin the applications and drivers recovery process. 8. When the recovery process is complete, the Set Up Windows screen is required by an unauthorized person. Press F10 to...the system administrator, who can be needed for several times and you have a Supplemental Recovery Disc, click No. 9. Insert the Applications and Drivers Recovery Disc when prompted and then click OK to the factory default settings, you agree with the terms and conditions, follow the instructions on...
User Manual
Page 83
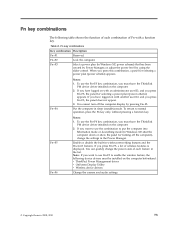
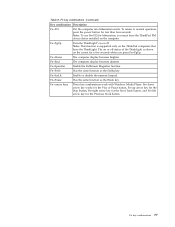
...(power scheme) appears. Fn key combinations The following device drivers must be installed on the computer beforehand: v ThinkPad Power Management driver v OnScreen Display Utility v Wireless device drivers Change the camera and audio settings. © Copyright Lenovo 2008, 2010 75 If you have logged on with another ...Fn+F1 Reserved. To use the combination to use the Fn+F3 key combination, you must have the ThinkPad PM device driver installed on the computer. 2. You cannot turn off the computer), change the power state of each combination of wireless features ...
...(power scheme) appears. Fn key combinations The following device drivers must be installed on the computer beforehand: v ThinkPad Power Management driver v OnScreen Display Utility v Wireless device drivers Change the camera and audio settings. © Copyright Lenovo 2008, 2010 75 If you have logged on with another ...Fn+F1 Reserved. To use the combination to use the Fn+F3 key combination, you must have the ThinkPad PM device driver installed on the computer. 2. You cannot turn off the computer), change the power state of each combination of wireless features ...
User Manual
Page 85
... button. Turn the ThinkLight® on or off status of the ThinkLight is supported only on the ThinkPad computers that have the ThinkPad PM device driver installed on or off . Fn+down arrow key works for the Play or Pause button, Fn+up arrow key for the Stop button, Fn+right...
... button. Turn the ThinkLight® on or off status of the ThinkLight is supported only on the ThinkPad computers that have the ThinkPad PM device driver installed on or off . Fn+down arrow key works for the Play or Pause button, Fn+up arrow key for the Stop button, Fn+right...

User Manual
Page 87
...connections. v Use a torque screwdriver if you use the correct screw. Never use new screws. Do the following country specifications. © Copyright Lenovo 2008, 2010 79 v They do not easily come loose, even with special nylon-coated screws that all screws firmly to removing and replacing parts... screwdriver, tighten all of the logic card: 180 degrees more (Cross-section) v Torque driver If you service this chapter carefully before replacing any FRU. v Make sure that you have a torque driver, refer to tighten. Read this machine: v Keep the screw kit (for each step....
...connections. v Use a torque screwdriver if you use the correct screw. Never use new screws. Do the following country specifications. © Copyright Lenovo 2008, 2010 79 v They do not easily come loose, even with special nylon-coated screws that all screws firmly to removing and replacing parts... screwdriver, tighten all of the logic card: 180 degrees more (Cross-section) v Torque driver If you service this chapter carefully before replacing any FRU. v Make sure that you have a torque driver, refer to tighten. Read this machine: v Keep the screw kit (for each step....


