
User Manual
Page 5
...LCD-related symptoms 52 Intermittent problems 53 Undetermined problems 53 FRU replacement notices 54 Screw notices 54 © Copyright Lenovo 2007 Retaining serial numbers 54 Removing and replacing a FRU 57 1010 Battery pack 58 1020 Ultrabay Enhanced device for R60, R61, and R61i 59 1030 Hard disk drive cover, hard disk...Express Mini Card for 802.11 a/b/g/n wireless LAN 76 1110 PCI Express Mini Card for wireless WAN for R60 and R61i 78 1120 Backup battery 79 1130 Keyboard bezel and wireless WAN antenna cable (AUX 80 1140 SIM card slot 82 1150 Fan assembly 83 1160 CPU 86 1170 LCD...
...LCD-related symptoms 52 Intermittent problems 53 Undetermined problems 53 FRU replacement notices 54 Screw notices 54 © Copyright Lenovo 2007 Retaining serial numbers 54 Removing and replacing a FRU 57 1010 Battery pack 58 1020 Ultrabay Enhanced device for R60, R61, and R61i 59 1030 Hard disk drive cover, hard disk...Express Mini Card for 802.11 a/b/g/n wireless LAN 76 1110 PCI Express Mini Card for wireless WAN for R60 and R61i 78 1120 Backup battery 79 1130 Keyboard bezel and wireless WAN antenna cable (AUX 80 1140 SIM card slot 82 1150 Fan assembly 83 1160 CPU 86 1170 LCD...

User Manual
Page 21
... power (primary voltage on the frame can continue without first correcting the problem. Check for worn, frayed, or pinched cables. Check for cracked or bulging batteries. 5. Blowers and fans - Use a meter to the safety of non-ThinkPad features or options not covered by this inspection guide is to attachment of any...
... power (primary voltage on the frame can continue without first correcting the problem. Check for worn, frayed, or pinched cables. Check for cracked or bulging batteries. 5. Blowers and fans - Use a meter to the safety of non-ThinkPad features or options not covered by this inspection guide is to attachment of any...
User Manual
Page 22
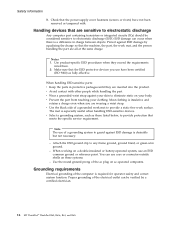
... product. Make sure that the machine, the part, the work surface. v Wear a grounded wrist strap against your skin to eliminate static on a double-insulated or battery-operated system, use have not been removed or tampered with other people while handling the part. When working on your clothing. Proper grounding of the...
... product. Make sure that the machine, the part, the work surface. v Wear a grounded wrist strap against your skin to eliminate static on a double-insulated or battery-operated system, use have not been removed or tampered with other people while handling the part. When working on your clothing. Proper grounding of the...
User Manual
Page 29
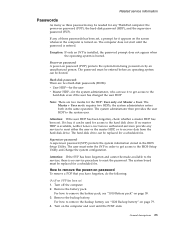
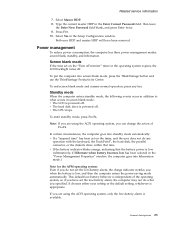
... it to get access to remove the backup battery, see "1010 Battery pack" on page 58. 3. The password must be entered before an operating system can be replaced for a scheduled fee. If no master HDP is available, neither Lenovo nor Lenovo authorized servicers provide any ThinkPad computer: the power...-on the screen whenever the computer is entered. Attention: If the SVP has been forgotten and cannot be made available to the servicer, there is booted. Remove the battery pack. For how ...
... it to get access to remove the backup battery, see "1010 Battery pack" on page 58. 3. The password must be entered before an operating system can be replaced for a scheduled fee. If no master HDP is available, neither Lenovo nor Lenovo authorized servicers provide any ThinkPad computer: the power...-on the screen whenever the computer is entered. Attention: If the SVP has been forgotten and cannot be made available to the servicer, there is booted. Remove the battery pack. For how ...
User Manual
Page 30
...Security, using the cursor directional keys to move down the menu. 5. The hard disk drive can be made available to the servicer, neither Lenovo nor Lenovo authorized servicers provide any services to reset the user HDPs or to remove the hard-disk password Attention: If User only mode is displayed....the POP. Click Yes. Select Hard-disk x password, where x is displayed at the lower-left of the hard disk drive. Reinstall the backup battery and the battery pack. (B) If an SVP has been set and is displayed. 3. For the other models, enter the master HDP. The computer restarts, and...
...Security, using the cursor directional keys to move down the menu. 5. The hard disk drive can be made available to the servicer, neither Lenovo nor Lenovo authorized servicers provide any services to reset the user HDPs or to remove the hard-disk password Attention: If User only mode is displayed....the POP. Click Yes. Select Hard-disk x password, where x is displayed at the lower-left of the hard disk drive. Reinstall the backup battery and the battery pack. (B) If an SVP has been set and is displayed. 3. For the other models, enter the master HDP. The computer restarts, and...
User Manual
Page 31
...drive is low, and then the computer enters the power-saving mode automatically. General descriptions 25 v The CPU stops. v If the battery indicator blinks orange, indicating that time. To end screen blank mode and resume normal operation, press any operation with the keyboard, the ...certain circumstances, the computer goes into screen blank mode, press the ThinkVantage button and use the ThinkVantage Productivity Center. This default low-battery behavior is powered off . so if you are using the ACPI operating system, you specified. Standby mode When the computer enters...
...drive is low, and then the computer enters the power-saving mode automatically. General descriptions 25 v The CPU stops. v If the battery indicator blinks orange, indicating that time. To end screen blank mode and resume normal operation, press any operation with the keyboard, the ...certain circumstances, the computer goes into screen blank mode, press the ThinkVantage button and use the ThinkVantage Productivity Center. This default low-battery behavior is powered off . so if you are using the ACPI operating system, you specified. Standby mode When the computer enters...

User Manual
Page 32
... mode and resumes operation. Hibernation mode In hibernation mode, the following : v Press the Fn key. v The time set the mode to Hibernate when battery becomes low, and the battery charge becomes critically low. If you do any input immediately after it and then try to resume normal operation, you will have set...
... mode and resumes operation. Hibernation mode In hibernation mode, the following : v Press the Fn key. v The time set the mode to Hibernate when battery becomes low, and the battery charge becomes critically low. If you do any input immediately after it and then try to resume normal operation, you will have set...

User Manual
Page 36
... R61i Remove the battery pack. 3. Check that the battery pack supplies power when you turn on the computer. Check that power is designed to help you troubleshoot and resolve problems related to display symptoms and solutions: v CHECK SYSTEM HEALTH v SYSTEM AND DEVICE TESTS v LENOVO TROUBLESHOOTING v CENTER ... LCD Info v Hardware Events Log Utility v Run External Tests v Surface Scan Hard Disk v Benchmark System v DOS Shell v Tech Support Form v Battery Rundown v View Test Log v Print Log v Save Log v Full Erase Hard Drive v Quick Erase Hard Drive PC-Doctor for Windows This product ...
... R61i Remove the battery pack. 3. Check that the battery pack supplies power when you turn on the computer. Check that power is designed to help you troubleshoot and resolve problems related to display symptoms and solutions: v CHECK SYSTEM HEALTH v SYSTEM AND DEVICE TESTS v LENOVO TROUBLESHOOTING v CENTER ... LCD Info v Hardware Events Log Utility v Run External Tests v Surface Scan Hard Disk v Benchmark System v DOS Shell v Tech Support Form v Battery Rundown v View Test Log v Print Log v Save Log v Full Erase Hard Drive v Quick Erase Hard Drive PC-Doctor for Windows This product ...
User Manual
Page 37
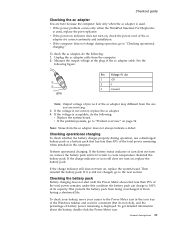
...servicing. 3. v If the problem persists, go to room temperature. Perform operational charging. If the charge indicator still does not turn on, remove the battery pack and let it is still not charged, go to 100% of the ac adapter may different from having a shortened life. under this condition ...the battery pack can charge to ″Checking operational charging.″ To check the ac adapter, do the following : 1. Unplug the ac adapter cable from...
...servicing. 3. v If the problem persists, go to room temperature. Perform operational charging. If the charge indicator still does not turn on, remove the battery pack and let it is still not charged, go to 100% of the ac adapter may different from having a shortened life. under this condition ...the battery pack can charge to ″Checking operational charging.″ To check the ac adapter, do the following : 1. Unplug the ac adapter cable from...
User Manual
Page 38
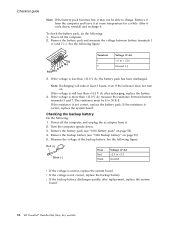
...5 Terminal 1 7 Voltage (V dc) + 0 to +3.2 Ground v If the voltage is more than +11.0 V dc, the battery pack has been discharged. Remove the battery pack and measure the voltage between battery terminals 5 and 7. If the resistance is still less than +11.0 V dc after replacement, replace the system board. 32 MT ThinkPad&#...174; ThinkPad R60, R60e, R61, and R61i Remove the backup battery (see "1010 Battery pack" on page 58). 4. Power off the computer, and unplug the ac adapter from the computer and leave it . 2. ...
...5 Terminal 1 7 Voltage (V dc) + 0 to +3.2 Ground v If the voltage is more than +11.0 V dc, the battery pack has been discharged. Remove the battery pack and measure the voltage between battery terminals 5 and 7. If the resistance is still less than +11.0 V dc after replacement, replace the system board. 32 MT ThinkPad&#...174; ThinkPad R60, R60e, R61, and R61i Remove the backup battery (see "1010 Battery pack" on page 58). 4. Power off the computer, and unplug the ac adapter from the computer and leave it . 2. ...
User Manual
Page 39
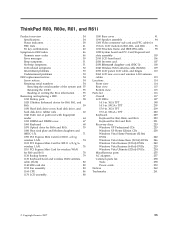
... serial number of the system unit 55 Retaining the UUID 55 Reading or writing the ECA information . . 55 Removing and replacing a FRU 57 1010 Battery pack 58 1020 Ultrabay Enhanced device for R60, R61, and R61i 59 1030 Hard disk drive cover, hard disk drive, and hard disk drive rubber... (32 bit) DVDs . . . 254 Miscellaneous parts 255 AC adapters 257 Common parts list 258 Tools 258 Power cords 259 Notices 260 Trademarks 261 © Copyright Lenovo 2007 33 LCD models in R60, R61, and R61i . . . 96 1210 Structure frame and IEEE1394 cable . . . 98 1220 System board and PC Card/...
... serial number of the system unit 55 Retaining the UUID 55 Reading or writing the ECA information . . 55 Removing and replacing a FRU 57 1010 Battery pack 58 1020 Ultrabay Enhanced device for R60, R61, and R61i 59 1030 Hard disk drive cover, hard disk drive, and hard disk drive rubber... (32 bit) DVDs . . . 254 Miscellaneous parts 255 AC adapters 257 Common parts list 258 Tools 258 Power cords 259 Notices 260 Trademarks 261 © Copyright Lenovo 2007 33 LCD models in R60, R61, and R61i . . . 96 1210 Structure frame and IEEE1394 cable . . . 98 1220 System board and PC Card/...
User Manual
Page 43
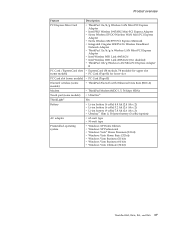
... v ThinkPad Modem (MDC-1.5, 56 kbps HDA) Touch pad (some models) v UltraNav® ThinkLight® Yes Battery v Li-ion battery (6 cells) 4.8 Ah (2.4 Ah x 2) v Li-ion battery (6 cells) 5.2 Ah (2.6 Ah x 2) v Li-ion battery (9 cells) 7.8 Ah (2.6 Ah x 3) v Ultrabay™ Slim Li Polymer battery (3 cells) (option) AC adapter v 65-watt type v 90-watt type Preinstalled operating system v Windows XP...
... v ThinkPad Modem (MDC-1.5, 56 kbps HDA) Touch pad (some models) v UltraNav® ThinkLight® Yes Battery v Li-ion battery (6 cells) 4.8 Ah (2.4 Ah x 2) v Li-ion battery (6 cells) 5.2 Ah (2.6 Ah x 2) v Li-ion battery (9 cells) 7.8 Ah (2.6 Ah x 3) v Ultrabay™ Slim Li Polymer battery (3 cells) (option) AC adapter v 65-watt type v 90-watt type Preinstalled operating system v Windows XP...
User Manual
Page 45
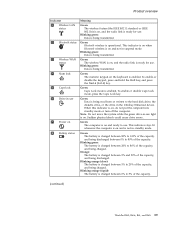
... the radio link is ready for use. To enable or disable Caps Lock mode, press the Caps Lock key. Blinking green: The battery is operational. Blinking orange (rapid): The battery is being discharged. Product overview Indicator 1 Wireless LAN status 2 Bluetooth status R 3 Wireless WAN status 4 Num lock 5 Caps lock...to use . When this indicator is on and not in standby mode. Sudden physical shock could cause drive errors. Blinking orange (slow): The battery is enabled. Blinking green: Data is on , do not put the computer into standby mode or turn off the computer. Green: The ...
... the radio link is ready for use. To enable or disable Caps Lock mode, press the Caps Lock key. Blinking green: The battery is operational. Blinking orange (rapid): The battery is being discharged. Product overview Indicator 1 Wireless LAN status 2 Bluetooth status R 3 Wireless WAN status 4 Num lock 5 Caps lock...to use . When this indicator is on and not in standby mode. Sudden physical shock could cause drive errors. Blinking orange (slow): The battery is enabled. Blinking green: Data is on , do not put the computer into standby mode or turn off the computer. Green: The ...
User Manual
Page 47
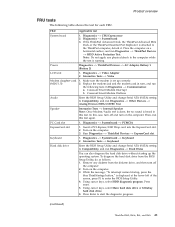
... to Compatibility, and run Diagnostics --> Fixed Disks You can also diagnose the hard disk drive without starting up correctly. 2. Power Diagnostics --> ThinkPad Devices --> AC Adapter, Battery 1 (Battery 2) LCD unit 1. Replace the modem jack and the modem card in turn on a horizontal surface, and run Diagnostics --> Other Devices --> Analog Devices HDA CODEC Test...
... to Compatibility, and run Diagnostics --> Fixed Disks You can also diagnose the hard disk drive without starting up correctly. 2. Power Diagnostics --> ThinkPad Devices --> AC Adapter, Battery 1 (Battery 2) LCD unit 1. Replace the modem jack and the modem card in turn on a horizontal surface, and run Diagnostics --> Other Devices --> Analog Devices HDA CODEC Test...
User Manual
Page 53
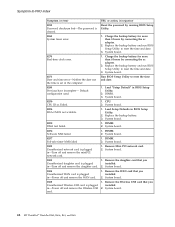
...More than 8 hours by pressing F10. 2. Press to reset the time and date. 0251 System CMOS checksum bad- Charge the backup battery for more than one specified in BIOS Setup Utility. 3. System board. 0199 System Security- Run BIOS Setup Utility, and then save ... Remove the Ethernet device that you installed; Run interactive tests of them. Extended RAM error- Default configuration used. 1. Replace the backup battery and run BIOS Setup Utility to continue. 1. Symptom-to reset the time and date. Otherwise, press Esc to ignore the warning message...
...More than 8 hours by pressing F10. 2. Press to reset the time and date. 0251 System CMOS checksum bad- Charge the backup battery for more than one specified in BIOS Setup Utility. 3. System board. 0199 System Security- Run BIOS Setup Utility, and then save ... Remove the Ethernet device that you installed; Run interactive tests of them. Extended RAM error- Default configuration used. 1. Replace the backup battery and run BIOS Setup Utility to continue. 1. Symptom-to reset the time and date. Otherwise, press Esc to ignore the warning message...
User Manual
Page 54
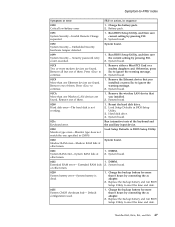
.... 1. DIMM. 2. System board. 1805 Unauthorized Wireless USB card is set in -Turn off and remove the miniPCI network card. 1. Replace the backup battery and run BIOS Setup Utility to reset the time and date. 3. DIMM. 2. System board. 1802 Unauthorized network card is plugged in BIOS Setup Utility.... in -Power off and remove the Wireless USB card. 1. Remove the WAN card that you Unauthorized daughter card is cleared. Replace the backup battery and run BIOS Setup Utility to reset the time and date. 3. System board. 02F0 CPU ID:xx Failed. 1. Load Setup Defaults in ...
.... 1. DIMM. 2. System board. 1805 Unauthorized Wireless USB card is set in -Turn off and remove the miniPCI network card. 1. Replace the backup battery and run BIOS Setup Utility to reset the time and date. 3. DIMM. 2. System board. 1802 Unauthorized network card is plugged in BIOS Setup Utility.... in -Power off and remove the Wireless USB card. 1. Remove the WAN card that you Unauthorized daughter card is cleared. Replace the backup battery and run BIOS Setup Utility to reset the time and date. 3. System board. 02F0 CPU ID:xx Failed. 1. Load Setup Defaults in ...

User Manual
Page 56
... and R61i System board. 1. Thermal grease. 3. Device not found. 1. System board. 1. Load "Setup Defaults" in the BIOS Setup Utility. 2. Backup battery. 3. Fan. 2. Check the status of device which you want to -FRU index Error messages Symptom or error Device address conflict. Check that the operating system... you want to boot from. 2. Device Error. 1. Failing bits: nnnn. Load "Setup Defaults" in the BIOS Setup Utility. 2. Backup battery. 3. Allocation error for device. DIMM. 2. System board. 1. Hibernation error. System board. System board.
... and R61i System board. 1. Thermal grease. 3. Device not found. 1. System board. 1. Load "Setup Defaults" in the BIOS Setup Utility. 2. Backup battery. 3. Fan. 2. Check the status of device which you want to -FRU index Error messages Symptom or error Device address conflict. Check that the operating system... you want to boot from. 2. Device Error. 1. Failing bits: nnnn. Load "Setup Defaults" in the BIOS Setup Utility. 2. Backup battery. 3. Allocation error for device. DIMM. 2. System board. 1. Hibernation error. System board. System board.

User Manual
Page 59
... external devices d. Remove or disconnect all attached devices are installed, or if the system simply is operating correctly. (See "Power system checkout" on the computer. 5. Battery pack e. Hard disk drive f. DIMM h. If the problem remains, replace the following devices: a. Run the diagnostic test for damage. Visually check each FRU for the...
... external devices d. Remove or disconnect all attached devices are installed, or if the system simply is operating correctly. (See "Power system checkout" on the computer. 5. Battery pack e. Hard disk drive f. DIMM h. If the problem remains, replace the following devices: a. Run the diagnostic test for damage. Visually check each FRU for the...
User Manual
Page 63
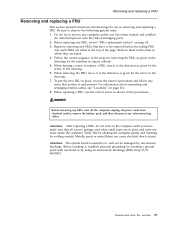
... parts or metal flakes can be removed before the failing FRU. Begin by removing any FRUs that all power cords from electrical outlets, remove the battery pack, and then disconnect any FRU, review "FRU replacement notices" on page 54. 3. Follow the correct sequence in which they are loose inside the computer...
... parts or metal flakes can be removed before the failing FRU. Begin by removing any FRUs that all power cords from electrical outlets, remove the battery pack, and then disconnect any FRU, review "FRU replacement notices" on page 54. 3. Follow the correct sequence in which they are loose inside the computer...
User Manual
Page 64
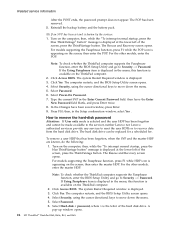
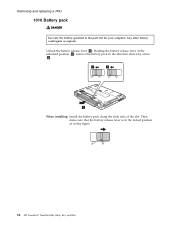
Removing and replacing a FRU 1010 Battery pack DANGER Use only the battery specified in the direction shown by arrow 3. 1 2 3 When installing: Install the battery pack along the slide rails of the slot. Holding the battery release lever in the unlocked position 2 , remove the battery pack in the parts list for your computer. Any other battery could ignite or explode. Then make sure that the battery release lever is in the locked position as in this figure. 58 MT ThinkPad® ThinkPad R60, R60e, R61, and R61i Unlock the battery release lever 1 .
Removing and replacing a FRU 1010 Battery pack DANGER Use only the battery specified in the direction shown by arrow 3. 1 2 3 When installing: Install the battery pack along the slide rails of the slot. Holding the battery release lever in the unlocked position 2 , remove the battery pack in the parts list for your computer. Any other battery could ignite or explode. Then make sure that the battery release lever is in the locked position as in this figure. 58 MT ThinkPad® ThinkPad R60, R60e, R61, and R61i Unlock the battery release lever 1 .


