
User Guide
Page 3
... for healthy work habits ...2-2 Accessibility information ...2-3 Adjusting your monitor image ...2-3 Using the direct access controls ...2-3 Using the On-Screen Display (OSD) controls ...2-3 Selecting a supported display mode ...2-5 Understanding power management ...2-6 Caring for your option ...1-5 Chapter 2. Reference information 3-1 Monitor specifications ...3-1 Troubleshooting ...3-2 Manual image setup ...3-3 Manually installing the monitor driver ...3-4 Service information ...3-6 Appendix A. ii Contents Safety information...
... for healthy work habits ...2-2 Accessibility information ...2-3 Adjusting your monitor image ...2-3 Using the direct access controls ...2-3 Using the On-Screen Display (OSD) controls ...2-3 Selecting a supported display mode ...2-5 Understanding power management ...2-6 Caring for your option ...1-5 Chapter 2. Reference information 3-1 Monitor specifications ...3-1 Troubleshooting ...3-2 Manual image setup ...3-3 Manually installing the monitor driver ...3-4 Service information ...3-6 Appendix A. ii Contents Safety information...

User Guide
Page 5
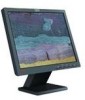
... Poster that was shipped with your monitor, please see "Detaching the monitor stand" on the ThinkVision™ L151 Flat Panel Monitor. Chapter 1. Shipping contents The product package should include the following items: · ThinkVision L151 Flat Panel Monitor Setup Poster · Monitor Safety, Troubleshooting, and Warranty Guide · Reference and Driver CD · ThinkVision L151 Flat Panel Monitor · Power Cord · Analog...
... Poster that was shipped with your monitor, please see "Detaching the monitor stand" on the ThinkVision™ L151 Flat Panel Monitor. Chapter 1. Shipping contents The product package should include the following items: · ThinkVision L151 Flat Panel Monitor Setup Poster · Monitor Safety, Troubleshooting, and Warranty Guide · Reference and Driver CD · ThinkVision L151 Flat Panel Monitor · Power Cord · Analog...
User Guide
Page 9
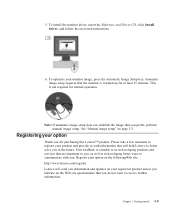
... the monitor driver, insert the Reference and Driver CD, click Install driver, and follow the on page 3-3. Register your option on the Web site questionnaire that you for at least 15 minutes. Getting started 1-5 Your feedback is valuable to receive further information. Registering your registered product unless you indicate on the followingWeb site: http://www.lenovo...
... the monitor driver, insert the Reference and Driver CD, click Install driver, and follow the on page 3-3. Register your option on the Web site questionnaire that you for at least 15 minutes. Getting started 1-5 Your feedback is valuable to receive further information. Registering your registered product unless you indicate on the followingWeb site: http://www.lenovo...
User Guide
Page 17
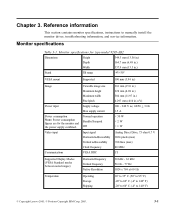
... Table 3-1. C% '6 !" ( 4' !" >$2 ? $ C% 74 !" ( 88 !" .* ;6:5 3 849 46 !" / - ;66 '76 >766 @76 1? (:66 466 >(56 ;566 1? (:66 466 >(56 ;566 1? © Copyright Lenovo 2005. © Portions Copyright IBM Corp. 2005. 3-1 Monitor specifications for type-model 9205-AB2 ! '55 ' >;' 74 ? ;45 8 >4 59 ? = ''8 @ >;' ' ? / (56 A'66 $2 ;66 >' @5 ? % $ $ #3 #3 3 % #3 % . % - !" $ C $2 " % % % '9; >;7 6 ? ::9 >9 @9 ? '65 >;; @8 ? 6 :@8 > 6;6 ? >$? ;66 ( :56 $ ) 46 76 A ' !" ;7 B '6 = B:= B;= ) 87 ;6:5 3 > 3? 849 > 3? 96 #!" 68$ %# !" Chapter 3. Reference...
... Table 3-1. C% '6 !" ( 4' !" >$2 ? $ C% 74 !" ( 88 !" .* ;6:5 3 849 46 !" / - ;66 '76 >766 @76 1? (:66 466 >(56 ;566 1? (:66 466 >(56 ;566 1? © Copyright Lenovo 2005. © Portions Copyright IBM Corp. 2005. 3-1 Monitor specifications for type-model 9205-AB2 ! '55 ' >;' 74 ? ;45 8 >4 59 ? = ''8 @ >;' ' ? / (56 A'66 $2 ;66 >' @5 ? % $ $ #3 #3 3 % #3 % . % - !" $ C $2 " % % % '9; >;7 6 ? ::9 >9 @9 ? '65 >;; @8 ? 6 :@8 > 6;6 ? >$? ;66 ( :56 $ ) 46 76 A ' !" ;7 B '6 = B:= B;= ) 87 ;6:5 3 > 3? 849 > 3? 96 #!" 68$ %# !" Chapter 3. Reference...

User Guide
Page 20
...from a list or Specific location(Advanced), and then click Next. 12. Choose ThinkVision L151 Monitor and click OK. Press to boot into the CD drive, then click the Have Disk button. 13. Installing the monitor driver in Windows XP To use the Plug and Play feature in Microsoft® Windows... 2000 Professional. Click the Settings tab. 6. Click OK. 14. Click the Drivers tab. 10. Insert the Setup CD into Windows XP. 4. Ensure that the monitor is connected correctly. 3. If the frequency is selected. 15. Turn off the computer and all attached devices. 2. Ensure that the CD ...
...from a list or Specific location(Advanced), and then click Next. 12. Choose ThinkVision L151 Monitor and click OK. Press to boot into the CD drive, then click the Have Disk button. 13. Installing the monitor driver in Windows XP To use the Plug and Play feature in Microsoft® Windows... 2000 Professional. Click the Settings tab. 6. Click OK. 14. Click the Drivers tab. 10. Insert the Setup CD into Windows XP. 4. Ensure that the monitor is connected correctly. 3. If the frequency is selected. 15. Turn off the computer and all attached devices. 2. Ensure that the CD ...

User Guide
Page 21
... the Monitor tab. 8. Open the Upgrade Device Driver Wizard window by clicking Start Settings Control Panel, and then double-clicking the Display icon. 5. Choose ThinkVision L151 Monitor and...Driver, and then click Next. 11. Select Display a list of the known drivers for this device so that the monitor is selected. 15. Ensure that the CD drive letter is connected correctly. 3. Click the Drivers...will be copied from the Reference and Driver CD. Note: On LCD monitors, unlike CRTs, a faster refresh rate does not improve display quality. Lenovo recommends using either 1024 x 768 at...
... the Monitor tab. 8. Open the Upgrade Device Driver Wizard window by clicking Start Settings Control Panel, and then double-clicking the Display icon. 5. Choose ThinkVision L151 Monitor and...Driver, and then click Next. 11. Select Display a list of the known drivers for this device so that the monitor is selected. 15. Ensure that the CD drive letter is connected correctly. 3. Click the Drivers...will be copied from the Reference and Driver CD. Note: On LCD monitors, unlike CRTs, a faster refresh rate does not improve display quality. Lenovo recommends using either 1024 x 768 at...


