
Hardware Maintenance Manual
Page 5
...General information . . . . . 9 Specifications 9 Chapter 4. General Checkout . . . . . 11 Chapter 5. Additional Service Information 43 © Copyright Lenovo 2012 iii Safety information 3 General safety 3 Electrical safety 3 Safety inspection guide 5 Handling electrostatic discharge-sensitive devices 5 Grounding requirements 6 Safety notices 6 Chapter 3. Replacing ... the keyboard and mouse 35 FRU lists 36 Chapter 9. Symptom-to-FRU Index . . 17 Hard disk drive boot error 17 Power Supply Problems 17 POST error codes 18 Undetermined problems 18 Chapter 7. Using the...
...General information . . . . . 9 Specifications 9 Chapter 4. General Checkout . . . . . 11 Chapter 5. Additional Service Information 43 © Copyright Lenovo 2012 iii Safety information 3 General safety 3 Electrical safety 3 Safety inspection guide 5 Handling electrostatic discharge-sensitive devices 5 Grounding requirements 6 Safety notices 6 Chapter 3. Replacing ... the keyboard and mouse 35 FRU lists 36 Chapter 9. Symptom-to-FRU Index . . 17 Hard disk drive boot error 17 Power Supply Problems 17 POST error codes 18 Undetermined problems 18 Chapter 7. Using the...
Hardware Maintenance Manual
Page 19
... length • Contain at least one alphabetic character and one numeric character • Setup Utility program and hard disk drive passwords are using the Setup Utility program, you must use your user name © Copyright Lenovo 2012 13 Using passwords By using . The following rules: • Must have to set any passwords to...
... length • Contain at least one alphabetic character and one numeric character • Setup Utility program and hard disk drive passwords are using the Setup Utility program, you must use your user name © Copyright Lenovo 2012 13 Using passwords By using . The following rules: • Must have to set any passwords to...

Hardware Maintenance Manual
Page 21
... enable or disable load onboard PXE (Preboot Execution Environment). The password dialog box will display that changes have been saved. 3. hard disk drives or the optical disk drive) are disabled, no USB devices can 't be displayed. Start the Setup Utility program (see "Starting the Setup Utility program"...Setup Utility 15 To enable or disable a device, do not want to the Setup Utility program menu and select the Exit option. 6. ATA Drives Setup press the Enter key , and then select SATA Mode. Select Exit. 4. Audio Setup press the Enter key, and then select Onboard ...
... enable or disable load onboard PXE (Preboot Execution Environment). The password dialog box will display that changes have been saved. 3. hard disk drives or the optical disk drive) are disabled, no USB devices can 't be displayed. Start the Setup Utility program (see "Starting the Setup Utility program"...Setup Utility 15 To enable or disable a device, do not want to the Setup Utility program menu and select the Exit option. 6. ATA Drives Setup press the Enter key , and then select SATA Mode. Select Exit. 4. Audio Setup press the Enter key, and then select Onboard ...

Hardware Maintenance Manual
Page 23
...Lenovo 2012 17 FRU/Action Reseat connectors Power Cord Power-on the boot drive. Power Supply Problems If you did receive a POST error message diagnose the POST error message first. • If you suspect a power problem, use the following causes. Replace the hard disk drive. Error The start-up drive...: • If you have the following procedures. Attempt to -FRU index lists error symptoms and possible causes. Hard disk drive boot error A hard disk drive boot error (error codes 1962 and I999030X) can also be formatted do the following for proper installation. •...
...Lenovo 2012 17 FRU/Action Reseat connectors Power Cord Power-on the boot drive. Power Supply Problems If you did receive a POST error message diagnose the POST error message first. • If you suspect a power problem, use the following causes. Replace the hard disk drive. Error The start-up drive...: • If you have the following procedures. Attempt to -FRU index lists error symptoms and possible causes. Hard disk drive boot error A hard disk drive boot error (error codes 1962 and I999030X) can also be formatted do the following for proper installation. •...

Hardware Maintenance Manual
Page 24
... Time are held pressed during POST. The CMOS battery is correctly installed. The computer loads the default configuration settings. Make sure the hard drive is no keys are invalid. Cannot initialize the keyboard. Make sure the keyboard is working If the POST detects a problem, an...found or initialized. When you have bootable media. This error might indicate that the boot drive is properly connected to appear. Undetermined problems If this computer has a parallel ATA hard disk drive, make sure that no longer functional. This error can cause several error messages to ...
... Time are held pressed during POST. The CMOS battery is correctly installed. The computer loads the default configuration settings. Make sure the hard drive is no keys are invalid. Cannot initialize the keyboard. Make sure the keyboard is working If the POST detects a problem, an...found or initialized. When you have bootable media. This error might indicate that the boot drive is properly connected to appear. Undetermined problems If this computer has a parallel ATA hard disk drive, make sure that no longer functional. This error can cause several error messages to ...
Hardware Maintenance Manual
Page 25
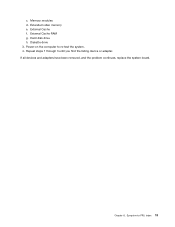
External Cache f. Chapter 6. Diskette drive 3. External Cache RAM g. If all devices and adapters have been removed, and the problem continues, replace the system board. Power-on the computer to -FRU Index 19 Memory modules d. Hard disk drive h. c. Symptom-to re-test the system. 4. Repeat steps 1 through 3 until you find the failing device or adapter. Extended video memory e.
External Cache f. Chapter 6. Diskette drive 3. External Cache RAM g. If all devices and adapters have been removed, and the problem continues, replace the system board. Power-on the computer to -FRU Index 19 Memory modules d. Hard disk drive h. c. Symptom-to re-test the system. 4. Repeat steps 1 through 3 until you find the failing device or adapter. Extended video memory e.

Hardware Maintenance Manual
Page 27
... of the computer. Memory card reader 7. Headphone connector 2. Microphone connector © Copyright Lenovo 2012 21 Locating components, controls and connectors The following illustration shows the location of the computer. 1. USB ports (2) 8. Power button 4. Eject button 3. Chapter 7. Hard disk drive indicator 5. Optical drive (selected models only) 6. Locations This section provides illustrations to help you to...
... of the computer. Memory card reader 7. Headphone connector 2. Microphone connector © Copyright Lenovo 2012 21 Locating components, controls and connectors The following illustration shows the location of the computer. 1. USB ports (2) 8. Power button 4. Eject button 3. Chapter 7. Hard disk drive indicator 5. Optical drive (selected models only) 6. Locations This section provides illustrations to help you to...

Hardware Maintenance Manual
Page 29
Chassis 7. Locations 23 System fan 3. Computer cover 2. Hard disk drive Chapter 7. 1 2 3 4 5 6 1. Motherboard 9 8 7 6. Heat-sink 4. Wi-Fi card 5. RTC battery 8. Memory module 9.
Chassis 7. Locations 23 System fan 3. Computer cover 2. Hard disk drive Chapter 7. 1 2 3 4 5 6 1. Motherboard 9 8 7 6. Heat-sink 4. Wi-Fi card 5. RTC battery 8. Memory module 9.
Hardware Maintenance Manual
Page 30
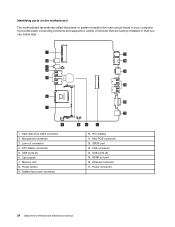
...-out port 16. Identifying parts on the motherboard The motherboard (sometimes called the planar or system board) is the main circuit board in your computer. Hard disk drive SATA connector 2. RTC battery connector 5.
...-out port 16. Identifying parts on the motherboard The motherboard (sometimes called the planar or system board) is the main circuit board in your computer. Hard disk drive SATA connector 2. RTC battery connector 5.

Hardware Maintenance Manual
Page 35
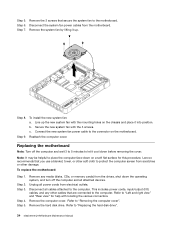
Lenovo recommends that you use a blanket, towel, or other soft cloth to protect the computer screen from scratches or other cables that secure the hard disk drive to "Removing the computer cover". Step 3. Remove the computer cover. Replacing hardware 29 Replacing the hard disk drive Attention.... Step 6. Line up the computer cover as shown. Lift up the computer cover with the chassis as shown. To replace the hard disk drive Step 1. Refer to the motherboard. b. Disconnect all attached devices. Step 7. Remove the 4 screws that are connected to the computer...
Lenovo recommends that you use a blanket, towel, or other soft cloth to protect the computer screen from scratches or other cables that secure the hard disk drive to "Removing the computer cover". Step 3. Remove the computer cover. Replacing hardware 29 Replacing the hard disk drive Attention.... Step 6. Line up the computer cover as shown. Lift up the computer cover with the chassis as shown. To replace the hard disk drive Step 1. Refer to the motherboard. b. Disconnect all attached devices. Step 7. Remove the 4 screws that are connected to the computer...

Hardware Maintenance Manual
Page 36
...removing the cover. 30 IdeaCentre Q190Hardware Maintenance Manual Step 9. Slide out the hard disk drive out of the hard disk drive and pull it out as follows: a. Reattach the computer cover. Step 10. Slide the new hard disk drive bay into position and secure it to the chassis with the 4 screws.... Slide the new hard disk drive and bay into bay and secure it to the bay with the 4 screws. Replacing a...
...removing the cover. 30 IdeaCentre Q190Hardware Maintenance Manual Step 9. Slide out the hard disk drive out of the hard disk drive and pull it out as follows: a. Reattach the computer cover. Step 10. Slide the new hard disk drive bay into position and secure it to the chassis with the 4 screws.... Slide the new hard disk drive and bay into bay and secure it to the bay with the 4 screws. Replacing a...
Hardware Maintenance Manual
Page 40
... minutes to let it cool down the operating system, and turn off the computer and all cables attached to the computer. Lenovo recommends that secure the system fan to place the computer face-down on the chassis and place it up the new system ...screws. Remove the computer cover. To install the new system fan: a. c. Step 5. Remove any other damage. Refer to "Replacing the hard disk drive". 34 IdeaCentre Q190Hardware Maintenance Manual Refer to "Removing the computer cover". Disconnect the system fan power cables from electrical outlets. Step 9. Disconnect ...
... minutes to let it cool down the operating system, and turn off the computer and all cables attached to the computer. Lenovo recommends that secure the system fan to place the computer face-down on the chassis and place it up the new system ...screws. Remove the computer cover. To install the new system fan: a. c. Step 5. Remove any other damage. Refer to "Replacing the hard disk drive". 34 IdeaCentre Q190Hardware Maintenance Manual Refer to "Removing the computer cover". Disconnect the system fan power cables from electrical outlets. Step 9. Disconnect ...
Hardware Maintenance Manual
Page 49
... either a single event , a daily event or a weekly event. • On LAN Wake Up: This feature allows LAN adapter card to wake the System. © Copyright Lenovo 2012 43 Automatic Power-On features The Automatic Power-On features within the Power Management menu allow you to control the power management features of...
... either a single event , a daily event or a weekly event. • On LAN Wake Up: This feature allows LAN adapter card to wake the System. © Copyright Lenovo 2012 43 Automatic Power-On features The Automatic Power-On features within the Power Management menu allow you to control the power management features of...

Safety and Warranty guide
Page 13
..., inspect and, if necessary, clean your safety and to maintain optimum computer performance, always follow these appliances can damage the monitor and data on the hard disk drive. 8 Safety and warranty guide If you notice external dust accumulation, then examine and remove dust from the electrical outlet; Inspect your computer in a well...
..., inspect and, if necessary, clean your safety and to maintain optimum computer performance, always follow these appliances can damage the monitor and data on the hard disk drive. 8 Safety and warranty guide If you notice external dust accumulation, then examine and remove dust from the electrical outlet; Inspect your computer in a well...
IdeaCentre Q190 Quick Reference
Page 1
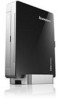
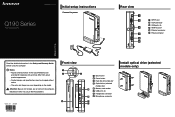
...view SPDIF port VGA connector USB ports (5) HDMI-out port Ethernet connector Power connector Read the detailed information in this computer. Q190 Series Tiny Desktop PC Initial setup instructions Connect to block any air vents on the model. Blocked air vents may vary .... • The color and shape may cause thermal problems. Front view Version: 1.0 2012.08 31503040 Install optical drive (selected models only) Eject button Power button Hard disk drive indicator Optical drive (selected models only) Memory card reader USB ports (2) Headphone connector Microphone connector 1 2
...view SPDIF port VGA connector USB ports (5) HDMI-out port Ethernet connector Power connector Read the detailed information in this computer. Q190 Series Tiny Desktop PC Initial setup instructions Connect to block any air vents on the model. Blocked air vents may vary .... • The color and shape may cause thermal problems. Front view Version: 1.0 2012.08 31503040 Install optical drive (selected models only) Eject button Power button Hard disk drive indicator Optical drive (selected models only) Memory card reader USB ports (2) Headphone connector Microphone connector 1 2
IdeaCentre Q190 User Guide
Page 7
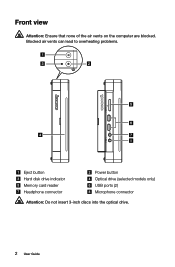
Front view Attention: Ensure that none of the air vents on the computer are blocked. Blocked air vents can lead to overheating problems. Eject button Hard disk drive indicator Memory card reader Headphone connector Power button Optical drive (selected models only) USB ports (2) Microphone connector Attention: Do not insert 3-inch discs into the optical drive. 2 User Guide
Front view Attention: Ensure that none of the air vents on the computer are blocked. Blocked air vents can lead to overheating problems. Eject button Hard disk drive indicator Memory card reader Headphone connector Power button Optical drive (selected models only) USB ports (2) Microphone connector Attention: Do not insert 3-inch discs into the optical drive. 2 User Guide
IdeaCentre Q190 User Guide
Page 20
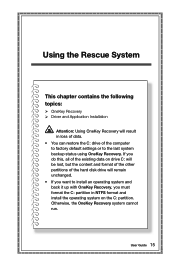
If you do this, all of the existing data on drive C: will remain unchanged. • If you want to the last system backup status using OneKey Recovery. User Guide 15 Using the Rescue System This chapter ...: OneKey Recovery Driver and Application Installation Attention: Using OneKey Recovery will result in loss of data. • You can restore the C: drive of the hard disk drive will be lost, but the content and format of the other partitions of the computer to factory default settings or to install an operating...
If you do this, all of the existing data on drive C: will remain unchanged. • If you want to the last system backup status using OneKey Recovery. User Guide 15 Using the Rescue System This chapter ...: OneKey Recovery Driver and Application Installation Attention: Using OneKey Recovery will result in loss of data. • You can restore the C: drive of the hard disk drive will be lost, but the content and format of the other partitions of the computer to factory default settings or to install an operating...

IdeaCentre Q190 User Guide
Page 36
... compliant products and taking advantage of the powermanagement features of the U.S. Department of Energy aimed at the time of electricity. Lenovo encourages you reduce the consumption of manufacture. Energy Star Statement ENERGY STAR® is proud to offer our customers products with... ENERGY STAR power-management features, by operating system. Microsoft Windows Vista, Windows 7 and Windows 8 Power plan: Balanced • Turn off hard disk drives: After 20 minutes - Hibernate: Never To awaken your computer from a Sleep or System Standby mode, press any key on your computer, ...
... compliant products and taking advantage of the powermanagement features of the U.S. Department of Energy aimed at the time of electricity. Lenovo encourages you reduce the consumption of manufacture. Energy Star Statement ENERGY STAR® is proud to offer our customers products with... ENERGY STAR power-management features, by operating system. Microsoft Windows Vista, Windows 7 and Windows 8 Power plan: Balanced • Turn off hard disk drives: After 20 minutes - Hibernate: Never To awaken your computer from a Sleep or System Standby mode, press any key on your computer, ...

IdeaCentre Q190 User Guide (Linux)
Page 7
Blocked air vents can lead to overheating problems. Eject button Hard disk drive indicator Memory card reader Headphone connector Power button Optical drive (selected models only) USB ports (2) Microphone connector Attention: Do not insert 3-inch discs into the optical drive. 2 User Guide Front view Attention: Ensure that none of the air vents on the computer are blocked.
Blocked air vents can lead to overheating problems. Eject button Hard disk drive indicator Memory card reader Headphone connector Power button Optical drive (selected models only) USB ports (2) Microphone connector Attention: Do not insert 3-inch discs into the optical drive. 2 User Guide Front view Attention: Ensure that none of the air vents on the computer are blocked.

Lenovo IdeaCentre Q190 Series User Guide
Page 7
Front view Attention: Ensure that none of the air vents on the computer are blocked. Blocked air vents can lead to overheating problems. Eject button Hard disk drive indicator Memory card reader Headphone connector Power button Optical drive (selected models only) USB ports (2) Microphone connector Attention: Do not insert 3-inch discs into the optical drive. 2 User Guide
Front view Attention: Ensure that none of the air vents on the computer are blocked. Blocked air vents can lead to overheating problems. Eject button Hard disk drive indicator Memory card reader Headphone connector Power button Optical drive (selected models only) USB ports (2) Microphone connector Attention: Do not insert 3-inch discs into the optical drive. 2 User Guide


