

Setup Guide
Page 5
Contents Introduction vi About the printer vi Other sources of information viii Step 1: Choose your setup (local or network printer) . . . . 1 Local printer 1 Network printer 1 Step 2: Install drivers for local printing 2 Windows 2 Macintosh 4 UNIX/Linux 7 Step 3: Unpack the printer 8 Step 4: Set up the printer and options 9 Positioning the optional drawer 9 Positioning the printer 11 Raising the paper rest 12 Attaching an operator panel overlay 12 Step 5: Install the print cartridge 13 Removing the packaging 13 Installing the print cartridge 15 Contents iii
Contents Introduction vi About the printer vi Other sources of information viii Step 1: Choose your setup (local or network printer) . . . . 1 Local printer 1 Network printer 1 Step 2: Install drivers for local printing 2 Windows 2 Macintosh 4 UNIX/Linux 7 Step 3: Unpack the printer 8 Step 4: Set up the printer and options 9 Positioning the optional drawer 9 Positioning the printer 11 Raising the paper rest 12 Attaching an operator panel overlay 12 Step 5: Install the print cartridge 13 Removing the packaging 13 Installing the print cartridge 15 Contents iii

Setup Guide
Page 18
.... One 250-sheet tray - Choose a firm, level surface away from the box. Print cartridge (shipped inside printer, wrapped in .) clearance on the right side of the printer for the trays, cover, and doors. Step 3: Unpack the printer Warning: Allow at http://support.lexmark.com. Make sure you need to function properly. 1 2 3 5 4 Select a well ventilated location...
.... One 250-sheet tray - Choose a firm, level surface away from the box. Print cartridge (shipped inside printer, wrapped in .) clearance on the right side of the printer for the trays, cover, and doors. Step 3: Unpack the printer Warning: Allow at http://support.lexmark.com. Make sure you need to function properly. 1 2 3 5 4 Select a well ventilated location...
Setup Guide
Page 25
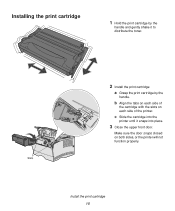
Installing the print cartridge 1 Hold the print cartridge by the handle and gently shake it snaps into place. 3 Close the upper front door. b Align the tabs on each side of the cartridge with the slots on both sides, or the printer will not function properly. c Slide the cartridge into the printer until it to distribute the toner. 2 Install the print cartridge: a Grasp the print cartridge by the handle. Slots Install the print cartridge 15 Make sure the door snaps closed on each side of the printer.
Installing the print cartridge 1 Hold the print cartridge by the handle and gently shake it snaps into place. 3 Close the upper front door. b Align the tabs on each side of the cartridge with the slots on both sides, or the printer will not function properly. c Slide the cartridge into the printer until it to distribute the toner. 2 Install the print cartridge: a Grasp the print cartridge by the handle. Slots Install the print cartridge 15 Make sure the door snaps closed on each side of the printer.

Quick Reference Guide
Page 2
...on the print media to locate a green lever. 3 Push down . 23x Paper Jam, Remove Tray1, Pull Down Lever At Printer Rear 1 Pull Tray 1 completely out. 2 Look under the back of the print cartridge. 3 Remove any jams. Note: You may be hot. 2 Remove any jams. Note: To clear the Paper Jam error message... left side to clear a jam in use. Note: Make sure the metal plate under the printer on the green lever. 24x Paper Jam, Check Tray 1 Gently open the tray until you have to remove the print cartridge to locate a green lever. To clear this area. 3 Close the rear output bin door. ...
...on the print media to locate a green lever. 3 Push down . 23x Paper Jam, Remove Tray1, Pull Down Lever At Printer Rear 1 Pull Tray 1 completely out. 2 Look under the back of the print cartridge. 3 Remove any jams. Note: You may be hot. 2 Remove any jams. Note: To clear the Paper Jam error message... left side to clear a jam in use. Note: Make sure the metal plate under the printer on the green lever. 24x Paper Jam, Check Tray 1 Gently open the tray until you have to remove the print cartridge to locate a green lever. To clear this area. 3 Close the rear output bin door. ...
User's Guide
Page 3
Contents Chapter 1: Printer overview 7 Chapter 2: Print media 9 Print media sources and specifications 10 Choosing the right print media 13 Paper ...13 Preprinted forms and letterhead 14 Transparencies ...15 ... Using the standard output bin 39 Raising the paper rest 39 Using the rear output bin 40 Clearing jams ...43 200 / 201 Paper Jam, Remove Cartridge 44 202 Paper Jam, Open Rear Door 46 23x Paper Jam (duplex jams 49 24x Paper Jam, Check Tray
Contents Chapter 1: Printer overview 7 Chapter 2: Print media 9 Print media sources and specifications 10 Choosing the right print media 13 Paper ...13 Preprinted forms and letterhead 14 Transparencies ...15 ... Using the standard output bin 39 Raising the paper rest 39 Using the rear output bin 40 Clearing jams ...43 200 / 201 Paper Jam, Remove Cartridge 44 202 Paper Jam, Open Rear Door 46 23x Paper Jam (duplex jams 49 24x Paper Jam, Check Tray

User's Guide
Page 5
... of supplies 119 Conserving supplies ...120 Ordering supplies ...121 Ordering a print cartridge 121 Ordering a charge roll 121 Storing the print cartridge 122 Changing the print cartridge 123 Removing the used print cartridge 123 Cleaning the printer 124 Installing the new print cartridge 124 Recycling Lexmark products 127 Replacing the charge roll 128 Removing options ...133 Removing the...
... of supplies 119 Conserving supplies ...120 Ordering supplies ...121 Ordering a print cartridge 121 Ordering a charge roll 121 Storing the print cartridge 122 Changing the print cartridge 123 Removing the used print cartridge 123 Cleaning the printer 124 Installing the new print cartridge 124 Recycling Lexmark products 127 Replacing the charge roll 128 Removing options ...133 Removing the...

User's Guide
Page 17
...125 in.) strip from the leading edge to prevent labels from peeling inside the printer. • Portrait orientation is not possible, a 3 mm (0.125 in.) strip should be removed on Lexmark's Web site at least 1 mm (0.04 in.) away from Tray 1 ...they may cause labels to the standard output bin; Partial sheets also contaminate your printer and your cartridge with adhesive, and could void your printer and cartridge warranties. • Use labels that can send labels to peel off during ...output bin. • Do not load labels together with laser printers. Choosing the right print media 17
...125 in.) strip from the leading edge to prevent labels from peeling inside the printer. • Portrait orientation is not possible, a 3 mm (0.125 in.) strip should be removed on Lexmark's Web site at least 1 mm (0.04 in.) away from Tray 1 ...they may cause labels to the standard output bin; Partial sheets also contaminate your printer and your cartridge with adhesive, and could void your printer and cartridge warranties. • Use labels that can send labels to peel off during ...output bin. • Do not load labels together with laser printers. Choosing the right print media 17

User's Guide
Page 43
... you must remove all jams out gently and slowly. The following table to locate instructions for a particular jam: Jam message 200 / 201 Paper Jam, Remove Cartridge 202 Paper Jam, Open Rear Door 23x Paper Jam (duplex jams) 24x Paper Jam, Check Tray 250 Paper Jam, Check MP Feeder Go to avoid... 202 Paper Jam 250 Paper Jam 24x Paper Jam 23x Paper Jam Use the following illustration shows the path that print media travels through the printer. Print media Clearing jams By carefully selecting print media and loading it properly, you should be able to page: 44 46 49 53 55 Note...
... you must remove all jams out gently and slowly. The following table to locate instructions for a particular jam: Jam message 200 / 201 Paper Jam, Remove Cartridge 202 Paper Jam, Open Rear Door 23x Paper Jam (duplex jams) 24x Paper Jam, Check Tray 250 Paper Jam, Check MP Feeder Go to avoid... 202 Paper Jam 250 Paper Jam 24x Paper Jam 23x Paper Jam Use the following illustration shows the path that print media travels through the printer. Print media Clearing jams By carefully selecting print media and loading it properly, you should be able to page: 44 46 49 53 55 Note...
User's Guide
Page 44
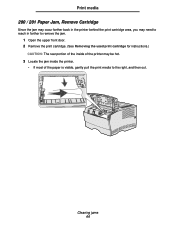
Clearing jams 44 Print media 200 / 201 Paper Jam, Remove Cartridge Since the jam may occur farther back in the printer behind the print cartridge area, you may need to reach in farther to remove the jam. 1 Open the upper front door. 2 Remove the print cartridge. (See Removing the used print cartridge for instructions.) CAUTION: The rear portion of the inside of the printer may be hot. 3 Locate the jam inside the printer. • If most of the paper is visible, gently pull the print media to the right, and then out.
Clearing jams 44 Print media 200 / 201 Paper Jam, Remove Cartridge Since the jam may occur farther back in the printer behind the print cartridge area, you may need to reach in farther to remove the jam. 1 Open the upper front door. 2 Remove the print cartridge. (See Removing the used print cartridge for instructions.) CAUTION: The rear portion of the inside of the printer may be hot. 3 Locate the jam inside the printer. • If most of the paper is visible, gently pull the print media to the right, and then out.

User's Guide
Page 89
...Emulation* PostScript emulation, compatible with Hewlett-Packard printers. Resource Save To determine what the printer does Off* with the inactive printer language. On Printer retains downloaded resources only until someone replaces the toner cartridge. Toner Alarm To specify how the printer Off* responds when it cancels the job... printing, displays an error message, and repeats three beeps every 10 seconds until the toner cartridge is displayed until memory is available. Using the printer menus 89 An error message is replaced. Note: Wait Timeout is only available when you use...
...Emulation* PostScript emulation, compatible with Hewlett-Packard printers. Resource Save To determine what the printer does Off* with the inactive printer language. On Printer retains downloaded resources only until someone replaces the toner cartridge. Toner Alarm To specify how the printer Off* responds when it cancels the job... printing, displays an error message, and repeats three beeps every 10 seconds until the toner cartridge is displayed until memory is available. Using the printer menus 89 An error message is replaced. Note: Wait Timeout is only available when you use...

User's Guide
Page 102
...or defined by the Paper Size or Paper Type settings for the message to clear. Remove the indicated print cartridge and install a new one. Busy The printer is busy receiving, processing, or printing data. • Wait for the message to open the Job Menu... message means What you how to the printer settings. See also: Changing the print cartridge Understanding the printer messages 102 This topic provides a list of all printer messages, explains what is activating PPDS emulation. 6 Understanding the printer messages The printer operator panel displays messages describing the current ...
...or defined by the Paper Size or Paper Type settings for the message to clear. Remove the indicated print cartridge and install a new one. Busy The printer is busy receiving, processing, or printing data. • Wait for the message to open the Job Menu... message means What you how to the printer settings. See also: Changing the print cartridge Understanding the printer messages 102 This topic provides a list of all printer messages, explains what is activating PPDS emulation. 6 Understanding the printer messages The printer operator panel displays messages describing the current ...

User's Guide
Page 103
... the current print job. Note: While the menus are disabled, you to clear. Warning: Do not turn the printer off while this message means The upper front door is open or the toner cartridge is waiting for the message to clear, then press Menu to all held jobs. The... the PIN you identified in the driver when you can do • Close the upper front door. • Install the print cartridge. The printer is defragmenting the flash memory to clear. Understanding the printer messages Message Close Door Deactivating PPDS Defragmenting DO NOT POWER OFF Delete All Jobs Go/Stop?
... the current print job. Note: While the menus are disabled, you to clear. Warning: Do not turn the printer off while this message means The upper front door is open or the toner cartridge is waiting for the message to clear, then press Menu to all held jobs. The... the PIN you identified in the driver when you can do • Close the upper front door. • Install the print cartridge. The printer is defragmenting the flash memory to clear. Understanding the printer messages Message Close Door Deactivating PPDS Defragmenting DO NOT POWER OFF Delete All Jobs Go/Stop?

User's Guide
Page 107
...means What you can occur if you update printer firmware or move a firmware card from Lexmark's Web site. 2 Paper Jam The printer detects a jam. 31 Missing or Defective The print cartridge is missing or is full. See also: Loading trays The printer has received a page of the buffer. ...• Press Menu to change printer settings The printer is waiting for the...
...means What you can occur if you update printer firmware or move a firmware card from Lexmark's Web site. 2 Paper Jam The printer detects a jam. 31 Missing or Defective The print cartridge is missing or is full. See also: Loading trays The printer has received a page of the buffer. ...• Press Menu to change printer settings The printer is waiting for the...
User's Guide
Page 108
...job. When Ready is allocated for the size paper you can do An unsupported print cartridge is correct for one . Understanding the printer messages Message 32 Unsupported Print Cartridge 34 Short Paper 35 Res Save Off Deficient Memory 37 Insufficient Collation Area 37 Insufficient Defrag... on the second line of the job. • Press Menu to print the formatted data. Understanding the printer messages 108 See also: Changing the print cartridge The printer has determined that prompted the message. • Make sure the Paper Size setting in the correct position. ...
...job. When Ready is allocated for the size paper you can do An unsupported print cartridge is correct for one . Understanding the printer messages Message 32 Unsupported Print Cartridge 34 Short Paper 35 Res Save Off Deficient Memory 37 Insufficient Collation Area 37 Insufficient Defrag... on the second line of the job. • Press Menu to print the formatted data. Understanding the printer messages 108 See also: Changing the print cartridge The printer has determined that prompted the message. • Make sure the Paper Size setting in the correct position. ...

User's Guide
Page 111
... replacement of the problem. top performance and avoid print quality and paper feed problems. The printer has detected that may require printer service. Plug in the print cartridge is disabled. • Press Go to clear the message. The Supplies message is not set to clear the message. ... displayed until you can do not have a print cartridge on hand, order one now. • Shake the print cartridge to utilize the remaining toner. • Replace the cartridge. • Press Go to printer problems that the toner supply in the printer and turn it on. See also: Changing the ...
... replacement of the problem. top performance and avoid print quality and paper feed problems. The printer has detected that may require printer service. Plug in the print cartridge is disabled. • Press Go to clear the message. The Supplies message is not set to clear the message. ... displayed until you can do not have a print cartridge on hand, order one now. • Shake the print cartridge to utilize the remaining toner. • Replace the cartridge. • Press Go to printer problems that the toner supply in the printer and turn it on. See also: Changing the ...

User's Guide
Page 114
...once Performing Self Test displays. 3 Select Prt Quality Pgs. The pages include: • An information page containing printer information, cartridge information, current margin settings, and a graphic to use to evaluate the print quality • Two pages with ...graphics to use to evaluate how well the printer is capable of printing various types of printing. To learn more about PDF printing and to download this utility, visit the Lexmark Web site at www.lexmark...
...once Performing Self Test displays. 3 Select Prt Quality Pgs. The pages include: • An information page containing printer information, cartridge information, current margin settings, and a graphic to use to evaluate the print quality • Two pages with ...graphics to use to evaluate how well the printer is capable of printing various types of printing. To learn more about PDF printing and to download this utility, visit the Lexmark Web site at www.lexmark...

User's Guide
Page 118
... site at 1-800-539-6275 for more information. See Changing the print cartridge and Cleaning the printer for information about Lexmark Authorized Supplies Dealers in your area. In the U.S., contact Lexmark at www.lexmark.com or contact the place where you bought your printer. Supplies and maintenance information 118 8 Supplies and maintenance information Section Maintaining the...
... site at 1-800-539-6275 for more information. See Changing the print cartridge and Cleaning the printer for information about Lexmark Authorized Supplies Dealers in your area. In the U.S., contact Lexmark at www.lexmark.com or contact the place where you bought your printer. Supplies and maintenance information 118 8 Supplies and maintenance information Section Maintaining the...
User's Guide
Page 119
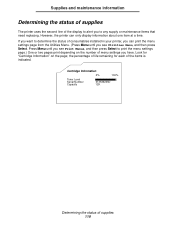
...life remaining for "Cartridge Information" on the number of menu settings you see Utilities Menu, and then press Select. If you want to any supply or maintenance items that need replacing. Supplies and maintenance information Determining the status of supplies The printer uses the second line... of the display to alert you to determine the status of consumables installed in your printer, you can only display information about one item at a time. Cartridge Information 0% 100% Toner Level Serial Number Capacity 013535245D 12K Determining the status of the items is...
...life remaining for "Cartridge Information" on the number of menu settings you see Utilities Menu, and then press Select. If you want to any supply or maintenance items that need replacing. Supplies and maintenance information Determining the status of supplies The printer uses the second line... of the display to alert you to determine the status of consumables installed in your printer, you can only display information about one item at a time. Cartridge Information 0% 100% Toner Level Serial Number Capacity 013535245D 12K Determining the status of the items is...

User's Guide
Page 121
... when the current one no longer prints satisfactorily. Order Lexmark part number 56P2341. In other countries or regions, visit the Lexmark Web site at 1-800-539-6275 for your printer are: Cartridge Type Part number Lexmark 4048 Return Program Print Cartridges 12A8420 12A8425 Lexmark 4048 Print Cartridges 12A8320 12A8325 * Yield based on approximately 5% coverage of pages. You can...
... when the current one no longer prints satisfactorily. Order Lexmark part number 56P2341. In other countries or regions, visit the Lexmark Web site at 1-800-539-6275 for your printer are: Cartridge Type Part number Lexmark 4048 Return Program Print Cartridges 12A8420 12A8425 Lexmark 4048 Print Cartridges 12A8320 12A8325 * Yield based on approximately 5% coverage of pages. You can...

User's Guide
Page 123
Changing the print cartridge 123 Removing the used print cartridge 1 Turn the printer off. 2 Open the upper front door. 3 Grasp the print cartridge by the handle and lift it aside. Handle 4 Set it out. For best results, use print cartridges from a thirdparty refiller. Supplies and maintenance information Changing the print cartridge Note: The manufacturer does not recommend that you do. Print quality and printer reliability cannot be guaranteed if you use genuine supplies.
Changing the print cartridge 123 Removing the used print cartridge 1 Turn the printer off. 2 Open the upper front door. 3 Grasp the print cartridge by the handle and lift it aside. Handle 4 Set it out. For best results, use print cartridges from a thirdparty refiller. Supplies and maintenance information Changing the print cartridge Note: The manufacturer does not recommend that you do. Print quality and printer reliability cannot be guaranteed if you use genuine supplies.


