User's Guide
Page 4
... the output bin ...37 Chapter 5: Maintenance 38 Maintaining your printer ...38 Determining the status of supplies ...38 Ordering supplies and maintenance items ...38 Ordering toner cartridges ...38 2
... the output bin ...37 Chapter 5: Maintenance 38 Maintaining your printer ...38 Determining the status of supplies ...38 Ordering supplies and maintenance items ...38 Ordering toner cartridges ...38 2

User's Guide
Page 5
... printer for long term storage 40 Storing supplies ...40 Storing media ...40 Storing the toner cartridges ...40 Replacing the toner cartridges ...41 Replacing the fuser ...44 Replacing the waste toner bottle ...47 Replacing the photodeveloper cartridge ...49 Recycling Lexmark products ...52 Cleaning the printhead lens ...52 Chapter 6: Clearing jams 55 Hints for avoiding jams...
... printer for long term storage 40 Storing supplies ...40 Storing media ...40 Storing the toner cartridges ...40 Replacing the toner cartridges ...41 Replacing the fuser ...44 Replacing the waste toner bottle ...47 Replacing the photodeveloper cartridge ...49 Recycling Lexmark products ...52 Cleaning the printhead lens ...52 Chapter 6: Clearing jams 55 Hints for avoiding jams...
User's Guide
Page 26
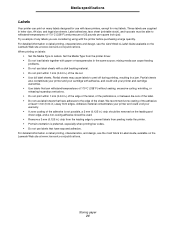
Partial sheets also contaminate your printer and your cartridge with adhesive, and could void your printer and cartridge warranties. • Use labels that can withstand temperatures of 170°C (338°F) without sealing, excessive curling, wrinkling, or releasing hazardous ...Storing paper 24 For detailed information on label printing, characteristics and design, see the Card Stock & Label Guide, available on the Lexmark Web site at www.lexmark.com/publications. Set the Media Type from edges. Partial sheets may cause labels to Labels. We recommend zone coating of the ...
Partial sheets also contaminate your printer and your cartridge with adhesive, and could void your printer and cartridge warranties. • Use labels that can withstand temperatures of 170°C (338°F) without sealing, excessive curling, wrinkling, or releasing hazardous ...Storing paper 24 For detailed information on label printing, characteristics and design, see the Card Stock & Label Guide, available on the Lexmark Web site at www.lexmark.com/publications. Set the Media Type from edges. Partial sheets may cause labels to Labels. We recommend zone coating of the ...

User's Guide
Page 40
...the messages comes on the operator panel, you should order the appropriate new print cartridge. Maintaining your printer, print the status page. In other countries or regions, visit the Lexmark Web site at 1-800-539-6275 for detailed instructions. Ordering supplies and maintenance items... To order supplies in the U.S., contact Lexmark at www.lexmark.com or contact the place where you bought your printer are: Part number Description of cartridge C500S2CG Cyan toner C500S2MG Magenta toner Yields are using the printer, you ...
...the messages comes on the operator panel, you should order the appropriate new print cartridge. Maintaining your printer, print the status page. In other countries or regions, visit the Lexmark Web site at 1-800-539-6275 for detailed instructions. Ordering supplies and maintenance items... To order supplies in the U.S., contact Lexmark at www.lexmark.com or contact the place where you bought your printer are: Part number Description of cartridge C500S2CG Cyan toner C500S2MG Magenta toner Yields are using the printer, you ...

User's Guide
Page 41
...voltage (220-240V/50-60Hz) printer. Ordering a photodeveloper cartridge When the Replace Belt CG message appears, the photodeveloper cartridge has been exhausted and will need to Ready. Order Lexmark part number C500X26G.After a new photodeveloper cartridge is installed, reset the photodeveloper count. 1 Make sure ...Belt CG, and then press . 6 Press until you see the Menus and Messages Guide on an approximate coverage of cartridge C500S2YG Yellow toner C500S2KG Black toner C500H2CG Cyan high yield toner C500H2MG Magenta high yield toner C500H2YG Yellow high yield toner...
...voltage (220-240V/50-60Hz) printer. Ordering a photodeveloper cartridge When the Replace Belt CG message appears, the photodeveloper cartridge has been exhausted and will need to Ready. Order Lexmark part number C500X26G.After a new photodeveloper cartridge is installed, reset the photodeveloper count. 1 Make sure ...Belt CG, and then press . 6 Press until you see the Menus and Messages Guide on an approximate coverage of cartridge C500S2YG Yellow toner C500S2KG Black toner C500H2CG Cyan high yield toner C500H2MG Magenta high yield toner C500H2YG Yellow high yield toner...

User's Guide
Page 42
...gases are ready to install them. To pull the fuser pressure release levers open and then store the fuser. Do not store toner cartridges in their original packaging until you are present • An environment with salty air Maintaining your printer for an extended period, remove ...the fuser. Storing supplies Use the following guidelines for long term storage 40 Storing the toner cartridges Store toner cartridges in : • Temperatures greater than directly on the floor. • If you turn the printer off for long term storage ...
...gases are ready to install them. To pull the fuser pressure release levers open and then store the fuser. Do not store toner cartridges in their original packaging until you are present • An environment with salty air Maintaining your printer for an extended period, remove ...the fuser. Storing supplies Use the following guidelines for long term storage 40 Storing the toner cartridges Store toner cartridges in : • Temperatures greater than directly on the floor. • If you turn the printer off for long term storage ...
User's Guide
Page 43
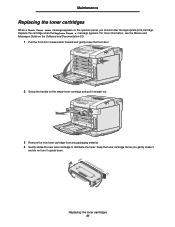
... as you should order the appropriate print cartridge. Replacing the toner cartridges 41 For more information, see the Menus and Messages Guide on the Software and Documentation CD. 1 Pull the front door release latch forward and ...do not turn it straight out. 3 Remove the new toner cartridge from any packaging material. 4 Gently shake the new toner cartridge to distribute the toner. Maintenance Replacing the toner cartridges When a Check Toner xxxx message appears on the empty toner cartridge and pull it upside down. Replace the cartridge when the Replace Toner x message appears.
... as you should order the appropriate print cartridge. Replacing the toner cartridges 41 For more information, see the Menus and Messages Guide on the Software and Documentation CD. 1 Pull the front door release latch forward and ...do not turn it straight out. 3 Remove the new toner cartridge from any packaging material. 4 Gently shake the new toner cartridge to distribute the toner. Maintenance Replacing the toner cartridges When a Check Toner xxxx message appears on the empty toner cartridge and pull it upside down. Replace the cartridge when the Replace Toner x message appears.
User's Guide
Page 44
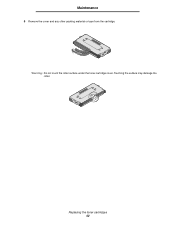
Replacing the toner cartridges 42 Touching the surface may damage the roller. Warning: Do not touch the roller surface under the toner cartridge cover. Maintenance 5 Remove the cover and any other packing material or tape from the cartridge.
Replacing the toner cartridges 42 Touching the surface may damage the roller. Warning: Do not touch the roller surface under the toner cartridge cover. Maintenance 5 Remove the cover and any other packing material or tape from the cartridge.
User's Guide
Page 45
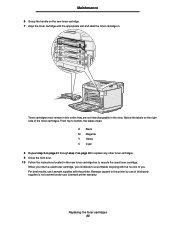
... the front door. 10 Follow the instructions located in . Replacing the toner cartridges 43 Damage caused to the printer by use Lexmark supplies with the appropriate slot and slide the toner cartridge in the new toner cartridge box to recycle the used toner cartridge, you contribute to a worldwide recycling effort at no cost to you...
... the front door. 10 Follow the instructions located in . Replacing the toner cartridges 43 Damage caused to the printer by use Lexmark supplies with the appropriate slot and slide the toner cartridge in the new toner cartridge box to recycle the used toner cartridge, you contribute to a worldwide recycling effort at no cost to you...
User's Guide
Page 51
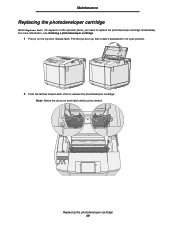
Note: Notice the arrow on each other to release the photodeveloper cartridge. Replacing the photodeveloper cartridge 49 Pull the top door up on the top door release latch. Maintenance Replacing the photodeveloper cartridge When Replace Belt CG appears on the operator panel, you need to its open position. 2 Push the latches toward each latch which points inward. For more information, see Ordering a photodeveloper cartridge. 1 Pull up , then rotate it backwards to replace the photodeveloper cartridge immediately.
Note: Notice the arrow on each other to release the photodeveloper cartridge. Replacing the photodeveloper cartridge 49 Pull the top door up on the top door release latch. Maintenance Replacing the photodeveloper cartridge When Replace Belt CG appears on the operator panel, you need to its open position. 2 Push the latches toward each latch which points inward. For more information, see Ordering a photodeveloper cartridge. 1 Pull up , then rotate it backwards to replace the photodeveloper cartridge immediately.
User's Guide
Page 52
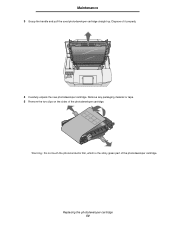
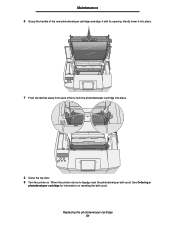
Dispose of the photodeveloper cartridge. Warning: Do not touch the photoconductor film, which is the shiny green part of it properly. 4 Carefully unpack the new photodeveloper cartridge. Replacing the photodeveloper cartridge 50 Maintenance 3 Grasp the handle and pull the used photodeveloper cartridge straight up. Remove any packaging material or tape. 5 Remove the two clips on the sides of the photodeveloper cartridge.
Dispose of the photodeveloper cartridge. Warning: Do not touch the photoconductor film, which is the shiny green part of it properly. 4 Carefully unpack the new photodeveloper cartridge. Replacing the photodeveloper cartridge 50 Maintenance 3 Grasp the handle and pull the used photodeveloper cartridge straight up. Remove any packaging material or tape. 5 Remove the two clips on the sides of the photodeveloper cartridge.
User's Guide
Page 53
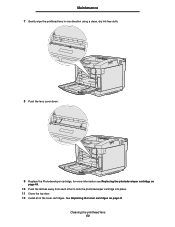
When the printer returns to lock the photodeveloper cartridge into place. 8 Close the top door. 9 Turn the printer on resetting the belt count. Gently lower it with its opening. Replacing the photodeveloper cartridge 51 Maintenance 6 Grasp the handle of the new photodeveloper cartridge and align it into place. 7 Push the latches away from each other to Ready, reset the photodeveloper belt count. See Ordering a photodeveloper cartridge for information on .
When the printer returns to lock the photodeveloper cartridge into place. 8 Close the top door. 9 Turn the printer on resetting the belt count. Gently lower it with its opening. Replacing the photodeveloper cartridge 51 Maintenance 6 Grasp the handle of the new photodeveloper cartridge and align it into place. 7 Push the latches away from each other to Ready, reset the photodeveloper belt count. See Ordering a photodeveloper cartridge for information on .
User's Guide
Page 54
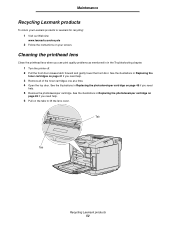
.... 6 Pull on page 49 if you need help . 5 Remove the photodeveloper cartridge. See the illustrations in Replacing the toner cartridges on your Lexmark products to Lexmark for recycling: 1 Visit our Web site: www.lexmark.com/recycle 2 Follow the instructions on page 41 if you see print quality problems... as mentioned in in Replacing the photodeveloper cartridge on the tabs to lift the lens cover. Tab Tab Recycling Lexmark products 52 Cleaning the printhead lens Clean the printhead lens when you need help . 3 Remove ...
.... 6 Pull on page 49 if you need help . 5 Remove the photodeveloper cartridge. See the illustrations in Replacing the toner cartridges on your Lexmark products to Lexmark for recycling: 1 Visit our Web site: www.lexmark.com/recycle 2 Follow the instructions on page 41 if you see print quality problems... as mentioned in in Replacing the photodeveloper cartridge on the tabs to lift the lens cover. Tab Tab Recycling Lexmark products 52 Cleaning the printhead lens Clean the printhead lens when you need help . 3 Remove ...
User's Guide
Page 55
Maintenance 7 Gently wipe the printhead lens in one direction using a clean, dry lint-free cloth. 8 Push the lens cover down. 9 Replace the Photodeveloper cartridge, for more information see Replacing the photodeveloper cartridge on page 41. See Replacing the toner cartridges on page 49. 10 Push the latches away from each other to lock the photodeveloper cartridge into place. 11 Close the top door. 12 Install all of the toner cartridges. Cleaning the printhead lens 53
Maintenance 7 Gently wipe the printhead lens in one direction using a clean, dry lint-free cloth. 8 Push the lens cover down. 9 Replace the Photodeveloper cartridge, for more information see Replacing the photodeveloper cartridge on page 41. See Replacing the toner cartridges on page 49. 10 Push the latches away from each other to lock the photodeveloper cartridge into place. 11 Close the top door. 12 Install all of the toner cartridges. Cleaning the printhead lens 53
User's Guide
Page 69
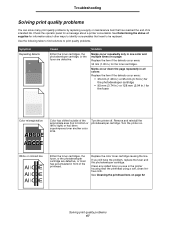
...in all colors: Replace the item if the defects occur every: • 35 mm (1.38 in.) or 95 mm (3.74 in.) for the photodeveloper cartridge • 95 mm (3.74 in.) or 128 mm (5.04 in the printer housing near the printhead using a soft, clean lintfree cloth. Remove and... reinstall the photodeveloper cartridge. See Determining the status of its intended life. Troubleshooting Solving print quality problems You can solve many print quality problems by replacing a supply or ...
...in all colors: Replace the item if the defects occur every: • 35 mm (1.38 in.) or 95 mm (3.74 in.) for the photodeveloper cartridge • 95 mm (3.74 in.) or 128 mm (5.04 in the printer housing near the printhead using a soft, clean lintfree cloth. Remove and... reinstall the photodeveloper cartridge. See Determining the status of its intended life. Troubleshooting Solving print quality problems You can solve many print quality problems by replacing a supply or ...

User's Guide
Page 70
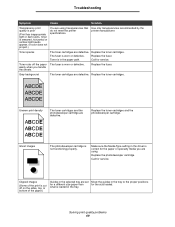
...rough finishes. Replace the needed . Avoid textured paper with rough finishes. Make sure the paper you are using . Replace the toner cartridges. Print irregularities ABCDE ABCDE ABCDE Paper has absorbed moisture due to If paper is smeared before fusing to high humidity. You are using... paper that does not meet the printer specifications. Replace the fuser. The toner cartridges may be defective, empty, or worn. The toner cartridges are defective or have been installed in more than one printer. the paper. Load paper from a new ...
...rough finishes. Replace the needed . Avoid textured paper with rough finishes. Make sure the paper you are using . Replace the toner cartridges. Print irregularities ABCDE ABCDE ABCDE Paper has absorbed moisture due to If paper is smeared before fusing to high humidity. You are using... paper that does not meet the printer specifications. Replace the fuser. The toner cartridges may be defective, empty, or worn. The toner cartridges are defective or have been installed in more than one printer. the paper. Load paper from a new ...
User's Guide
Page 71
Toner is in the tray. ABCDE ABCDE ABCDE Uneven print density ABCDE ABCDE ABCDE The toner cartridges and the photodeveloper cartridge are defective. Make sure the Media Type setting in the tray to the proper positions for a ... do not meet the printer specifications. Replace the toner cartridges. Replace the toner cartridges. Call for service. Gray background The toner cartridges are defective. Ghost images The photodeveloper cartridge is worn or defective. Toner specks The toner cartridges are defective. The fuser is not functioning properly. Replace...
Toner is in the tray. ABCDE ABCDE ABCDE Uneven print density ABCDE ABCDE ABCDE The toner cartridges and the photodeveloper cartridge are defective. Make sure the Media Type setting in the tray to the proper positions for a ... do not meet the printer specifications. Replace the toner cartridges. Replace the toner cartridges. Call for service. Gray background The toner cartridges are defective. Ghost images The photodeveloper cartridge is worn or defective. Toner specks The toner cartridges are defective. The fuser is not functioning properly. Replace...
User's Guide
Page 72
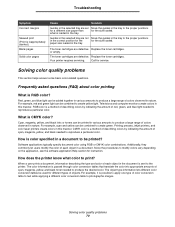
.... When a user prints a document, information describing the type and color of red, green, and blue light needed to print? The toner cartridges are defective. Frequently asked questions (FAQ) about color printing What is a method of describing colors by indicating the amount of each object in... the guides in the tray to the proper positions for a different size paper than for instruction. or empty. The toner cartridges are defective Replace the toner cartridges. What is possible to produce a large range of objects. Cyan, magenta, yellow, and black inks or toners can be...
.... When a user prints a document, information describing the type and color of red, green, and blue light needed to print? The toner cartridges are defective. Frequently asked questions (FAQ) about color printing What is a method of describing colors by indicating the amount of each object in... the guides in the tray to the proper positions for a different size paper than for instruction. or empty. The toner cartridges are defective Replace the toner cartridges. What is possible to produce a large range of objects. Cyan, magenta, yellow, and black inks or toners can be...

User's Guide
Page 80
... to that the warranty period for any supplies and for this statement is defaced, altered, in need of all print cartridges, programs, data, and removable storage media (unless directed otherwise by a Lexmark warranty, technical support may recover actual damages up , depleted, or consumed. This limitation of such damages. The Fuser Unit and...
... to that the warranty period for any supplies and for this statement is defaced, altered, in need of all print cartridges, programs, data, and removable storage media (unless directed otherwise by a Lexmark warranty, technical support may recover actual damages up , depleted, or consumed. This limitation of such damages. The Fuser Unit and...
User's Guide
Page 82
...hints to avoid 55 L labels guidelines 24 printer maintenance 24 laser notices 77 letterhead 21 guidelines 21 page orientation 22 printing 22 Lexmark Authorized Supplies Dealers 38 loading standard tray envelopes 34 letterhead 34 trays optional 530-sheet tray 30 standard tray 30 M Macintosh 16 ...maintaining the printer 38 toner cartridges, storing 40 media guidelines 18 letterhead 21 letterhead, printing 22 letterhead guidelines 21 loading instructions based on source 22 storing 25, 40...
...hints to avoid 55 L labels guidelines 24 printer maintenance 24 laser notices 77 letterhead 21 guidelines 21 page orientation 22 printing 22 Lexmark Authorized Supplies Dealers 38 loading standard tray envelopes 34 letterhead 34 trays optional 530-sheet tray 30 standard tray 30 M Macintosh 16 ...maintaining the printer 38 toner cartridges, storing 40 media guidelines 18 letterhead 21 letterhead, printing 22 letterhead guidelines 21 loading instructions based on source 22 storing 25, 40...

