
User's Guide
Page 24
...530-sheet drawer Print side Printed letterhead faceup Printed letterhead faceup Top of page Letterhead goes toward the rear of the tray Letterhead goes toward the rear of any envelopes you are considering using with 100% cotton content must be set the Media Type to...You can print directly on the transparencies you are considering before buying large quantities. Lexmark recommends Lexmark part number 12A5940 for letter-size transparencies and Lexmark part number 12A5941 for help prevent jams. Check with the manufacturer or vendor to 170°C (338°F). See ...
...530-sheet drawer Print side Printed letterhead faceup Printed letterhead faceup Top of page Letterhead goes toward the rear of the tray Letterhead goes toward the rear of any envelopes you are considering using with 100% cotton content must be set the Media Type to...You can print directly on the transparencies you are considering before buying large quantities. Lexmark recommends Lexmark part number 12A5940 for letter-size transparencies and Lexmark part number 12A5941 for help prevent jams. Check with the manufacturer or vendor to 170°C (338°F). See ...
User's Guide
Page 59
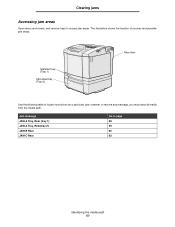
Jam message JAM-A Tray, Rear (tray 1) JAM-A Tray, Rear(tray 2) JAM-B Rear JAM-C Rear Go to access jam areas. Clearing jams Accessing jam areas Open doors and covers, and remove trays to page 58 59 60 62 Identifying the media path 57 The illustration shows the location of sources and possible jam areas. Standard tray (Tray 1) 530-sheet tray (Tray 2) Rear door Use the following table to resolve any message, you must clear all media from the media path. however, to locate instructions for a particular jam;
Jam message JAM-A Tray, Rear (tray 1) JAM-A Tray, Rear(tray 2) JAM-B Rear JAM-C Rear Go to access jam areas. Clearing jams Accessing jam areas Open doors and covers, and remove trays to page 58 59 60 62 Identifying the media path 57 The illustration shows the location of sources and possible jam areas. Standard tray (Tray 1) 530-sheet tray (Tray 2) Rear door Use the following table to resolve any message, you must clear all media from the media path. however, to locate instructions for a particular jam;
User's Guide
Page 60
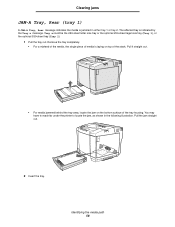
... tray 1 or tray 2. The affected tray is indicated by the Tray x message. Pull it straight out. • For media jammed behind the tray area, locate the jam on top of the tray housing. Tray x could be the 250-sheet letter size tray or the optional 250-sheet legal size... tray (Tray 1), or the optional 530-sheet tray (Tray 2). 1 Pull the tray out. Clearing jams JAM-A Tray, Rear (tray 1) A JAM-A Tray, Rear message indicates the media is jammed in the ...
... tray 1 or tray 2. The affected tray is indicated by the Tray x message. Pull it straight out. • For media jammed behind the tray area, locate the jam on top of the tray housing. Tray x could be the 250-sheet letter size tray or the optional 250-sheet legal size... tray (Tray 1), or the optional 530-sheet tray (Tray 2). 1 Pull the tray out. Clearing jams JAM-A Tray, Rear (tray 1) A JAM-A Tray, Rear message indicates the media is jammed in the ...
User's Guide
Page 61
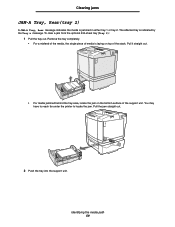
... Push the tray into the support unit. ABC • For media jammed behind the tray area, locate the jam on top of the support unit. Identifying the media path 59 Clearing jams JAM-A Tray, Rear(tray 2) A JAM-A Tray, Rear message indicates the media is indicated by the Tray x message. The ...affected tray is jammed in either tray 1 or tray 2. Remove the tray completely. • For a misfeed of the ...
... Push the tray into the support unit. ABC • For media jammed behind the tray area, locate the jam on top of the support unit. Identifying the media path 59 Clearing jams JAM-A Tray, Rear(tray 2) A JAM-A Tray, Rear message indicates the media is indicated by the Tray x message. The ...affected tray is jammed in either tray 1 or tray 2. Remove the tray completely. • For a misfeed of the ...
User's Guide
Page 62
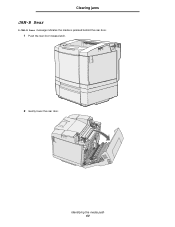
Clearing jams JAM-B Rear A JAM-B Rear message indicates the media is jammed behind the rear door. 1 Push the rear door release latch. 2 Gently lower the rear door. Identifying the media path 60
Clearing jams JAM-B Rear A JAM-B Rear message indicates the media is jammed behind the rear door. 1 Push the rear door release latch. 2 Gently lower the rear door. Identifying the media path 60
User's Guide
Page 63
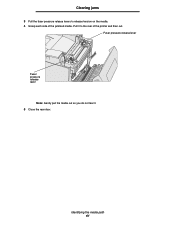
Clearing jams 3 Pull the fuser pressure release levers to the rear of the jammed media. Pull it . 5 Close the rear door. Identifying the media path 61 Fuser pressure release lever Fuser pressure release lever Note: Gently pull the media out so you do not tear it to release tension on the media. 4 Grasp each side of the printer and then out.
Clearing jams 3 Pull the fuser pressure release levers to the rear of the jammed media. Pull it . 5 Close the rear door. Identifying the media path 61 Fuser pressure release lever Fuser pressure release lever Note: Gently pull the media out so you do not tear it to release tension on the media. 4 Grasp each side of the printer and then out.
User's Guide
Page 64
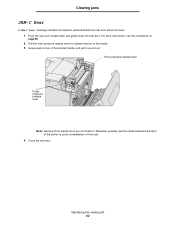
... the fuser pressure release levers to avoid contamination of the jammed media, and pull it . Identifying the media path 62 Clearing jams JAM-C Rear A JAM-C Rear message indicates the media is jammed behind the rear door above the fuser. 1 Push the rear door release latch and gently lower the rear door. Fuser pressure release lever Fuser pressure release lever Note...
... the fuser pressure release levers to avoid contamination of the jammed media, and pull it . Identifying the media path 62 Clearing jams JAM-C Rear A JAM-C Rear message indicates the media is jammed behind the rear door above the fuser. 1 Push the rear door release latch and gently lower the rear door. Fuser pressure release lever Fuser pressure release lever Note...
User's Guide
Page 82
...canceling, print job printer operator panel 16 card stock, guidelines 25 characteristics, media 18 letterhead 21 cleaning, printhead lens 52 clearing jams, possible jam areas 56 current menu settings 17 with menu settings page 17 D display panel 6 E electronic emission statement 74 envelopes, guidelines 22... light 5 J jam messages JAM-A Tray, Rear 58 JAM-B Rear 60 JAM-C Rear 62 jams avoiding 55 clearing, media path 56 hints to avoid 55 L labels guidelines 24 printer maintenance 24 laser notices 77 letterhead 21 guidelines 21 page orientation 22 printing 22 Lexmark Authorized Supplies Dealers ...
...canceling, print job printer operator panel 16 card stock, guidelines 25 characteristics, media 18 letterhead 21 cleaning, printhead lens 52 clearing jams, possible jam areas 56 current menu settings 17 with menu settings page 17 D display panel 6 E electronic emission statement 74 envelopes, guidelines 22... light 5 J jam messages JAM-A Tray, Rear 58 JAM-B Rear 60 JAM-C Rear 62 jams avoiding 55 clearing, media path 56 hints to avoid 55 L labels guidelines 24 printer maintenance 24 laser notices 77 letterhead 21 guidelines 21 page orientation 22 printing 22 Lexmark Authorized Supplies Dealers ...

Menus and Messages
Page 13
... The toner of color "x"-K (black), Y (yellow), M (magenta), or C (cyan)- An invalid toner cartridge is full. A paper jam has occured. The output tray is installed. A page memory error has occured. Replace or install a waste toner bottle. The photodeveloper belt is ... belt. Install or reseat the indicated paper tray. For more information, see Media size indications (yyyy). Error Recovery JAM-A Tray, Rear JAM-B, Rear JAM-C, Rear Output Tray Full PM Error Replace Toner x Replace WT. Replace the toner cartridge for service. The specied paper tray...
... The toner of color "x"-K (black), Y (yellow), M (magenta), or C (cyan)- An invalid toner cartridge is full. A paper jam has occured. The output tray is installed. A page memory error has occured. Replace or install a waste toner bottle. The photodeveloper belt is ... belt. Install or reseat the indicated paper tray. For more information, see Media size indications (yyyy). Error Recovery JAM-A Tray, Rear JAM-B, Rear JAM-C, Rear Output Tray Full PM Error Replace Toner x Replace WT. Replace the toner cartridge for service. The specied paper tray...
Menus and Messages
Page 15
..., menu 5 display panel 5 Downloading 11 Duplicate IPaddr 12 E Error Recovery 13 Executing 11 F Firmware Update 11 Format Error 11 I Indicator light 4 Init EEPOROM 11 J JAM-A Tray, Rear 13 JAM-B, Rear 13 JAM-C, Rear 13 M menu diagram 5 N Navigation buttons 5 Not Ready 11 O operator panel 4 Output Tray Full 13 P panel display 5 operator 4 Please Wait 11 PM Error 13...
..., menu 5 display panel 5 Downloading 11 Duplicate IPaddr 12 E Error Recovery 13 Executing 11 F Firmware Update 11 Format Error 11 I Indicator light 4 Init EEPOROM 11 J JAM-A Tray, Rear 13 JAM-B, Rear 13 JAM-C, Rear 13 M menu diagram 5 N Navigation buttons 5 Not Ready 11 O operator panel 4 Output Tray Full 13 P panel display 5 operator 4 Please Wait 11 PM Error 13...


