
User's Guide
Page 2
... and verification of operation in any way it operates. The safety features of purchase. Edition: March 2005 The following paragraph does not apply to any existing intellectual property right may be used . Lexmark is near the product and easily accessible. You must understand the ... of publications related to meet strict global safety standards with other replacement parts. • Your product uses a laser. Some states do not imply the manufacturer intends to Lexmark International Ltd., Marketing and Services Department, Westhorpe House, Westhorpe, Marlow Bucks SL7 3RQ.
... and verification of operation in any way it operates. The safety features of purchase. Edition: March 2005 The following paragraph does not apply to any existing intellectual property right may be used . Lexmark is near the product and easily accessible. You must understand the ... of publications related to meet strict global safety standards with other replacement parts. • Your product uses a laser. Some states do not imply the manufacturer intends to Lexmark International Ltd., Marketing and Services Department, Westhorpe House, Westhorpe, Marlow Bucks SL7 3RQ.

User's Guide
Page 6
Models The printer is available in determining the installation location of options attached to determine the features and options of the differences between the models. Input capacity Output capacity Standard memory, non network/network Maximum ... a lightning storm. 1 Learning about the printer Identifying printers Use the following table indicates some of your Lexmark™ T640, T642, or T644 printer. The illustrations aid you in three base models The following table to the printer. For more information about the printer 6 Learning about installing input options, see ...
Models The printer is available in determining the installation location of options attached to determine the features and options of the differences between the models. Input capacity Output capacity Standard memory, non network/network Maximum ... a lightning storm. 1 Learning about the printer Identifying printers Use the following table indicates some of your Lexmark™ T640, T642, or T644 printer. The illustrations aid you in three base models The following table to the printer. For more information about the printer 6 Learning about installing input options, see ...

User's Guide
Page 11
...CD does not launch automatically, click Start Æ Run, and type D:\Setup.exe in the Printers folder. The procedure to install the custom printer driver and obtain enhanced printer features and functionality. Use the drivers CD that is not available for local printing 11 Using Windows Server... CD-ROM drive). For additional help, see the documentation that lets the computer communicate with the printer to install drivers depends on the Lexmark Web site at www.lexmark.com. Installing drivers for Windows NT operating systems. To use a Windows NT operating system, you...
...CD does not launch automatically, click Start Æ Run, and type D:\Setup.exe in the Printers folder. The procedure to install the custom printer driver and obtain enhanced printer features and functionality. Use the drivers CD that is not available for local printing 11 Using Windows Server... CD-ROM drive). For additional help, see the documentation that lets the computer communicate with the printer to install drivers depends on the Lexmark Web site at www.lexmark.com. Installing drivers for Windows NT operating systems. To use a Windows NT operating system, you...

User's Guide
Page 36
... you are available from the initial Print dialog to click Properties or Setup from the Lexmark Web site. Printing 36 You may need to see all the printer features, use the Lexmark custom printer drivers supplied with the USB 2.0 standard. • Hi-Speed USB devices must use the FAT file system. To support all of...
... you are available from the initial Print dialog to click Properties or Setup from the Lexmark Web site. Printing 36 You may need to see all the printer features, use the Lexmark custom printer drivers supplied with the USB 2.0 standard. • Hi-Speed USB devices must use the FAT file system. To support all of...
User's Guide
Page 57
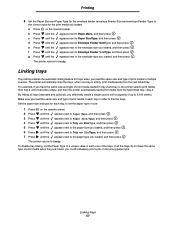
c Press until the appears next to the envelope size you loaded, and then press . Linking trays Tray linking enables the automatic linking feature for each tray, to set the Paper Type to a unique value in each tray in order to link the trays. Make sure you could mistakenly ... Size/Type, and then press . 5 Press until the appears next to Tray Size/Type, and then press . 7 Press until it becomes empty, and then the printer automatically feeds print media from the next linked tray. g Press until the appears next to the envelope type you loaded. d Press until the appears next...
c Press until the appears next to the envelope size you loaded, and then press . Linking trays Tray linking enables the automatic linking feature for each tray, to set the Paper Type to a unique value in each tray in order to link the trays. Make sure you could mistakenly ... Size/Type, and then press . 5 Press until the appears next to Tray Size/Type, and then press . 7 Press until it becomes empty, and then the printer automatically feeds print media from the next linked tray. g Press until the appears next to the envelope type you loaded. d Press until the appears next...

User's Guide
Page 99
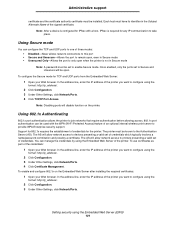
... device configuration by using the format: http: //ip_address/. 2 Click Configuration. A system password is installed. 1 Turn the printer off . 2 Press and hold and while turning the printer on. 3 Release the buttons when you see a clock. To set the system password: 1 Open your Web browser. Continue...system password protects configuration of the device. Encrypting the disk 99 CONFIG MENU appears on the first line of the printer you see a clock. These features are available through the Web page of the Embedded Web Server. The Encrypting Disk progress bar appears. 8 When ...
... device configuration by using the format: http: //ip_address/. 2 Click Configuration. A system password is installed. 1 Turn the printer off . 2 Press and hold and while turning the printer on. 3 Release the buttons when you see a clock. To set the system password: 1 Open your Web browser. Continue...system password protects configuration of the device. Encrypting the disk 99 CONFIG MENU appears on the first line of the printer you see a clock. These features are available through the Web page of the Embedded Web Server. The Encrypting Disk progress bar appears. 8 When ...
User's Guide
Page 101
... access. 802.1x port authentication can be used with a host, IPSec is required for IPSec with the WPA (Wi-Fi Protected Access) feature of an optional internal wireless print server to devices presenting a valid set of credentials. The AS will allow network access to Secure and Unsecure.... The AS will allow network access to provide WPA-Enterprise security support. To enable and configure 802.1x on the printer. The printer must be open when the printer is configured for any IP communication to the Authentication Server (AS). You can configure the TCP and UDP ports to ...
... access. 802.1x port authentication can be used with a host, IPSec is required for IPSec with the WPA (Wi-Fi Protected Access) feature of an optional internal wireless print server to devices presenting a valid set of credentials. The AS will allow network access to Secure and Unsecure.... The AS will allow network access to provide WPA-Enterprise security support. To enable and configure 802.1x on the printer. The printer must be open when the printer is configured for any IP communication to the Authentication Server (AS). You can configure the TCP and UDP ports to ...

User's Guide
Page 102
...or event logs can be prompted to configure using the format: http://ip_address/. 2 Click Configuration. 3 Under Other Settings, click Security. 4 Click Printer Lockout PIN. When a user exceeds a specific number of PIN entry attempts, all of that user's print jobs are deleted. Printing Lockout Printing ... for print jobs. To activate Confidential Print Setup: Note: This feature is locked. Note: If an optional internal wireless print server is installed. In the address line, enter the IP address of the printer you create a PIN number and choose specific menus to configure using...
...or event logs can be prompted to configure using the format: http://ip_address/. 2 Click Configuration. 3 Under Other Settings, click Security. 4 Click Printer Lockout PIN. When a user exceeds a specific number of PIN entry attempts, all of that user's print jobs are deleted. Printing Lockout Printing ... for print jobs. To activate Confidential Print Setup: Note: This feature is locked. Note: If an optional internal wireless print server is installed. In the address line, enter the IP address of the printer you create a PIN number and choose specific menus to configure using...

User's Guide
Page 119
...program is proud to be a participant in conformance with ISO 9296. Lexmark is a partnership effort with office equipment manufacturers to promote the introduction of energy-efficient products and to 50 percent. This feature will cut the energy used . has determined that this program introduce...63128 Dietzenbach Phone: 0180 - 564 56 44 (Product Information) Phone: 01805 - 51 25 11 (Technical Support) E-mail: internet@lexmark.de The following measurements were made in accordance with ISO 7779 and reported in this program. Companies participating in this product meets the ENERGY...
...program is proud to be a participant in conformance with ISO 9296. Lexmark is a partnership effort with office equipment manufacturers to promote the introduction of energy-efficient products and to 50 percent. This feature will cut the energy used . has determined that this program introduce...63128 Dietzenbach Phone: 0180 - 564 56 44 (Product Information) Phone: 01805 - 51 25 11 (Technical Support) E-mail: internet@lexmark.de The following measurements were made in accordance with ISO 7779 and reported in this program. Companies participating in this product meets the ENERGY...

User's Guide
Page 121
...Remarketer or the Lexmark designated location. If this product is a feature or option, this statement applies only when that the warranty period for any other than Lexmark or a Lexmark authorized servicer &#...8226; Operation of all print cartridges, programs, data, and removable storage media (unless directed otherwise by : • Modification or unauthorized attachments • Accidents, misuse, abuse or use inconsistent with the printer...
...Remarketer or the Lexmark designated location. If this product is a feature or option, this statement applies only when that the warranty period for any other than Lexmark or a Lexmark authorized servicer &#...8226; Operation of all print cartridges, programs, data, and removable storage media (unless directed otherwise by : • Modification or unauthorized attachments • Accidents, misuse, abuse or use inconsistent with the printer...
Service Manual
Page 9
...of installation A-1 Installing a 250-sheet or 500-sheet drawer A-1 Installing a duplex unit A-3 Installing memory or option cards A-4 Accessing the printer system board A-5 Removing or installing a memory card A-7 Removal A-7 Installation A-8 Removing or installing a flash memory or firmware card A-8 ...Removal A-8 Installation A-9 Installing an option card A-10 Replacing the shield A-11 Printing and using features A-11 Canceling a print job A-11 Printing the menu settings page A-13 Printing a network setup page A-13 Printing a font sample ...
...of installation A-1 Installing a 250-sheet or 500-sheet drawer A-1 Installing a duplex unit A-3 Installing memory or option cards A-4 Accessing the printer system board A-5 Removing or installing a memory card A-7 Removal A-7 Installation A-8 Removing or installing a flash memory or firmware card A-8 ...Removal A-8 Installation A-9 Installing an option card A-10 Replacing the shield A-11 Printing and using features A-11 Canceling a print job A-11 Printing the menu settings page A-13 Printing a network setup page A-13 Printing a font sample ...

Service Manual
Page 24
... upon the options and features used, additional memory may be required to optimize performance. Available memory options Optional 128MB, 256MB, and 512MB SDRAM DIMMs are 168-pin synchronous DRAM DIMMs. Flash memory options include 32MB and 64MB. The memory options are available from Lexmark. Either slot supports both...576 640 640 640 Optional flash memory 32 and 64 MB available Note: One firmware card and one flash memory card are supported. Operating clearances Printer side Measurement Left and right side 12 in. (30.48 cm) Front 20 in. (50.8 cm) Rear Top* 12 in. (30...
... upon the options and features used, additional memory may be required to optimize performance. Available memory options Optional 128MB, 256MB, and 512MB SDRAM DIMMs are 168-pin synchronous DRAM DIMMs. Flash memory options include 32MB and 64MB. The memory options are available from Lexmark. Either slot supports both...576 640 640 640 Optional flash memory 32 and 64 MB available Note: One firmware card and one flash memory card are supported. Operating clearances Printer side Measurement Left and right side 12 in. (30.48 cm) Front 20 in. (50.8 cm) Rear Top* 12 in. (30...

Service Manual
Page 121
... option installed on the system board observe all the ESD precautions and turn the printer off and disconnect each option installed on the system board. Warning: When removing any feature or option cards are removed or replaced. Note: Use care not to step 6. See "Low voltage power supply removal" on page 4-54...
... option installed on the system board observe all the ESD precautions and turn the printer off and disconnect each option installed on the system board. Warning: When removing any feature or option cards are removed or replaced. Note: Use care not to step 6. See "Low voltage power supply removal" on page 4-54...
Service Manual
Page 196
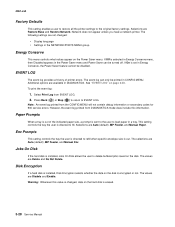
...is erased. 3-28 Service Manual Select Print Log from DIAGNOSTICS mode does include this value is out. Paper Prompts When a tray is out of printer errors. If On is directed to refill when specific envelope size is changed : • Display language • Settings in CONFIG MENU. Selections ...are Disable and Enable. This setting controls the tray the user is set in Energy Conserve, the Power Saver feature cannot be printed in the NETWORK/PORTS MENU group. Env Prompts This setting controls the tray the user is directed to fill. The values...
...is erased. 3-28 Service Manual Select Print Log from DIAGNOSTICS mode does include this value is out. Paper Prompts When a tray is out of printer errors. If On is directed to refill when specific envelope size is changed : • Display language • Settings in CONFIG MENU. Selections ...are Disable and Enable. This setting controls the tray the user is set in Energy Conserve, the Power Saver feature cannot be printed in the NETWORK/PORTS MENU group. Env Prompts This setting controls the tray the user is directed to fill. The values...
Service Manual
Page 198
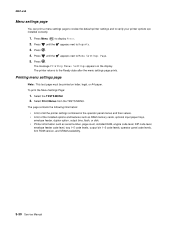
... TESTS MENU. The page contains the following information: • A list of all the printer settings contained in the operator panel menus and their values. • A list of the installed options and features such as RAM memory cards, optional input paper trays, envelope feeder, duplex option, output... bins, flash, or disk. • Printer information such as serial number, page count, installed RAM, engine code level, RIP...
... TESTS MENU. The page contains the following information: • A list of all the printer settings contained in the operator panel menus and their values. • A list of the installed options and features such as RAM memory cards, optional input paper trays, envelope feeder, duplex option, output... bins, flash, or disk. • Printer information such as serial number, page count, installed RAM, engine code level, RIP...

Service Manual
Page 271
... Operator panel assembly (or upper front cover) • System board assembly • Interconnect card assembly Only replace one or the printer will be rendered inoperable. Warning: Observe all ESD precautions while handling ESD-sensitive parts. Remove the two screws securing the interconnect card..... Go to the manufacturer. Replace the required component and perform a POR before you begin. 4061-xx0 Warning: When replacing any feature or option cards from the interconnect card. 2. Repair information 4-53 If this procedure is replaced, the Configuration ID must be rendered...
... Operator panel assembly (or upper front cover) • System board assembly • Interconnect card assembly Only replace one or the printer will be rendered inoperable. Warning: Observe all ESD precautions while handling ESD-sensitive parts. Remove the two screws securing the interconnect card..... Go to the manufacturer. Replace the required component and perform a POR before you begin. 4061-xx0 Warning: When replacing any feature or option cards from the interconnect card. 2. Repair information 4-53 If this procedure is replaced, the Configuration ID must be rendered...
Service Manual
Page 294
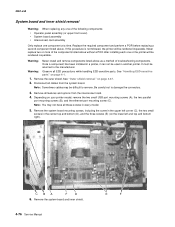
... parts. Be careful not to remove. Depending on page 4-1. 1. Remove the system board mounting screws, including the screw in a printer, it can not be rendered inoperable. It must be rendered inoperable. Disconnect all features and options from the system board. C BA F D 6. Warning: Never install and remove components listed above as a method of...
... parts. Be careful not to remove. Depending on page 4-1. 1. Remove the system board mounting screws, including the screw in a printer, it can not be rendered inoperable. It must be rendered inoperable. Disconnect all features and options from the system board. C BA F D 6. Warning: Never install and remove components listed above as a method of...
Service Manual
Page 385
... purchased an MFP that is available on installing a printer stand, printer base, or 2000-sheet drawer, see the instructions included with the option. Decals Appendix A-Options and features A-1 The printer automatically recognizes any options you have purchased in the following... order: CAUTION: If you may need additional furniture. For information on our Lexmark Web site at www.lexmark.com/multifunction printers. More information is installed....
... purchased an MFP that is available on installing a printer stand, printer base, or 2000-sheet drawer, see the instructions included with the option. Decals Appendix A-Options and features A-1 The printer automatically recognizes any options you have purchased in the following... order: CAUTION: If you may need additional furniture. For information on our Lexmark Web site at www.lexmark.com/multifunction printers. More information is installed....
Service Manual
Page 387
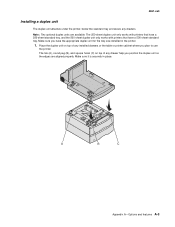
... standard tray. A B C Appendix A-Options and features A-3 Make sure it is securely in the printer. 1. The 250-sheet duplex unit only works with printers that have a 250-sheet standard tray, and the 500-sheet duplex unit only works with printers that have the appropriate duplex unit for the tray ...(B), and square holes (C) on top of any installed drawers or the table or printer cabinet where you plan to use the printer. 4061-xx0 Installing a duplex unit The duplex unit attaches under the printer, below the standard tray and above any drawers. Note: Two optional duplex units are...
... standard tray. A B C Appendix A-Options and features A-3 Make sure it is securely in the printer. 1. The 250-sheet duplex unit only works with printers that have a 250-sheet standard tray, and the 500-sheet duplex unit only works with printers that have the appropriate duplex unit for the tray ...(B), and square holes (C) on top of any installed drawers or the table or printer cabinet where you plan to use the printer. 4061-xx0 Installing a duplex unit The duplex unit attaches under the printer, below the standard tray and above any drawers. Note: Two optional duplex units are...
Service Manual
Page 389
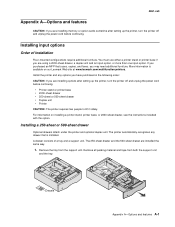
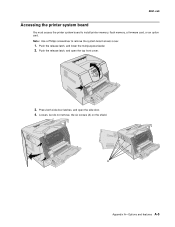
Press both side door latches, and open the top front cover. 3. A Appendix A-Options and features A-5 4061-xx0 Accessing the printer system board You must access the printer system board to remove the system board access cover. 1. Push the release latch, and open the side door. 4. Note: Use a Phillips screwdriver to install printer memory, flash memory, a firmware card, or an option card. Loosen, but do not remove, the six screws (A) on the shield. Push the release latch, and lower the multipurpose feeder. 2.
Press both side door latches, and open the top front cover. 3. A Appendix A-Options and features A-5 4061-xx0 Accessing the printer system board You must access the printer system board to remove the system board access cover. 1. Push the release latch, and open the side door. 4. Note: Use a Phillips screwdriver to install printer memory, flash memory, a firmware card, or an option card. Loosen, but do not remove, the six screws (A) on the shield. Push the release latch, and lower the multipurpose feeder. 2.
