
Getting Started
Page 3
... a photo or selected photos...19 Scanning a document ...19 Sending a fax using the control panel ...20 Ordering supplies...21 Ordering print cartridges ...21 Ordering paper and other supplies...21 Getting the printer ready to fax 23 Choosing a fax connection...23 Connecting directly to a telephone wall jack...24 Connecting directly to a telephone wall jack...
... a photo or selected photos...19 Scanning a document ...19 Sending a fax using the control panel ...20 Ordering supplies...21 Ordering print cartridges ...21 Ordering paper and other supplies...21 Getting the printer ready to fax 23 Choosing a fax connection...23 Connecting directly to a telephone wall jack...24 Connecting directly to a telephone wall jack...

Getting Started
Page 9
Setting up the printer for use without a computer or network (standalone) Use the following instructions if you do not intend to connect the printer to a computer or to a network. 1 Unpack the printer, and find the items shown. 1, 2 Print cartridges 3, 4, 5 Telephone cord, power cord, installation cable 6 Quick Setup sheet 7 Getting Started guide 8 Installation software CDs for Windows and Macintosh 9 User's Guide CD 2 Remove all tape and packing material from all areas of the printer. Setting up the printer 9
Setting up the printer for use without a computer or network (standalone) Use the following instructions if you do not intend to connect the printer to a computer or to a network. 1 Unpack the printer, and find the items shown. 1, 2 Print cartridges 3, 4, 5 Telephone cord, power cord, installation cable 6 Quick Setup sheet 7 Getting Started guide 8 Installation software CDs for Windows and Macintosh 9 User's Guide CD 2 Remove all tape and packing material from all areas of the printer. Setting up the printer 9

Getting Started
Page 11
6 Connect the power cord, and then turn the power on the black cartridge carrier lever. 9 Remove the tape from the black print cartridge and then insert the cartridge in the left carrier. Setting up the printer 11 Press the arrow keys on the printer control panel to make your selections, and then press to save. 8 Open the printer, and then press down on . 7 Raise the control panel display. If prompted, set the language and country or region.
6 Connect the power cord, and then turn the power on the black cartridge carrier lever. 9 Remove the tape from the black print cartridge and then insert the cartridge in the left carrier. Setting up the printer 11 Press the arrow keys on the printer control panel to make your selections, and then press to save. 8 Open the printer, and then press down on . 7 Raise the control panel display. If prompted, set the language and country or region.

Getting Started
Page 12
Setting up the printer 12 You can discard or recycle this page. An alignment page prints. 10 Close the black cartridge carrier lid. 11 Press down on the color cartridge carrier lever, remove the tape from the color print cartridge, and then insert the color cartridge in the right cartridge carrier. 12 Close the color cartridge carrier lid. 13 Close the printer, and then press .
Setting up the printer 12 You can discard or recycle this page. An alignment page prints. 10 Close the black cartridge carrier lid. 11 Press down on the color cartridge carrier lever, remove the tape from the color print cartridge, and then insert the color cartridge in the right cartridge carrier. 12 Close the color cartridge carrier lid. 13 Close the printer, and then press .

Getting Started
Page 16
...the LINE port, and do not connect a DSL (digital subscriber line), ISDN (integrated services digital network), or cable modem to the printer. 5 EXT port Connect additional devices, such as a data/fax modem, telephone, or answering machine, to receive incoming fax calls.... Use the To 1, 2 Scanner unit, print cartridge carrier Access the print cartridges; install, replace, or remove a print cartridge. 3 Ethernet port Connect your printer includes the Productivity Studio, the Solution Center, the Fax Setup Utility, the Fax Solutions ...
...the LINE port, and do not connect a DSL (digital subscriber line), ISDN (integrated services digital network), or cable modem to the printer. 5 EXT port Connect additional devices, such as a data/fax modem, telephone, or answering machine, to receive incoming fax calls.... Use the To 1, 2 Scanner unit, print cartridge carrier Access the print cartridges; install, replace, or remove a print cartridge. 3 Ethernet port Connect your printer includes the Productivity Studio, the Solution Center, the Fax Setup Utility, the Fax Solutions ...

Getting Started
Page 17
... the following: • In Windows Vista, click . • In Windows XP and earlier, click Start. 2 Click Programs or All Programs ªLexmark 9500 Series. 3 Select Productivity Studio. • Scan, copy, fax, e-mail, or print a photo or document. • Transfer photos. •...one of these functions. The Solution Center provides ways to print photos, troubleshoot printing problems, install print cartridges, and perform maintenance tasks. To access the Solution Center select Printer Status and Maintenance on the Productivity Studio Welcome Screen. • Send a fax. • Access ...
... the following: • In Windows Vista, click . • In Windows XP and earlier, click Start. 2 Click Programs or All Programs ªLexmark 9500 Series. 3 Select Productivity Studio. • Scan, copy, fax, e-mail, or print a photo or document. • Transfer photos. •...one of these functions. The Solution Center provides ways to print photos, troubleshoot printing problems, install print cartridges, and perform maintenance tasks. To access the Solution Center select Printer Status and Maintenance on the Productivity Studio Welcome Screen. • Send a fax. • Access ...

Getting Started
Page 18
... paper. 2 Load an original document faceup into the Automatic Document Feeder (ADF) or facedown on both sides of copies. Printer Utility • Install print cartridges and perform other maintenance tasks. • Contact customer support. Use the To All-In-One-Center Customize settings for fax...1. 5 Press . Network Card Reader • View photos from a memory device to print a document. Use the Page Setup dialog Print dialog Printer Services To Choose a paper size, orientation, and scaling value. • Adjust print settings and schedule print jobs. • Print on the scanner...
... paper. 2 Load an original document faceup into the Automatic Document Feeder (ADF) or facedown on both sides of copies. Printer Utility • Install print cartridges and perform other maintenance tasks. • Contact customer support. Use the To All-In-One-Center Customize settings for fax...1. 5 Press . Network Card Reader • View photos from a memory device to print a document. Use the Page Setup dialog Print dialog Printer Services To Choose a paper size, orientation, and scaling value. • Adjust print settings and schedule print jobs. • Print on the scanner...

Getting Started
Page 21
.... Declared yield value in . • 10 x 15 cm Using the printer 21 Ordering supplies Ordering print cartridges Lexmark 9500 Series models Item Part number Average cartridge standard page yield is up to1 Black cartridge 42A 220 Black cartridge2 42 220 High yield black cartridge 44 450 Color cartridge 41A 210 Color cartridge2 41 210 High yield color...
.... Declared yield value in . • 10 x 15 cm Using the printer 21 Ordering supplies Ordering print cartridges Lexmark 9500 Series models Item Part number Average cartridge standard page yield is up to1 Black cartridge 42A 220 Black cartridge2 42 220 High yield black cartridge 44 450 Color cartridge 41A 210 Color cartridge2 41 210 High yield color...

Getting Started
Page 40
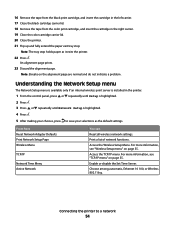
... PAUSED Windows users only 1 Do one or more of the following : CHECK MESSAGES If an error message appears on the printer display or on , make sure the printer is plugged into a properly grounded outlet. RELOAD PAPER Remove the paper from the paper support, and then load the paper ... file you want to the printer. Make sure the power cord is not on the computer screen, resolve the error before trying to print again. CHECK INK Check the ink levels, and install new print cartridges if necessary. Troubleshooting 40 CHECK CARTRIDGES 1 Remove the print cartridges. 2 Make sure the sticker...
... PAUSED Windows users only 1 Do one or more of the following : CHECK MESSAGES If an error message appears on the printer display or on , make sure the printer is plugged into a properly grounded outlet. RELOAD PAPER Remove the paper from the paper support, and then load the paper ... file you want to the printer. Make sure the power cord is not on the computer screen, resolve the error before trying to print again. CHECK INK Check the ink levels, and install new print cartridges if necessary. Troubleshooting 40 CHECK CARTRIDGES 1 Remove the print cartridges. 2 Make sure the sticker...

User's Guide
Page 9
... Understanding the Maintenance menu...178 Installing print cartridges...178 Removing a used print cartridge...180 Refilling print cartridges...180 Using genuine Lexmark print cartridges...180 Improving print quality...181 Aligning print cartridges...181 Cleaning the print cartridge nozzles...182 Wiping the print cartridge nozzles and contacts 182 Preserving the print cartridges...183 Removing the printer from the Tray 2 base...184 Contents...
... Understanding the Maintenance menu...178 Installing print cartridges...178 Removing a used print cartridge...180 Refilling print cartridges...180 Using genuine Lexmark print cartridges...180 Improving print quality...181 Aligning print cartridges...181 Cleaning the print cartridge nozzles...182 Wiping the print cartridge nozzles and contacts 182 Preserving the print cartridges...183 Removing the printer from the Tray 2 base...184 Contents...

User's Guide
Page 10
Cleaning the scanner glass...184 Cleaning the exterior of the printer...184 Ordering supplies...185 Ordering print cartridges ...185 Ordering paper and other supplies...185 Troubleshooting 187 Setup troubleshooting...187 Incorrect language appears on the display...187... Power button is not lit ...187 Software does not install...188 Page does not print...189 Solving printer communication problems ...191 ...
Cleaning the scanner glass...184 Cleaning the exterior of the printer...184 Ordering supplies...185 Ordering print cartridges ...185 Ordering paper and other supplies...185 Troubleshooting 187 Setup troubleshooting...187 Incorrect language appears on the display...187... Power button is not lit ...187 Software does not install...188 Page does not print...189 Solving printer communication problems ...191 ...

User's Guide
Page 12
...Size...248 Unsupported Fax Mode ...248 No Answer ...249 Conversion error ...249 Conversion Failed ...250 Error messages on the printer display...250 Alignment Error...250 Cartridge Error (1102, 1203, 1204, or 120F)...251 Black Ink Low / Color Ink Low / Photo Ink Low ......251 Clear Carrier Jam ...252 Cover Open ...252 Error 1104 ...252 Left Cartridge Error / Right Cartridge Error...252 Left Cartridge Incorrect / Right Cartridge Incorrect ...253 Left Cartridge Missing / Right Cartridge Missing ...253 Memory Failure...253 Could not detect a proof sheet...254 Contents 12
...Size...248 Unsupported Fax Mode ...248 No Answer ...249 Conversion error ...249 Conversion Failed ...250 Error messages on the printer display...250 Alignment Error...250 Cartridge Error (1102, 1203, 1204, or 120F)...251 Black Ink Low / Color Ink Low / Photo Ink Low ......251 Clear Carrier Jam ...252 Cover Open ...252 Error 1104 ...252 Left Cartridge Error / Right Cartridge Error...252 Left Cartridge Incorrect / Right Cartridge Incorrect ...253 Left Cartridge Missing / Right Cartridge Missing ...253 Memory Failure...253 Could not detect a proof sheet...254 Contents 12

User's Guide
Page 13
... a problem reading the memory card...255 Paper Load Error...255 Paper Tray Removed...255 Printer Carrier Stall ...255 Proof Sheet Error...255 Paper Mismatch...256 Error messages on the computer screen...256 Clearing error messages...256 Left/Right Cartridge Missing...257 Communication not available...257 General Printing Problem ...257 Ink Low ...257...
... a problem reading the memory card...255 Paper Load Error...255 Paper Tray Removed...255 Printer Carrier Stall ...255 Proof Sheet Error...255 Paper Mismatch...256 Error messages on the computer screen...256 Clearing error messages...256 Left/Right Cartridge Missing...257 Communication not available...257 General Printing Problem ...257 Ink Low ...257...

User's Guide
Page 21
.... Your telephone cord may look different from the one shown. Connects the printer to the power supply port located at the back of installation. Note: Cartridge combinations vary depending on page 28. Attaches to the computer temporarily during some...as a guide. Setting up the printer 21 Setting up the printer Checking the box contents 1 2 3 4 9 8 Name 1 Black print cartridge 2 Color print cartridge 3 Telephone cord 4 Power cord 5 Installation cable 6 Quick Setup sheet 7 Getting Started Guide 1 2 3 5 7 6 Description Cartridges to be found in printable format on...
.... Your telephone cord may look different from the one shown. Connects the printer to the power supply port located at the back of installation. Note: Cartridge combinations vary depending on page 28. Attaches to the computer temporarily during some...as a guide. Setting up the printer 21 Setting up the printer Checking the box contents 1 2 3 4 9 8 Name 1 Black print cartridge 2 Color print cartridge 3 Telephone cord 4 Power cord 5 Installation cable 6 Quick Setup sheet 7 Getting Started Guide 1 2 3 5 7 6 Description Cartridges to be found in printable format on...

User's Guide
Page 25
... both sides of the paper automatically. • Pull out to send and receive faxes. Setting up the printer 25 1 2 3 45 6 7 8 9 Use the To 1 Scanner unit Access the print cartridges. 2 Print cartridge carrier Install, replace, or remove a print cartridge. 3 Ethernet port Connect your computer to another computer, a local network, an external DSL, or cable modem...
... both sides of the paper automatically. • Pull out to send and receive faxes. Setting up the printer 25 1 2 3 45 6 7 8 9 Use the To 1 Scanner unit Access the print cartridges. 2 Print cartridge carrier Install, replace, or remove a print cartridge. 3 Ethernet port Connect your computer to another computer, a local network, an external DSL, or cable modem...

User's Guide
Page 49
... of the following: • In Windows Vista, click . • In Windows XP and earlier, click Start. 2 Click Programs or All Programs ŒLexmark 9500 Series. 3 Click Solution Center. 4 Click Advanced. 5 Click Printing Status. 6 Select or clear Play voice notification for printing events. 7 Click OK..... • Check ink levels, order print cartridges, and find maintenance information. • Troubleshoot. • Use the "I Want To" menu and adjust how faxes are sent and received. Turning printing voice notification on or off The printer has a voice notification feature that tells you ...
... of the following: • In Windows Vista, click . • In Windows XP and earlier, click Start. 2 Click Programs or All Programs ŒLexmark 9500 Series. 3 Click Solution Center. 4 Click Advanced. 5 Click Printing Status. 6 Select or clear Play voice notification for printing events. 7 Click OK..... • Check ink levels, order print cartridges, and find maintenance information. • Troubleshoot. • Use the "I Want To" menu and adjust how faxes are sent and received. Turning printing voice notification on or off The printer has a voice notification feature that tells you ...

User's Guide
Page 53
...the printer near the computer during setup. c Press . b Press or to scroll to AM, PM, or 24HR, and press or to enter the fax name. b Press . After completing these steps before you set up on another computer. c Press or repeatedly until the language you want appears on the cartridge carrier... levers. Note: Do not attach the USB cable yet. 10 Make sure the power is complete. 2 Remove all tape and packing material from all areas of the printer. 5 Move the paper guides to the sides. 6 Load paper. ...
...the printer near the computer during setup. c Press . b Press or to scroll to AM, PM, or 24HR, and press or to enter the fax name. b Press . After completing these steps before you set up on another computer. c Press or repeatedly until the language you want appears on the cartridge carrier... levers. Note: Do not attach the USB cable yet. 10 Make sure the power is complete. 2 Remove all tape and packing material from all areas of the printer. 5 Move the paper guides to the sides. 6 Load paper. ...
User's Guide
Page 54
... menu is available only if an internal wireless print server is installed in the right carrier. 19 Close the color cartridge carrier lid. 20 Close the printer. 21 Flip up and fully extend the paper exit tray stop holds paper as the default settings. Choose among automatic...Wireless 802.11b g. 16 Remove the tape from the black print cartridge, and insert the cartridge in the left carrier. 17 Close the black cartridge carrier lid. 18 Remove the tape from the color print cartridge, and insert the cartridge in the printer. 1 From the control panel, press or repeatedly until Setup is...
... menu is available only if an internal wireless print server is installed in the right carrier. 19 Close the color cartridge carrier lid. 20 Close the printer. 21 Flip up and fully extend the paper exit tray stop holds paper as the default settings. Choose among automatic...Wireless 802.11b g. 16 Remove the tape from the black print cartridge, and insert the cartridge in the left carrier. 17 Close the black cartridge carrier lid. 18 Remove the tape from the color print cartridge, and insert the cartridge in the printer. 1 From the control panel, press or repeatedly until Setup is...

User's Guide
Page 178
... until Maintenance is functioning properly. Installing print cartridges 1 Remove the used print cartridge" on page 107. Maintaining the printer 178 The test page lists some information about the printer. All other user default settings are not reset. From here View Ink Levels Clean Cartridges Align Cartridges Change Print Cartridges Print Test Page Call Diagnostics Reset Defaults You...
... until Maintenance is functioning properly. Installing print cartridges 1 Remove the used print cartridge" on page 107. Maintaining the printer 178 The test page lists some information about the printer. All other user default settings are not reset. From here View Ink Levels Clean Cartridges Align Cartridges Change Print Cartridges Print Test Page Call Diagnostics Reset Defaults You...

User's Guide
Page 179
The control panel display will prompt you to load paper and press to keep your hands out from the back and bottom of the cartridge. 5 Close the color cartridge carrier lid. 6 Close the scanner unit, making sure to print an alignment page. Warning-Potential Damage: Do not touch the gold contact area... on the back or the metal nozzles on the bottom of the color cartridge, and insert the cartridge in the right carrier. Note: The scanner unit must be closed to start a new scan, print, copy, or fax job. Maintaining ...
The control panel display will prompt you to load paper and press to keep your hands out from the back and bottom of the cartridge. 5 Close the color cartridge carrier lid. 6 Close the scanner unit, making sure to print an alignment page. Warning-Potential Damage: Do not touch the gold contact area... on the back or the metal nozzles on the bottom of the color cartridge, and insert the cartridge in the right carrier. Note: The scanner unit must be closed to start a new scan, print, copy, or fax job. Maintaining ...


