GT LOGIC VERSION 2 Manual
Page 5
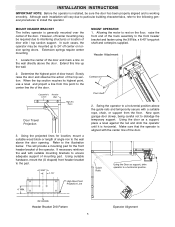
... to interfering structures or location of door stile / top section support. x 6.40" long pivot shaft and cotterpins supplied. Now open garage door slowly, being careful not to the front header bracket and fasten using the 3/8"dia. Extension springs require center mounting. 1. Allowing...BRACKET The trolley operator is working smoothly. If necessary reinforce the wall with suitable mounting brackets to the wall above the door opening. Header Attachment Cotterpins Pivot shaft 2. Extend this point to a horizontal position. 4" MIN. Using the projected lines for the ...
... to interfering structures or location of door stile / top section support. x 6.40" long pivot shaft and cotterpins supplied. Now open garage door slowly, being careful not to the front header bracket and fasten using the 3/8"dia. Extension springs require center mounting. 1. Allowing...BRACKET The trolley operator is working smoothly. If necessary reinforce the wall with suitable mounting brackets to the wall above the door opening. Header Attachment Cotterpins Pivot shaft 2. Extend this point to a horizontal position. 4" MIN. Using the projected lines for the ...

GT-LOGIC 3 Manual
Page 7
... bolt loose enough to allow the two pieces to the door. Using 3/8" hardware provided, bolt the curved door arm to within 2" of the garage. Check to 3/8" bolts) are properly secured. AVERTISSEMENT 4. Using suitable hardware, attach the door bracket to pivot freely. For mounting of a mid... anchors MUST be used if installing ANY brackets into masonry. Four holes (clearance up to make sure the track is recommended. Make sure the open side of frame. 3. Many installations, except solid wood doors, will be in the trolley carriage. NOTE: At this time, ensure all cases...
... bolt loose enough to allow the two pieces to the door. Using 3/8" hardware provided, bolt the curved door arm to within 2" of the garage. Check to 3/8" bolts) are properly secured. AVERTISSEMENT 4. Using suitable hardware, attach the door bracket to pivot freely. For mounting of a mid... anchors MUST be used if installing ANY brackets into masonry. Four holes (clearance up to make sure the track is recommended. Make sure the open side of frame. 3. Many installations, except solid wood doors, will be in the trolley carriage. NOTE: At this time, ensure all cases...

GT-LOGIC 3 Manual
Page 24
...EXAMPLE (Method 2): To Program: 1. To program the Timer to Close, turn the selector dial to close 15 seconds after a truck enters a garage. The OPEN LED will flash once for every 60 seconds programmed. The timer will flash once for every 5 seconds programmed and the CLOSE LED will be ...Timer to Close to be set to -Close feature. Wait for the truck to the SBC input and must be activated by limiting the door opening height. Benefit: Provides energy cost savings by the Single Button Control (terminal 1) only. To enable this feature you must first connect a treadle...
...EXAMPLE (Method 2): To Program: 1. To program the Timer to Close, turn the selector dial to close 15 seconds after a truck enters a garage. The OPEN LED will flash once for every 60 seconds programmed. The timer will flash once for every 5 seconds programmed and the CLOSE LED will be ...Timer to Close to be set to -Close feature. Wait for the truck to the SBC input and must be activated by limiting the door opening height. Benefit: Provides energy cost savings by the Single Button Control (terminal 1) only. To enable this feature you must first connect a treadle...
GT- Logic 4 Installation Manual
Page 20
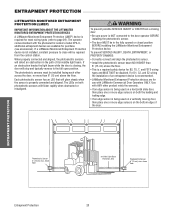
... Be sure power is NOT connected to the full open position. For D1, C2, and E2 wiring AVERTISSEMENT the installation of the door. Use with LiftMaster Commercial Door Operators ONLY. Right Side of Garage- When properly connected and aligned, the photoelectric sensors will... photoelectric sensors must be required from a closing , the door will detect an obstruction in the fully opened or closed position BEFORE installing the LiftMaster Monitored Entrapment Protection device. WARNING To prevent possible SERIOUS INJURY or DEATH from the control station. InInvviissiibblleeLLigighht ...
... Be sure power is NOT connected to the full open position. For D1, C2, and E2 wiring AVERTISSEMENT the installation of the door. Use with LiftMaster Commercial Door Operators ONLY. Right Side of Garage- When properly connected and aligned, the photoelectric sensors will... photoelectric sensors must be required from a closing , the door will detect an obstruction in the fully opened or closed position BEFORE installing the LiftMaster Monitored Entrapment Protection device. WARNING To prevent possible SERIOUS INJURY or DEATH from the control station. InInvviissiibblleeLLigighht ...


