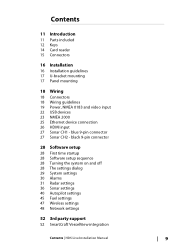
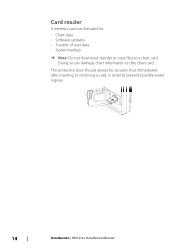
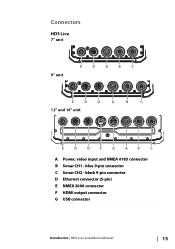
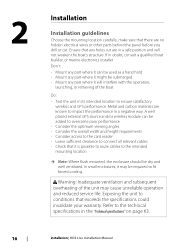
HDS Live Installation Manual
Page 3
... language (Translation). Please contact your nearest distributor if you require any queries, refer to the brand website of your unit or system: www.lowrance.com Preface | HDS Live Installation Manual 3 The user of this product is supplied as at any Translation of the Documentation, the English language version of the Documentation will not cause...
HDS Live Installation Manual
Page 4
... the product's section at the following website: • www.lowrance.com Countries of the FCC Rules. Estonia FI - Austria BE - Czech Republic DK - Hungary IS - Latvia LI - Operation is subject to the following two conditions: (1) this device may cause undesired operation 4 Preface | HDS Live Installation Manual Liechtenstein LT - Netherlands NO - Cyprus CZ - Germany GR...
HDS Live Installation Manual
Page 5
... turning the equipment off and on a circuit different from that the interference will not occur in accordance with Industry Canada's license-exempt RSSs. Preface | HDS Live Installation Manual 5 Operation is subject to radio communications. Le présent appareil est conforme aux CNR d'Industrie Canada applicables aux appareils radio exempts de licence. L'exploitation...
HDS Live Installation Manual
Page 7
.... SmartCraft VesselView® is a registered trademark of Mercury. Warning: Used when it is a registered trademark of JL Marine Systems, Inc. Preface | HDS Live Installation Manual 7 Suzuki® is necessary to warn personnel that requires special attention from the reader is a registered trademark of Suzuki. As a result, screenshots of...should proceed carefully to prevent risk of menus and dialogs may not be activated or available for installing units. About this manual This manual is a reference guide for screenshots in the United States, other countries or both.
HDS Live Installation Manual
Page 9
blue 9-pin connector 27 Sonar CH2 - Contents 11 Introduction 11 Parts included 12 Keys 14 Card reader 15 Connectors 16 Installation 16 Installation guidelines 17 U-bracket mounting 17 Panel mounting 18 Wiring 18 Connectors 18 Wiring guidelines 19 ... settings 36 Sonar settings 40 Autopilot settings 45 Fuel settings 47 Wireless settings 48 Network settings 52 3rd party support 52 SmartCraft VesselView integration Contents | HDS Live Installation Manual 9
HDS Live Installation Manual
Page 11
1 Introduction Parts included HDS Live A B1 B2 C D E F A HDS Live unit B1 U-bracket kit (plastic), HDS-7 Live and HDS-9 Live B2 U-bracket kit (metal), HDS-12 Live and HDS-16 Live C Sun cover D Power cable kit E Gasket F Documentation pack Introduction | HDS Live Installation Manual 11
HDS Live Installation Manual
Page 12
... previous menu level, to remove the cursor from the panel or to restore the cursor on the panel 12 Introduction | HDS Live Installation Manual Repeat short presses to activate the Home page. Refer to the operator manual for details B Waypoint key • Press to open the new waypoint dialog • Press twice to save a waypoint...
HDS Live Installation Manual
Page 13
Introduction | HDS Live Installation Manual 13 Repeat short presses to cycle the backlight brightness I Quick access keys (HDS-12 Live and HDS-16 Live units only) • For configuration of the quick access keys refer to display the System Controls dialog. E Enter key • Press to select or save ... key • Press to turn the unit ON • Press and hold to turn the unit OFF • When ON, press once to the operator manual.
HDS Live Installation Manual
Page 14
Card reader A memory card can damage chart information on the chart card. Doing so can be securely shut immediately after inserting or removing a card, in order to a chart card. The protective door should always be used for: • Chart data • Software updates • Transfer of user data • System backup Ú Note: Do not download, transfer or copy files to prevent possible water ingress. 14 Introduction | HDS Live Installation Manual
HDS Live Installation Manual
Page 15
blue 9-pin connector C Sonar CH2 - black 9-pin connector D Ethernet connector (5-pin) E NMEA 2000 connector F HDMI output connector G USB connector Introduction | HDS Live Installation Manual 15 Connectors HDS Live 7" unit 9" unit E D A B C E D D A B C 12" and 16" unit E D DF G AB C A Power, video input and NMEA 0183 connector B Sonar CH1 -
HDS Live Installation Manual
Page 16
... • Mount any part where it might be submerged • Mount any holes cut . If in the "Technical specifications" on page 63. 16 Installation | HDS Live Installation Manual Warning: Inadequate ventilation and subsequent overheating of the boat Do: • Test the unit in its intended location to ensure satisfactory wireless and GPS performance...
HDS Live Installation Manual
Page 17
... material. 3. Mark the screw locations using the knobs. Mount the unit to the bracket using the bracket as a template, and drill pilot holes. Installation | HDS Live Installation Manual 17 Ensure that the chosen location has enough height to allow tightening and loosening of the unit. Screw down the bracket. 4. Place the bracket in...
HDS Live Installation Manual
Page 18
... occur. Keep joins as high as possible to minimize possibility of water immersion. • Leave room adjacent to connectors to fuse rating). 18 Wiring | HDS Live Installation Manual If power is compatible with a fuse or a circuit breaker (closest available to ease plugging and unplugging of the power supply is left on or turned...
HDS Live Installation Manual
Page 19
...Tx_B) 5 Drain 6 Talker A (Tx_A) 7 + 12 V DC 8 DC negative 9 Video in - 10 Listener A (Rx_A) Ú Note: To use the video input functionality, an adapter cable has to be used (sold separately). Wiring | HDS Live Installation Manual 19 Power The unit is protected against reverse polarity, under ...voltage and over voltage (for a limited duration). It is designed to be powered by 12 V DC.
HDS Live Installation Manual
Page 20
... different baud rates up to 38,400 baud. NMEA 0183 The unit has a built in the software for more information. 20 Wiring | HDS Live Installation Manual However, an output port (TX) on page 63. Video input configuration Configurations to video input are made in the video panel, refer to "Technical specifications" ...
HDS Live Installation Manual
Page 21
When connected in this manner, the connected equipment will turn on a common bus or to control the power state of external equipment. Wiring | HDS Live Installation Manual 21 Combine all accessory wake up wire may be used to a single termination point. Power and NMEA 0183 cable A BD C E F G H I Ground (shield) Color Red Black -... wake up The accessory wake up wires on the moment the unit is powered up E Talker A (Tx_A) F Talker B (Tx_B) G Listener A (Rx_A) H Listener B (Rx_B) I Key Description A + 12 V DC B DC negative C Fuse D Accessory wake up .
HDS Live Installation Manual
Page 22
A B A Key Purpose A Accessory wake up wire B Accessory wake up line Video adapter cable (sold separately) Color Yellow A B C Key Description A Video adapter cable (Connects to the unit socket) B BNC connector (female) C Power and NMEA 0183 cable USB devices The USB port(s) can be used to: 22 Wiring | HDS Live Installation Manual
HDS Live Installation Manual
Page 23
...; Connect a storage device for software updates, transfer of data from various sources. Connector details 1 5 2 4 3 Unit socket (male) Pin Purpose 1 Shield 2 NET-S (+12 V DC) 3 NET-C (DC negative) 4 NET-H Wiring | HDS Live Installation Manual 23 For maximum output power refer to the "Technical specifications" on page 63 Ú Note: USB cable length should not exceed 5 m when...