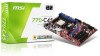

User Guide
Page 12
...installation CD must be created before attempting to the following website: http://www.microsoft.com/windows2000/downloads/ servicepacks/sp4/HFdeploy.htm 1-4 M S-7125 ATX M ainboard † Supports boot from LAN, USB Device 1.1 & 2.0, and SATA HDD. Now the nVidia nForce4 system driver is required. To create a bootable RAID volume for a Windows 2000 environment, Microsoft's Windows... 2000 Service Pack 4 (SP4) is only available for Windows 2000 and Windows XP. 2. To create the combination installation CD, please refer to install the ...
...installation CD must be created before attempting to the following website: http://www.microsoft.com/windows2000/downloads/ servicepacks/sp4/HFdeploy.htm 1-4 M S-7125 ATX M ainboard † Supports boot from LAN, USB Device 1.1 & 2.0, and SATA HDD. Now the nVidia nForce4 system driver is required. To create a bootable RAID volume for a Windows 2000 environment, Microsoft's Windows... 2000 Service Pack 4 (SP4) is only available for Windows 2000 and Windows XP. 2. To create the combination installation CD, please refer to install the ...
User Guide
Page 92
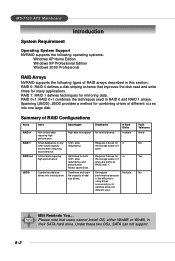
... storage space of 1 drive. Allows spare disks. Requires 2 drives for mirroring data. Multiple Fault Tolerance None Yes Yes No MSI Reminds You... Critical data requiring high performance. Combining odd size drives into one big drive Advantages Drawbacks High data throughput. Combines... Home Edition Windows XP Professional Edition Windows 2000 Professional RAID Arrays NVRAID supports the following types of RAID arrays described in this section: RAID 0: RAID 0 defines a disk striping scheme that users cannot install OS, either WinME or Win98, in their SATA hard drive. Summary ...
... storage space of 1 drive. Allows spare disks. Requires 2 drives for mirroring data. Multiple Fault Tolerance None Yes Yes No MSI Reminds You... Critical data requiring high performance. Combining odd size drives into one big drive Advantages Drawbacks High data throughput. Combines... Home Edition Windows XP Professional Edition Windows 2000 Professional RAID Arrays NVRAID supports the following types of RAID arrays described in this section: RAID 0: RAID 0 defines a disk striping scheme that users cannot install OS, either WinME or Win98, in their SATA hard drive. Summary ...

User Guide
Page 93
... set up the NVRAID BIOS. Choose the hard disks that has the RAID driver to copy and install the nForce RAID software. (Check p.5-9 for details.) 4. Boot from the Windows CD, use the floppy disk that are the basic steps for configuring NVRAID: Non-Bootable RAID Array... the RAID BIOS Setup by pressing F10 when prompted, and follow the procedures described below to set to Optimal. 5-3 Enter the Windows OS, run the Windows nForce Setup application and install the RAID software. (Check p.5-9 for details.) 4. Specify the RAID level, either Mirroring (RAID 1), Striping (RAID 0), Striping and...
... set up the NVRAID BIOS. Choose the hard disks that has the RAID driver to copy and install the nForce RAID software. (Check p.5-9 for details.) 4. Boot from the Windows CD, use the floppy disk that are the basic steps for configuring NVRAID: Non-Bootable RAID Array... the RAID BIOS Setup by pressing F10 when prompted, and follow the procedures described below to set to Optimal. 5-3 Enter the Windows OS, run the Windows nForce Setup application and install the RAID software. (Check p.5-9 for details.) 4. Specify the RAID level, either Mirroring (RAID 1), Striping (RAID 0), Striping and...

User Guide
Page 96
... assigning your RAID array disks, press F7. You must choose Yes if the drives were previously used as explained in "Installing the NVIDIA RAID Software Under Windows" on p5-9. 5-6 The Array List window appears, where you can review the RAID arrays that you want to set up , then press Enter. If you have... set up . 3. Press Enter again to go back to the previous window and then press Ctrl-X to wipe out all the data, otherwise press N. 6. Press Y if you want to wipe out all its contents then press C. 5. ...
... assigning your RAID array disks, press F7. You must choose Yes if the drives were previously used as explained in "Installing the NVIDIA RAID Software Under Windows" on p5-9. 5-6 The Array List window appears, where you can review the RAID arrays that you want to set up , then press Enter. If you have... set up . 3. Press Enter again to go back to the previous window and then press Ctrl-X to wipe out all the data, otherwise press N. 6. Press Y if you want to wipe out all its contents then press C. 5. ...
User Guide
Page 97
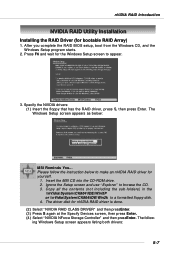
... screen to appear. 3. Ignore the Setup screen and use "Explorer" to a formatted floppy disk. 4. The following Windows Setup screen appears listing both drivers: 5-7 nVIDIA RAID Introduction NVIDIA RAID Utility Installation Installing the RAID Driver (for nVIDIA RAID driver is done. (2) Select "NVIDIA RAID CLASS DRIVER" and then pressEnter. (3) Press S again at the ... in the \\nVidia\System\CK804\IDE\WinXP or \\nVidia\System\CK804\IDE\Win2k to browse the CD. 3. Press F6 and wait for yourself. 1. Insert the MSI CD into the CD-ROM drive. 2. Please follow the instruction below...
... screen to appear. 3. Ignore the Setup screen and use "Explorer" to a formatted floppy disk. 4. The following Windows Setup screen appears listing both drivers: 5-7 nVIDIA RAID Introduction NVIDIA RAID Utility Installation Installing the RAID Driver (for nVIDIA RAID driver is done. (2) Select "NVIDIA RAID CLASS DRIVER" and then pressEnter. (3) Press S again at the ... in the \\nVidia\System\CK804\IDE\WinXP or \\nVidia\System\CK804\IDE\Win2k to browse the CD. 3. Press F6 and wait for yourself. 1. Insert the MSI CD into the CD-ROM drive. 2. Please follow the instruction below...

User Guide
Page 98
MSI Reminds You... After that hard drive. This will have to install Windows XP. During the GUI portion of Windows XP installation is completed, then take out the floppy. 5. MS-7125 ATX Mainboard 4. Follow the instructions on how to be installed under Windows once for that , the driver will not have to be installed 5-8 Click Yes as many times...
MSI Reminds You... After that hard drive. This will have to install Windows XP. During the GUI portion of Windows XP installation is completed, then take out the floppy. 5. MS-7125 ATX Mainboard 4. Follow the instructions on how to be installed under Windows once for that , the driver will not have to be installed 5-8 Click Yes as many times...

User Guide
Page 99
... the NV Serial ATA driver if SATA is selected. 3. Start the nForce Setup program to run the setup application and install the RAID software which will upgrade the Windows IDE driver and install the RAID software. 1. After the reboot, initialize the newly created array. 5-9 Click Next and then follow the instructions. 4. After the...
... the NV Serial ATA driver if SATA is selected. 3. Start the nForce Setup program to run the setup application and install the RAID software which will upgrade the Windows IDE driver and install the RAID software. 1. After the reboot, initialize the newly created array. 5-9 Click Next and then follow the instructions. 4. After the...
User Guide
Page 122
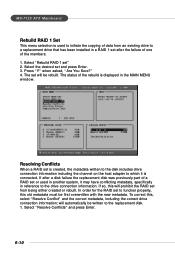
...channel on the host adapter to the replacement disk. 1. will prohibit the RAID set from an existing drive to a replacement drive that has been installed in a RAID 1 set after a disk failure the replacement disk was previously part of a RAID set or used in another system, it is.... Select "Rebuild RAID 1 set to function properly, this old metadata must be written to which it may have conflicting metadata, specifically in the MAIN MENU window. Press "Y" when asked, "Are You Sure?" 4. If so, this , select "Resolve Conflict" and the correct metadata, including the correct drive connection...
...channel on the host adapter to the replacement disk. 1. will prohibit the RAID set from an existing drive to a replacement drive that has been installed in a RAID 1 set after a disk failure the replacement disk was previously part of a RAID set or used in another system, it is.... Select "Rebuild RAID 1 set to function properly, this old metadata must be written to which it may have conflicting metadata, specifically in the MAIN MENU window. Press "Y" when asked, "Are You Sure?" 4. If so, this , select "Resolve Conflict" and the correct metadata, including the correct drive connection...
User Guide
Page 127
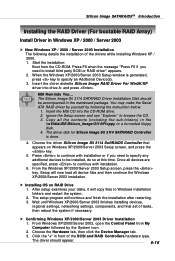
... Driver (For bootable RAID Array) Install Driver in Windows XP / 2000 / Server 2003 h New Windows XP / 2000 / Server 2003 Installation The following the instruction below. 1. h Confirming Windows XP/2000/Server 2003 Driver Installation 1. Click the "+" in the \\nVidia\IDE\Silicon_Image\3114\Floppy to install third party SCSI or RAID driver" appears. 2. MSI Reminds You... The Silicon Image Sil...
... Driver (For bootable RAID Array) Install Driver in Windows XP / 2000 / Server 2003 h New Windows XP / 2000 / Server 2003 Installation The following the instruction below. 1. h Confirming Windows XP/2000/Server 2003 Driver Installation 1. Click the "+" in the \\nVidia\IDE\Silicon_Image\3114\Floppy to install third party SCSI or RAID driver" appears. 2. MSI Reminds You... The Silicon Image Sil...
User Guide
Page 128
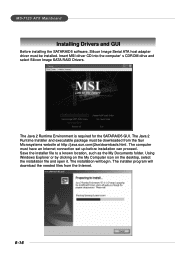
...must have an Internet connection set up before installation can proceed. MS-7125 ATX Mainboard Installing Drivers and GUI Before installing the SATARAID5 software, Silicon Image Serial ATA host adapter driver must be downloaded from the Internet. 6-16 Insert MSI driver CD into the computer's CDROM drive... and select Silicon Image SATA RAID Drivers. Save the installer file to a known location, such as the My Documents folder. Using Windows Explorer or by clicking on the My Computer ...
...must have an Internet connection set up before installation can proceed. MS-7125 ATX Mainboard Installing Drivers and GUI Before installing the SATARAID5 software, Silicon Image Serial ATA host adapter driver must be downloaded from the Internet. 6-16 Insert MSI driver CD into the computer's CDROM drive... and select Silicon Image SATA RAID Drivers. Save the installer file to a known location, such as the My Documents folder. Using Windows Explorer or by clicking on the My Computer ...
User Guide
Page 129
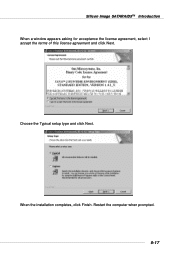
Choose the Typical setup type and click Next. When the installation completes, click Finish. Restart the computer when prompted. 6-17 Silicon Image SATARAID5TM Introduction When a window appears asking for acceptance the license agreement, select I accept the terms of this license agreement and click Next.
Choose the Typical setup type and click Next. When the installation completes, click Finish. Restart the computer when prompted. 6-17 Silicon Image SATARAID5TM Introduction When a window appears asking for acceptance the license agreement, select I accept the terms of this license agreement and click Next.

User Guide
Page 131
Click on the driver you like to install, and follow the following step to install the driver correctly. 1. Then the welcome dialogue will display. Click Next to install the NVIDIA nForce4 System Drivers for Windows 2000 and Windows XP operating system. NVIDIA nForce4 System Driver This driver is only available for your Windows OS. Please follow the proceeding instructions. MS-7125 ATX Mainboard Driver Installation Click on the Driver tab and the screen below will display. Click on this button to continue. 7-2
Click on the driver you like to install, and follow the following step to install the driver correctly. 1. Then the welcome dialogue will display. Click Next to install the NVIDIA nForce4 System Drivers for Windows 2000 and Windows XP operating system. NVIDIA nForce4 System Driver This driver is only available for your Windows OS. Please follow the proceeding instructions. MS-7125 ATX Mainboard Driver Installation Click on the Driver tab and the screen below will display. Click on this button to continue. 7-2


