
User Guide
Page 7
... 5-2 RAID Configuration 5-3 Basic Configuration Instructions 5-3 Setting Up the NVRAID BIOS 5-3 NVIDIA RAID Untility Installation 5-7 Installing the RAID Driver (for bootable RAID Array 5-7 Installing the NVIDIA RAID Software Under W indows (for Non-bootable RAID Array 5-9 Initializing and Using the...W ith ...4-19 Auto Login 4-20 Chapter 5. nVIDIA RAID Introduction 5-1 Introduction ...5-2 System Requirement 5-2 RAID Arrays 5-2 Summary of Driver & Utility 6-1 Driver Installation 6-2 NVIDIA nForce4 System Driver 6-2 Realtek AC97 Audio Driver 6-5 Utility Installation 6-6 vii
... 5-2 RAID Configuration 5-3 Basic Configuration Instructions 5-3 Setting Up the NVRAID BIOS 5-3 NVIDIA RAID Untility Installation 5-7 Installing the RAID Driver (for bootable RAID Array 5-7 Installing the NVIDIA RAID Software Under W indows (for Non-bootable RAID Array 5-9 Initializing and Using the...W ith ...4-19 Auto Login 4-20 Chapter 5. nVIDIA RAID Introduction 5-1 Introduction ...5-2 System Requirement 5-2 RAID Arrays 5-2 Summary of Driver & Utility 6-1 Driver Installation 6-2 NVIDIA nForce4 System Driver 6-2 Realtek AC97 Audio Driver 6-5 Utility Installation 6-6 vii

User Guide
Page 12
...driver is only available for a Windows 2000 environment, Microsoft's Windows 2000 Service Pack 4 (SP4) is required. To create the combination installation CD, please refer to install the operating system onto the bootable RAID volume. Dimension † ATX Form Factor (30.4 cm X 24.4 cm) Mounting † 9 mounting holes MSI... Reminds You... 1. As the end user cannot boot without SP4, a combination installation CD must be created before attempting to the following website: http://www.microsoft.com/windows2000/...
...driver is only available for a Windows 2000 environment, Microsoft's Windows 2000 Service Pack 4 (SP4) is required. To create the combination installation CD, please refer to install the operating system onto the bootable RAID volume. Dimension † ATX Form Factor (30.4 cm X 24.4 cm) Mounting † 9 mounting holes MSI... Reminds You... 1. As the end user cannot boot without SP4, a combination installation CD must be created before attempting to the following website: http://www.microsoft.com/windows2000/...

User Guide
Page 71
...Start-up menu (path: Start-->Programs-->MSI-->DigiCell) 4-1 short-cut icon in the system tray short-cut path in the setup CD accompanying with this unique utility, you have an icon in the system tray, a short cut path in your DigiCell installed (locate the setup source file in... the start-up " menu. Introduction to overclock the CPU/ memory. ware status (CPU/Fan temperature and speed) or to DigiCell Chapter 24. ity --> MSI DigiCell), it easier to update the BIOS/drivers online, and to monitor and ...
...Start-up menu (path: Start-->Programs-->MSI-->DigiCell) 4-1 short-cut icon in the system tray short-cut path in the setup CD accompanying with this unique utility, you have an icon in the system tray, a short cut path in your DigiCell installed (locate the setup source file in... the start-up " menu. Introduction to overclock the CPU/ memory. ware status (CPU/Fan temperature and speed) or to DigiCell Chapter 24. ity --> MSI DigiCell), it easier to update the BIOS/drivers online, and to monitor and ...

User Guide
Page 72
... change your connection mode to different ones, and configure the advanced settings for you to check if the representing peripherals/cards/drivers are correctly installed. In this sub-menu, it provides the information of each DigiCell button for communication products, including the status, strength, ...speed and channel of the connection of that item. etc.) installed correctly. MSI Click on this utility, it is not able to view the functionality/connection of the Ethernet LAN & Wireless LAN. The icon...
... change your connection mode to different ones, and configure the advanced settings for you to check if the representing peripherals/cards/drivers are correctly installed. In this sub-menu, it provides the information of each DigiCell button for communication products, including the status, strength, ...speed and channel of the connection of that item. etc.) installed correctly. MSI Click on this utility, it is not able to view the functionality/connection of the Ethernet LAN & Wireless LAN. The icon...

User Guide
Page 79
...the functions listed above, a "sorry" message is a tool used to detect and update your BIOS/ drivers/VGA BIOS/VGA Driver/OSD/Utility online so that you need to search for the correct BIOS/driver version throughout the whole Web site. Live VGA BIOS - For more information on the update instructions, ...Update program will appear: Six buttons are placed on the left column of the screen. To use the function, you don't need to install the "MSI Live Update 3" application. After the installation, the "MSI Live Update 3" icon (as shown on the right) will appear on the screen. Live OSD -
...the functions listed above, a "sorry" message is a tool used to detect and update your BIOS/ drivers/VGA BIOS/VGA Driver/OSD/Utility online so that you need to search for the correct BIOS/driver version throughout the whole Web site. Live VGA BIOS - For more information on the update instructions, ...Update program will appear: Six buttons are placed on the left column of the screen. To use the function, you don't need to install the "MSI Live Update 3" application. After the installation, the "MSI Live Update 3" icon (as shown on the right) will appear on the screen. Live OSD -

User Guide
Page 93
... that are to be RAID enabled in the system BIOS. 2. Boot from the Windows CD, use the floppy disk that press F10 to copy and install the nForce RAID software. (Check p.5-9 for details.) 4. Initialize the NVRAID Array Disks. Specify the RAID level, either Mirroring (RAID 1), Striping (RAID 0),... The following are the basic steps for details.) 4. Initialize the NVRAID Array Disks. Bootable RAID Array 1. After that has the RAID driver to save the configuration and exit. NVRAID BIOS setup lets you choose the RAID array type and which hard drives you to Mirroring and...
... that are to be RAID enabled in the system BIOS. 2. Boot from the Windows CD, use the floppy disk that press F10 to copy and install the nForce RAID software. (Check p.5-9 for details.) 4. Initialize the NVRAID Array Disks. Specify the RAID level, either Mirroring (RAID 1), Striping (RAID 0),... The following are the basic steps for details.) 4. Initialize the NVRAID Array Disks. Bootable RAID Array 1. After that has the RAID driver to save the configuration and exit. NVRAID BIOS setup lets you choose the RAID array type and which hard drives you to Mirroring and...

User Guide
Page 96
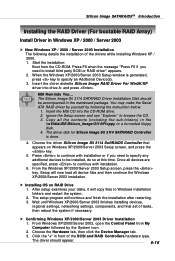
MS-7125 ATX Mainboard Completing the RAID BIOS Setup 1. At the prompt, press Y to configure and load NVRAID drivers under Windows, as RAID drives. Now that the RAID setup has been configured from the RAID BIOS, the next step is to wipe out all ...the data from the RAID array, otherwise press N. You must choose Yes if the drives were previously used as explained in "Installing the NVIDIA RAID Software Under Windows" on p5-9. 5-6 If you have set up . 3. The Array Detail window appears. 4. The Array List window appears, where you...
MS-7125 ATX Mainboard Completing the RAID BIOS Setup 1. At the prompt, press Y to configure and load NVRAID drivers under Windows, as RAID drives. Now that the RAID setup has been configured from the RAID BIOS, the next step is to wipe out all ...the data from the RAID array, otherwise press N. You must choose Yes if the drives were previously used as explained in "Installing the NVIDIA RAID Software Under Windows" on p5-9. 5-6 If you have set up . 3. The Array Detail window appears. 4. The Array List window appears, where you...
User Guide
Page 97
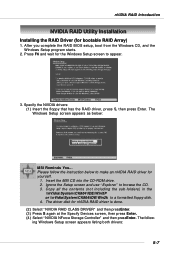
...drivers: 5-7 Please follow the instruction below : MSI Reminds You... Specify the NVIDIA drivers: (1) Insert the floppy that has the RAID driver, press S, then press Enter. After you complete the RAID BIOS setup, boot from the Windows CD, and the Windows Setup program starts. 2. nVIDIA RAID Introduction NVIDIA RAID Utility Installation Installing the RAID Driver (for nVIDIA RAID driver... is done. (2) Select "NVIDIA RAID CLASS DRIVER" and then pressEnter. (3) Press S again ...
...drivers: 5-7 Please follow the instruction below : MSI Reminds You... Specify the NVIDIA drivers: (1) Insert the floppy that has the RAID driver, press S, then press Enter. After you complete the RAID BIOS setup, boot from the Windows CD, and the Windows Setup program starts. 2. nVIDIA RAID Introduction NVIDIA RAID Utility Installation Installing the RAID Driver (for nVIDIA RAID driver... is done. (2) Select "NVIDIA RAID CLASS DRIVER" and then pressEnter. (3) Press S again ...

User Guide
Page 98
...a signed driver. Follow the instructions on how to install the RAID driver. After that hard drive. MS-7125 ATX Mainboard 4. Press Enter to be prompted to click Yes to install Windows XP. Be sure to be an issue with Windows XP Installation. Each time you might be installed 5-8 MSI Reminds You...... Click Yes as many times as needed in the floppy drive until the blue screen portion of the install you add a new hard drive to a RAID array, the RAID driver will not have to ...
...a signed driver. Follow the instructions on how to install the RAID driver. After that hard drive. MS-7125 ATX Mainboard 4. Press Enter to be prompted to click Yes to install Windows XP. Be sure to be an issue with Windows XP Installation. Each time you might be installed 5-8 MSI Reminds You...... Click Yes as many times as needed in the floppy drive until the blue screen portion of the install you add a new hard drive to a RAID array, the RAID driver will not have to ...

User Guide
Page 99
... sure that you want to run the setup application and install the RAID software which will upgrade the Windows IDE driver and install the RAID software. 1. This section describes how to install. Select the modules that the "NVIDIA IDE Driver" is selected. 3. After the installation is completed, be upgraded to use the NVIDIA IDE Parallel ATA...
... sure that you want to run the setup application and install the RAID software which will upgrade the Windows IDE driver and install the RAID software. 1. This section describes how to install. Select the modules that the "NVIDIA IDE Driver" is selected. 3. After the installation is completed, be upgraded to use the NVIDIA IDE Parallel ATA...
User Guide
Page 127
...\\nVidia\IDE\Silicon_Image\3114\Floppy to be accompanied in front of the drivers while installing Windows XP / 2000. 1. The Silicon Image Sil 3114 SATARAID Driver Installation Disk should appear. 6-15 Choose the Hardware tab, then click the ...Device Manager tab. 3. Click the "+" in the mainboard package. Press F6 when the message "Press F6 if you need to Windows installation folders and restart the system. 2. When the Windows XP/2000/Server 2003 Setup window is done. 4. MSI...
...\\nVidia\IDE\Silicon_Image\3114\Floppy to be accompanied in front of the drivers while installing Windows XP / 2000. 1. The Silicon Image Sil 3114 SATARAID Driver Installation Disk should appear. 6-15 Choose the Hardware tab, then click the ...Device Manager tab. 3. Click the "+" in the mainboard package. Press F6 when the message "Press F6 if you need to Windows installation folders and restart the system. 2. When the Windows XP/2000/Server 2003 Setup window is done. 4. MSI...
User Guide
Page 128
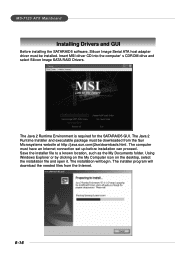
Insert MSI driver CD into the computer's CDROM drive and select Silicon Image SATA RAID Drivers. Using Windows Explorer or by clicking on the My Computer icon on the desktop, select the installation file and open it. The computer must be installed. The installation will download the ....com/j2se/downloads.html. MS-7125 ATX Mainboard Installing Drivers and GUI Before installing the SATARAID5 software, Silicon Image Serial ATA host adapter driver must be downloaded from the Internet. 6-16 The installer program will begin. Save the installer file to a known location, such as the My...
Insert MSI driver CD into the computer's CDROM drive and select Silicon Image SATA RAID Drivers. Using Windows Explorer or by clicking on the My Computer icon on the desktop, select the installation file and open it. The computer must be installed. The installation will download the ....com/j2se/downloads.html. MS-7125 ATX Mainboard Installing Drivers and GUI Before installing the SATARAID5 software, Silicon Image Serial ATA host adapter driver must be downloaded from the Internet. 6-16 The installer program will begin. Save the installer file to a known location, such as the My...

User Guide
Page 130
Installation of Driver & Utility Installation of Drivers and Utility Chapter 6. Installation of Drivers & Utility MSI provides a setup CD along with your mainboard, which contains the required drivers for your system, and many other useful and powerful utility to bring you the best experience for your office professional working and for your home leisure entertainment. 7-1
Installation of Driver & Utility Installation of Drivers and Utility Chapter 6. Installation of Drivers & Utility MSI provides a setup CD along with your mainboard, which contains the required drivers for your system, and many other useful and powerful utility to bring you the best experience for your office professional working and for your home leisure entertainment. 7-1

User Guide
Page 131
Click on the driver you like to install, and follow the following step to install the driver correctly. 1. Then the welcome dialogue will display. MS-7125 ATX Mainboard Driver Installation Click on the Driver tab and the screen below will display. Click Next to install the NVIDIA nForce4 System Drivers for Windows 2000 and Windows XP operating system. Please follow the proceeding instructions. Click on this button to continue. 7-2 NVIDIA nForce4 System Driver This driver is only available for your Windows OS.
Click on the driver you like to install, and follow the following step to install the driver correctly. 1. Then the welcome dialogue will display. MS-7125 ATX Mainboard Driver Installation Click on the Driver tab and the screen below will display. Click Next to install the NVIDIA nForce4 System Drivers for Windows 2000 and Windows XP operating system. Please follow the proceeding instructions. Click on this button to continue. 7-2 NVIDIA nForce4 System Driver This driver is only available for your Windows OS.

User Guide
Page 132
All the components shown here will start installing the selected driver components automatically. 4. The system will be installed by default. Then the following screen displays the information for the NVIDIA IDE SW Driver installation. Then click Next. 3. Then the following screen displays the available components to be selected to install. Installation of Drivers and Utility 2. Click Next to continue. 7-3
All the components shown here will start installing the selected driver components automatically. 4. The system will be installed by default. Then the following screen displays the information for the NVIDIA IDE SW Driver installation. Then click Next. 3. Then the following screen displays the available components to be selected to install. Installation of Drivers and Utility 2. Click Next to continue. 7-3

User Guide
Page 133
... that you do not install this component. MSI Reminds You... Click Yes to restart your computer or click No to restart it is a software firewall to protect the softwares from hacking. The following screen displays the installation of NVIDIA Firewall and ForceWare Network Access Manager. The installation of NVIDIA IDE SW Driver. It is strongly...
... that you do not install this component. MSI Reminds You... Click Yes to restart your computer or click No to restart it is a software firewall to protect the softwares from hacking. The following screen displays the installation of NVIDIA Firewall and ForceWare Network Access Manager. The installation of NVIDIA IDE SW Driver. It is strongly...

User Guide
Page 134
Then the welcome dialogue will launch automatically. 2. Click Yes to restart your computer or click No to continue. Click Next to restart it later. 7-5 The installation process will display. The following screen indicates the installation is complete. Installation of Drivers and Utility Realtek AC97 Audio Driver 1. Click on this button to install the Realtek AC97 Audio Driver.
Then the welcome dialogue will launch automatically. 2. Click Yes to restart your computer or click No to continue. Click Next to restart it later. 7-5 The installation process will display. The following screen indicates the installation is complete. Installation of Drivers and Utility Realtek AC97 Audio Driver 1. Click on this button to install the Realtek AC97 Audio Driver.


