
User Guide
Page 4
Trademarks All trademarks are the properties of Microsoft Corporation. Windows® 95/98/2000/NT/XP are registered trademarks of their respective owners. Revision History Revision V1.0 Revision History First Release Date September 2004 iv ...
Trademarks All trademarks are the properties of Microsoft Corporation. Windows® 95/98/2000/NT/XP are registered trademarks of their respective owners. Revision History Revision V1.0 Revision History First Release Date September 2004 iv ...

User Guide
Page 25
... USB devices directly into the port. Just plug in the IEEE 1394 connector into these connectors. The IEEE 1394 highspeed serial bus complements USB by Windows® 98 SE, Windows® XP, Windows® ME and Windows® 2000.
... USB devices directly into the port. Just plug in the IEEE 1394 connector into these connectors. The IEEE 1394 highspeed serial bus complements USB by Windows® 98 SE, Windows® XP, Windows® ME and Windows® 2000.

User Guide
Page 31
... without external power. Chapter 2 IEEE 1394 Port: J1394-1 The bigger 6-pin IEEE 1394 Port on the back panel is provided by Windows® 98 SE, Windows® XP, Windows® ME and Windows® 2000. Just plug in the IEEE 1394 connector into the port. That means the mainboard can provide the power for...
... without external power. Chapter 2 IEEE 1394 Port: J1394-1 The bigger 6-pin IEEE 1394 Port on the back panel is provided by Windows® 98 SE, Windows® XP, Windows® ME and Windows® 2000. Just plug in the IEEE 1394 connector into the port. That means the mainboard can provide the power for...
User Guide
Page 65
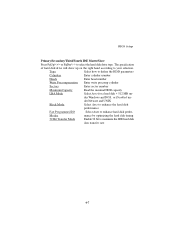
Type Select how to select the hard disk drive type. der Windows and DOS, or Disabled un- BIOS Setup Primary/Secondary/Third/Fourth IDE Master/Slave Press PgUp/ or PgDn/ to define the HDD parameters Cylinders Enter ...
Type Select how to select the hard disk drive type. der Windows and DOS, or Disabled un- BIOS Setup Primary/Secondary/Third/Fourth IDE Master/Slave Press PgUp/ or PgDn/ to define the HDD parameters Cylinders Enter ...
User Guide
Page 72
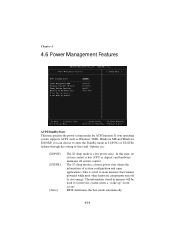
... power state where the information of this state, no system context is a low power state. If your operating system supports ACPI, such as Windows 98SE, Windows ME and Windows 2000/XP, you can choose to enter the Standby mode in memory will be used to save energy. BIOS determines the best mode automatically...
... power state where the information of this state, no system context is a low power state. If your operating system supports ACPI, such as Windows 98SE, Windows ME and Windows 2000/XP, you can choose to enter the Standby mode in memory will be used to save energy. BIOS determines the best mode automatically...

User Guide
Page 80
... 15 IRQs, while [Native Mode] means you may use all available IRQs to use for HDD. --- Older OSs that support switch to Native Mode (WinXP, Windows .NET Server) can set SATA and PATA to Legacy Mode. --- Maximum 4 ATA devices to configure the available ATA controller. Maximum 6 ATA devices to connect (4 for...
... 15 IRQs, while [Native Mode] means you may use all available IRQs to use for HDD. --- Older OSs that support switch to Native Mode (WinXP, Windows .NET Server) can set SATA and PATA to Legacy Mode. --- Maximum 4 ATA devices to configure the available ATA controller. Maximum 6 ATA devices to connect (4 for...
User Guide
Page 90
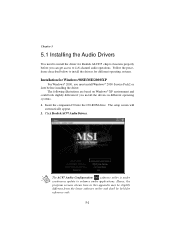
...driver. Click Realtek AC97 Audio Drivers. Chapter 5 5.1 Installing the Audio Drivers You need to install the driver for Windows 98SE/ME/2000/XP For Windows® 2000, you must install Windows® 2000 Service Pack2 or later before you can get access to 4-/6-channel audio operations. The following illustrations are ...based on Windows® XP environment and could look slightly different if you install the drivers in this appendix may be slightly different from the ...
...driver. Click Realtek AC97 Audio Drivers. Chapter 5 5.1 Installing the Audio Drivers You need to install the driver for Windows 98SE/ME/2000/XP For Windows® 2000, you must install Windows® 2000 Service Pack2 or later before you can get access to 4-/6-channel audio operations. The following illustrations are ...based on Windows® XP environment and could look slightly different if you install the drivers in this appendix may be slightly different from the ...
User Guide
Page 92
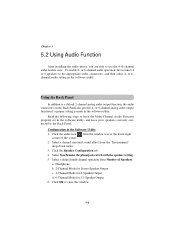
...default 2-channel analog audio output function, the audio connectors on the Back Panel also provide 4- Select a desired surround sound effect from the window tray at the lower-right corner of Speakers. Click the Speaker Configuration tab. 4. Headphone b. 2-Channel Mode for Stereo-Speaker Output c....-channel operation from Number of the screen. 2. Select Synchronize the phonejack switch with the speaker setting. 5. Click OK to close this window. 5-4 Configuration in the software utility. Click the audio icon from the "Environment" drop-down menu. 3. a. or 6channel audio setting...
...default 2-channel analog audio output function, the audio connectors on the Back Panel also provide 4- Select a desired surround sound effect from the window tray at the lower-right corner of Speakers. Click the Speaker Configuration tab. 4. Headphone b. 2-Channel Mode for Stereo-Speaker Output c....-channel operation from Number of the screen. 2. Select Synchronize the phonejack switch with the speaker setting. 5. Click OK to close this window. 5-4 Configuration in the software utility. Click the audio icon from the "Environment" drop-down menu. 3. a. or 6channel audio setting...

User Guide
Page 96
... 2. Click the audio icon the screen. The following window appears. Center Front Right Front Left Rear Right Rear Left Subwoofer 6 speakers appear on the window. 5-8 If you select "4-Channel Mode", only 4 speakers appear on the "Speaker Test" window only when you select "6-Channel Mode" in the "...No. from the window tray at the lower-right corner of Speakers" column. ...
... 2. Click the audio icon the screen. The following window appears. Center Front Right Front Left Rear Right Rear Left Subwoofer 6 speakers appear on the window. 5-8 If you select "4-Channel Mode", only 4 speakers appear on the "Speaker Test" window only when you select "6-Channel Mode" in the "...No. from the window tray at the lower-right corner of Speakers" column. ...

User Guide
Page 98
Chapter 5 5.4 Playing KaraOK The KaraOK function will automatically remove human voice (lyrics) and leave melody for 2-channel audio operation. In the Sound Effect tab, select Voice Cancellation under "KaraOK." 3. Click OK to sing the song. Click the audio icon from the window tray at the lower-right corner of the screen. 2. Note that this function applies only for you to close this window. 2 3 5-10 Playing KaraOK 1.
Chapter 5 5.4 Playing KaraOK The KaraOK function will automatically remove human voice (lyrics) and leave melody for 2-channel audio operation. In the Sound Effect tab, select Voice Cancellation under "KaraOK." 3. Click OK to sing the song. Click the audio icon from the window tray at the lower-right corner of the screen. 2. Note that this function applies only for you to close this window. 2 3 5-10 Playing KaraOK 1.
