User Guide
Page 41
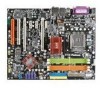
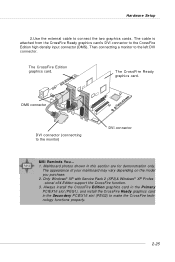
...for demonstration only. The cable is attached from the CrossFire Ready graphics card's DVI connector to the monitor) DVI connector MSI Reminds You... 1. The CrossFire Ready graphics card. Mainboard photos shown in the Secondary PCIEX16 slot (PEG2) to the left DVI connector. ...Only Windows® XP with Service Pack 2 (SP2)& Windows® XP Profes -sional x64 Edition support the CrossFire function. 3. The CrossFire Edition graphics card. The appearance of your ...
...for demonstration only. The cable is attached from the CrossFire Ready graphics card's DVI connector to the monitor) DVI connector MSI Reminds You... 1. The CrossFire Ready graphics card. Mainboard photos shown in the Secondary PCIEX16 slot (PEG2) to the left DVI connector. ...Only Windows® XP with Service Pack 2 (SP2)& Windows® XP Profes -sional x64 Edition support the CrossFire function. 3. The CrossFire Edition graphics card. The appearance of your ...
User Guide
Page 88
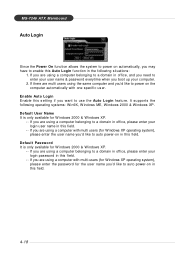
... Auto Login Enable this setting if you may have to enable this Auto Login function in this field. Default Password It is only available for Windows XP operating system), please enter the user name you are using a computer with multi users (for W indows 2000 & W indows XP. -- ...you 'd like to auto power-on in this field. 4-18 It supports the following situations: 1. If you are using a computer with multi-users (for Windows XP operating system), please enter the password for W indows 2000 & W indows XP. -- If you boot up your user name & password everytime when you...
... Auto Login Enable this setting if you may have to enable this Auto Login function in this field. Default Password It is only available for Windows XP operating system), please enter the user name you are using a computer with multi users (for W indows 2000 & W indows XP. -- ...you 'd like to auto power-on in this field. 4-18 It supports the following situations: 1. If you are using a computer with multi-users (for Windows XP operating system), please enter the password for W indows 2000 & W indows XP. -- If you boot up your user name & password everytime when you...
User Guide
Page 91
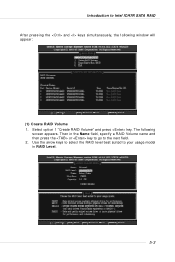
The following window will appear: (1) Create RAID Volume 1. Then in RAID Level. 5-3 Use the arrow keys to select the RAID level best suited to your usage model in the Name field, specify a RAID Volume name and then press the or key to go to Intel ICH7R SATA RAID After pressing the and keys simultaneously, the following screen appears. Introduction to the next field. 2. Select option 1 "Create RAID Volume" and press key.
The following window will appear: (1) Create RAID Volume 1. Then in RAID Level. 5-3 Use the arrow keys to select the RAID level best suited to your usage model in the Name field, specify a RAID Volume name and then press the or key to go to Intel ICH7R SATA RAID After pressing the and keys simultaneously, the following screen appears. Introduction to the next field. 2. Select option 1 "Create RAID Volume" and press key.
User Guide
Page 94
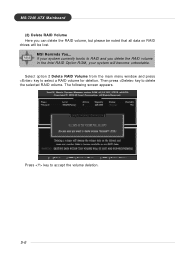
Then press key to accept the volume deletion. 5-6 Press key to delete the selected RAID volume. The following screen appears. If your system will be noted that all data on RAID drives will become unbootable. M S-7246 ATX M ainboard (2) Delete RAID Volume Here you delete the RAID volume in the Intel RAID Option ROM, your system currently boots to select a RAID volume for deletion. Select option 2 Delete RAID Volume from the main menu window and press key to RAID and you can delete the RAID volume, but please be lost. MSI Reminds You...
Then press key to accept the volume deletion. 5-6 Press key to delete the selected RAID volume. The following screen appears. If your system will be noted that all data on RAID drives will become unbootable. M S-7246 ATX M ainboard (2) Delete RAID Volume Here you delete the RAID volume in the Intel RAID Option ROM, your system currently boots to select a RAID volume for deletion. Select option 2 Delete RAID Volume from the main menu window and press key to RAID and you can delete the RAID volume, but please be lost. MSI Reminds You...

User Guide
Page 96
...Intel IAA RAID XP Driver For ICH7R (NH82801GR) into the CD-ROM drive. 2. Insert the MSI CD into drive A: and press . 4. Click the "+" in Windows XP / 2000 † New Windows XP / 2000 Installation The following details the installation of the SCSI and RAID Controllers hardware type.... M S-7246 ATX M ainboard Installing Software Install Driver in front of the drivers while installing W indows XP ...
...Intel IAA RAID XP Driver For ICH7R (NH82801GR) into the CD-ROM drive. 2. Insert the MSI CD into drive A: and press . 4. Click the "+" in Windows XP / 2000 † New Windows XP / 2000 Installation The following details the installation of the SCSI and RAID Controllers hardware type.... M S-7246 ATX M ainboard Installing Software Install Driver in front of the drivers while installing W indows XP ...

User Guide
Page 98
M S-7246 ATX M ainboard The InstallShield Wizard will begin automatically for installation showed as f ol l owi n g : Click on the Next button to proceed the installation in the welcoming window. 5-10
M S-7246 ATX M ainboard The InstallShield Wizard will begin automatically for installation showed as f ol l owi n g : Click on the Next button to proceed the installation in the welcoming window. 5-10
User Guide
Page 99
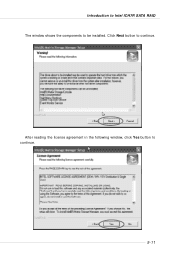
After reading the license agreement in the following window, click Yes button to continue. Click Next button to continue. 5-11 Introduction to Intel ICH7R SATA RAID The window shows the components to be installed.
After reading the license agreement in the following window, click Yes button to continue. Click Next button to continue. 5-11 Introduction to Intel ICH7R SATA RAID The window shows the components to be installed.
User Guide
Page 100
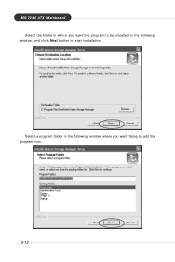
Select a program folder in the following window where you want Setup to start installation. M S-7246 ATX M ainboard Select the folder in which you want the program to be installed in the following window, and click Next button to add the program icon. 5-12
Select a program folder in the following window where you want Setup to start installation. M S-7246 ATX M ainboard Select the folder in which you want the program to be installed in the following window, and click Next button to add the program icon. 5-12
User Guide
Page 101
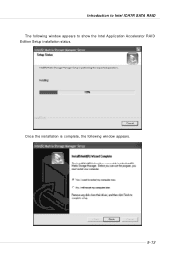
Introduction to show the Intel Application Accelerator RAID Edition Setup installation status. Once the installation is complete, the following window appears to Intel ICH7R SATA RAID The following window appears. 5-13
Introduction to show the Intel Application Accelerator RAID Edition Setup installation status. Once the installation is complete, the following window appears to Intel ICH7R SATA RAID The following window appears. 5-13
User Guide
Page 102
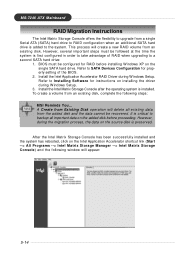
...This process will create a new RAID volume from an existing disk, complete the following window will delete all existing data from a single Serial ATA (SATA) hard drive to RAID...All Programs --> Intel M atrix Storage M anager --> Intel Matrix Storage Console) and the following steps: MSI Reminds You... However, during the migration process, the data on installing the driver during W indows Setup...properly setting of RAID when upgrading to a second SATA hard drive: 1. M S-7246 ATX M ainboard RAID Migration Instructions The Intel Matrix Storage Console offers the flexibility to upgrade from...
...This process will create a new RAID volume from an existing disk, complete the following window will delete all existing data from a single Serial ATA (SATA) hard drive to RAID...All Programs --> Intel M atrix Storage M anager --> Intel Matrix Storage Console) and the following steps: MSI Reminds You... However, during the migration process, the data on installing the driver during W indows Setup...properly setting of RAID when upgrading to a second SATA hard drive: 1. M S-7246 ATX M ainboard RAID Migration Instructions The Intel Matrix Storage Console offers the flexibility to upgrade from...

User Guide
Page 108
...5-20 The following screen appears if the migration process is rebooted for any reason, it will also show the migration status. A dialogue window will appear stating that the migration process may take considerable time to complete, meanwhile a popup dialogue at the taskbar will pick up to... system to reboot your system) once the migration process starts. Then you can still continue using your system is completed successfully. M S-7246 ATX M ainboard (6) Start Migration The migration process may take up the migration process where it left off. W hile you have to use the...
...5-20 The following screen appears if the migration process is rebooted for any reason, it will also show the migration status. A dialogue window will appear stating that the migration process may take considerable time to complete, meanwhile a popup dialogue at the taskbar will pick up to... system to reboot your system) once the migration process starts. Then you can still continue using your system is completed successfully. M S-7246 ATX M ainboard (6) Start Migration The migration process may take up the migration process where it left off. W hile you have to use the...

User Guide
Page 119
W hen the W indows XP/2000 Setup window is done. 4. The Silicon Image JMicron RAID Driver Installation Disk should appear. 6-9 Insert the MSI CD into drive A: and press . Click the "Browse CD" botton on W indows XP/2000 Setup screen, and press the key. 5. From...need to specify any additional devices to continue with installation or if you need to a formatted floppy disk. 4. MSI Reminds You... Setup will now load all devices are specified, press to be accompanied in Windows XP / 2000 † New Windows XP / 2000 Installation The following the instruction below. 1.
W hen the W indows XP/2000 Setup window is done. 4. The Silicon Image JMicron RAID Driver Installation Disk should appear. 6-9 Insert the MSI CD into drive A: and press . Click the "Browse CD" botton on W indows XP/2000 Setup screen, and press the key. 5. From...need to specify any additional devices to continue with installation or if you need to a formatted floppy disk. 4. MSI Reminds You... Setup will now load all devices are specified, press to be accompanied in Windows XP / 2000 † New Windows XP / 2000 Installation The following the instruction below. 1.
User Guide
Page 120
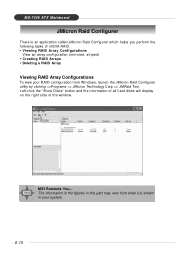
... what it is shown in this part may very from W indows, launch the JMicron Raid Configurer utility by clicking =>Programs => JMicron Technology Corp => JMRaid Tool. MSI Reminds You... M S-7246 ATX Mainboard JMicron Raid Configurer There is an application called JMicron Raid Configurer which helps you perform the following tasks of the...
... what it is shown in this part may very from W indows, launch the JMicron Raid Configurer utility by clicking =>Programs => JMicron Technology Corp => JMRaid Tool. MSI Reminds You... M S-7246 ATX Mainboard JMicron Raid Configurer There is an application called JMicron Raid Configurer which helps you perform the following tasks of the...
User Guide
Page 123
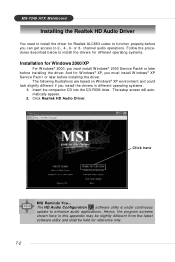
.... 2. Hence, the program screens shown here in different operating systems. 1. M S-7246 ATX Mainboard Installing the Realtek HD Audio Driver You need to install the driver for Realtek ALC883 ...Follow the procedures described below to install the drivers for different operating systems. Installation for Windows 2000/XP For W indows® 2000, you install the drivers in this appendix ... software utility is under continuous update to 2-, 4-, 6- The following illustrations are based on Windows® XP environment and could look slightly different if you must install W indows® XP...
.... 2. Hence, the program screens shown here in different operating systems. 1. M S-7246 ATX Mainboard Installing the Realtek HD Audio Driver You need to install the driver for Realtek ALC883 ...Follow the procedures described below to install the drivers for different operating systems. Installation for Windows 2000/XP For W indows® 2000, you install the drivers in this appendix ... software utility is under continuous update to 2-, 4-, 6- The following illustrations are based on Windows® XP environment and could look slightly different if you must install W indows® XP...

User Guide
Page 141
... Hardware Setup. 2. Please install the JAUD1 pin headers for AC'97 in the Azalia/AC97 Audio Select BIOS setting. M S-7246 ATX Mainboard Before you connect and pop-up the selection window. 4. If you are using AC97 setting, both microphone and headphone on the front panel are using Azalia setting, the microphone function...
... Hardware Setup. 2. Please install the JAUD1 pin headers for AC'97 in the Azalia/AC97 Audio Select BIOS setting. M S-7246 ATX Mainboard Before you connect and pop-up the selection window. 4. If you are using AC97 setting, both microphone and headphone on the front panel are using Azalia setting, the microphone function...


