

User Manual
Page 2
Contents Copyright and Trademarks Notice iii Revision iii Technical Support iii Safety Instructions iv CE Conformity vi FCC-B Radio Frequency Interference Statement vi WEEE Statement vii Chemical Substances Information vii RoHS Statement vii 1. OSD Setup 2-1 Navi Key 2-2 OSD Setup via Navi Key 2-5 Appendix A-1 Specifications A-2 Preset Display Modes A-4 Troubleshooting A-5 Getting Started 1-1 Package Contents 1-2 Installing the Monitor Stand 1-3 Adjusting the Monitor 1-5 Monitor Overview 1-6 Connecting the Monitor to PC 1-10 ii 2.
Contents Copyright and Trademarks Notice iii Revision iii Technical Support iii Safety Instructions iv CE Conformity vi FCC-B Radio Frequency Interference Statement vi WEEE Statement vii Chemical Substances Information vii RoHS Statement vii 1. OSD Setup 2-1 Navi Key 2-2 OSD Setup via Navi Key 2-5 Appendix A-1 Specifications A-2 Preset Display Modes A-4 Troubleshooting A-5 Getting Started 1-1 Package Contents 1-2 Installing the Monitor Stand 1-3 Adjusting the Monitor 1-5 Monitor Overview 1-6 Connecting the Monitor to PC 1-10 ii 2.

User Manual
Page 9
1 Getting Started This chapter provides you with the information on the monitor. While connecting devices, be careful in appearance. • Do not use a grounded wrist strap to avoid static electricity. Your monitor may vary in holding the devices and use any sharp objects on hardware setup procedures. IMPORTANT • The illustrations are for reference only.
1 Getting Started This chapter provides you with the information on the monitor. While connecting devices, be careful in appearance. • Do not use a grounded wrist strap to avoid static electricity. Your monitor may vary in holding the devices and use any sharp objects on hardware setup procedures. IMPORTANT • The illustrations are for reference only.
User Manual
Page 10
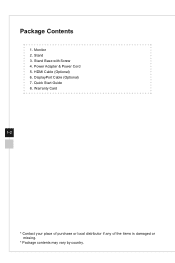
Stand 3. HDMI Cable (Optional) 6. Warranty Card 1-2 * Contact your place of purchase or local distributor if any of the items is damaged or missing. * Package contents may vary by country. Quick Start Guide 8. Power Adapter & Power Cord 5. DisplayPort Cable (Optional) 7. Stand Base with Screw 4. Package Contents 1. Monitor 2.
Stand 3. HDMI Cable (Optional) 6. Warranty Card 1-2 * Contact your place of purchase or local distributor if any of the items is damaged or missing. * Package contents may vary by country. Quick Start Guide 8. Power Adapter & Power Cord 5. DisplayPort Cable (Optional) 7. Stand Base with Screw 4. Package Contents 1. Monitor 2.
User Manual
Page 11
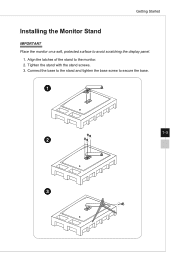
Connect the base to the stand and tighten the base screw to the monitor. 2. Align the latches of the stand to secure the base. 1 1-3 2 3 Tighten the stand with the stand screws. 3. Getting Started Installing the Monitor Stand IMPORTANT Place the monitor on a soft, protected surface to avoid scratching the display panel. 1.
Connect the base to the stand and tighten the base screw to the monitor. 2. Align the latches of the stand to secure the base. 1 1-3 2 3 Tighten the stand with the stand screws. 3. Getting Started Installing the Monitor Stand IMPORTANT Place the monitor on a soft, protected surface to avoid scratching the display panel. 1.
User Manual
Page 13
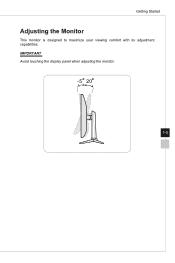
Getting Started Adjusting the Monitor This monitor is designed to maximize your viewing comfort with its adjustment capabilities. IMPORTANT Avoid touching the display panel when adjusting the monitor. -5 O 20O 1-5
Getting Started Adjusting the Monitor This monitor is designed to maximize your viewing comfort with its adjustment capabilities. IMPORTANT Avoid touching the display panel when adjusting the monitor. -5 O 20O 1-5
User Manual
Page 18
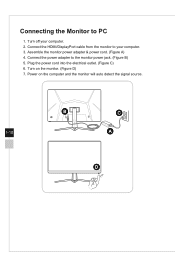
Turn off your computer. 3. Assemble the monitor power adapter & power cord. (Figure A) 4. Turn on the computer and the monitor will auto detect the signal source. Connecting the Monitor to the monitor power jack. (Figure B) 5. Connect the power adapter to PC 1. Connect the HDMI/DisplayPort cable from the monitor to your computer. 2. B C 1-10 A D Power on the monitor. (Figure D) 7. Plug the power cord into the electrical outlet. (Figure C) 6.
Turn off your computer. 3. Assemble the monitor power adapter & power cord. (Figure A) 4. Turn on the computer and the monitor will auto detect the signal source. Connecting the Monitor to the monitor power jack. (Figure B) 5. Connect the power adapter to PC 1. Connect the HDMI/DisplayPort cable from the monitor to your computer. 2. B C 1-10 A D Power on the monitor. (Figure D) 7. Plug the power cord into the electrical outlet. (Figure C) 6.

User Manual
Page 20
Navi Key 2-2 The Navi Key default settings are as follows. Navi Key Middle Button Hot Key (When OSD menu is OFF) OSD Main Menu Basic Operations (When OSD menu is ON) ■■ Entering submenus ■■ Confirming a selection or setting Navi Key The monitor comes with a Navi Key, a multi-directional control that helps navigate the On-Screen Display (OSD) menu.
Navi Key 2-2 The Navi Key default settings are as follows. Navi Key Middle Button Hot Key (When OSD menu is OFF) OSD Main Menu Basic Operations (When OSD menu is ON) ■■ Entering submenus ■■ Confirming a selection or setting Navi Key The monitor comes with a Navi Key, a multi-directional control that helps navigate the On-Screen Display (OSD) menu.
User Manual
Page 24
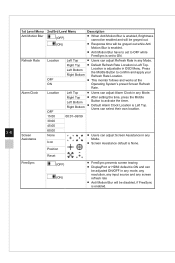
... ■■ Users can adjust Refresh Rate in OSD Menu. Press the Middle Button to confirm and apply your Refresh Rate Location. ■■ This monitor follows and works at the Operating System's preset Screen Refresh Rate. Right Bottom ■■ Default Alarm Clock Location is Left Top. Left Bottom Right...
... ■■ Users can adjust Refresh Rate in OSD Menu. Press the Middle Button to confirm and apply your Refresh Rate Location. ■■ This monitor follows and works at the Operating System's preset Screen Refresh Rate. Right Bottom ■■ Default Alarm Clock Location is Left Top. Left Bottom Right...

User Manual
Page 27
...9632; Users can press power button to original OSD Default in any Mode. Reset YES NO Users can Reset and restore settings to close monitor. When users set to tune off panel and backlight. Information on Screen. Users' own language setting will be changed. 한국&#...can press power button to OFF, users can enable or disable the Information on Screen (OFF) ■■ The information of the monitor status will override the factory default. Default is an independent setting. OSD Setup hh Setting 1st Level Menu 2nd Level Menu Description Language ...
...9632; Users can press power button to original OSD Default in any Mode. Reset YES NO Users can Reset and restore settings to close monitor. When users set to tune off panel and backlight. Information on Screen. Users' own language setting will be changed. 한국&#...can press power button to OFF, users can enable or disable the Information on Screen (OFF) ■■ The information of the monitor status will override the factory default. Default is an independent setting. OSD Setup hh Setting 1st Level Menu 2nd Level Menu Description Language ...

User Manual
Page 33
.... No image. ■■ Check if the computer graphics card is properly connected. ■■ Check for the monitor to display. A-5 ■■ Check if the monitor signal cable is properly connected. ■■ Check if the computer and graphics card are fuzzy, blurry or have color...any key to a setting suitable for bent pins on . ■■ Check if the monitor signal cable is properly connected. Refer to Preset Display Modes to set the computer to activate the monitor. The icons, font or screen are Plug & Play compatible. The screen image is properly ...
.... No image. ■■ Check if the computer graphics card is properly connected. ■■ Check for the monitor to display. A-5 ■■ Check if the monitor signal cable is properly connected. ■■ Check if the computer and graphics card are fuzzy, blurry or have color...any key to a setting suitable for bent pins on . ■■ Check if the monitor signal cable is properly connected. Refer to Preset Display Modes to set the computer to activate the monitor. The icons, font or screen are Plug & Play compatible. The screen image is properly ...
