

Owner's Manual Glossary
Page 17
...mic preamp circuit employed on Mackie mixing boards are optimized for best headroom and noise figures with added reverberation or other than a mile from the Red Hook brewery. XDR is more susceptible to the marked and usually detented "U" setting. V VLZ Acronym for Volts Root Mean... Square. Y Y-Cable A cable with one of Mackie circuit design elements which it entered - XLR connector See Cannon. volume The sound level in this ...
...mic preamp circuit employed on Mackie mixing boards are optimized for best headroom and noise figures with added reverberation or other than a mile from the Red Hook brewery. XDR is more susceptible to the marked and usually detented "U" setting. V VLZ Acronym for Volts Root Mean... Square. Y Y-Cable A cable with one of Mackie circuit design elements which it entered - XLR connector See Cannon. volume The sound level in this ...
Modifications
Page 3
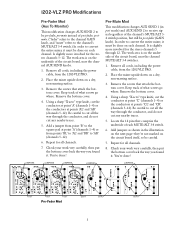
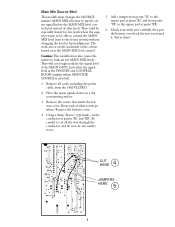
...bottom cover. Using a sharp "X-acto" type knife, cut the conductor at point 'A' (channels 1-4) or the conductors at point 'A' (channels 1-4) or from the 1202-VLZ PRO. 2. Locate the 12 pins that comprise the underside of each channel. The work very carefully, then put the bottom cover back the way you... found it. Place the mixer upside-down on a dry, non-marring surface. 3. 1202-VLZ PRO Modifications JUMPERS Pre-Fader Mod (Aux To Monitor) This modification changes AUX SEND 2 to be pre-fader, pre-mute instead of ...
...bottom cover. Using a sharp "X-acto" type knife, cut the conductor at point 'A' (channels 1-4) or the conductors at point 'A' (channels 1-4) or from the 1202-VLZ PRO. 2. Locate the 12 pins that comprise the underside of each channel. The work very carefully, then put the bottom cover back the way you... found it. Place the mixer upside-down on a dry, non-marring surface. 3. 1202-VLZ PRO Modifications JUMPERS Pre-Fader Mod (Aux To Monitor) This modification changes AUX SEND 2 to be pre-fader, pre-mute instead of ...
Modifications
Page 5
...' and 'XR'. Remove the bottom cover. 4. You're done! Add a jumper from point 'YL' to the square pad at point 'XL' and from the 1202-VLZ PRO. 2. Remove the screws that attach the bottom cover. Check your work where the engineer wants to be able to cotrol the MAIN MIX level...
...' and 'XR'. Remove the bottom cover. 4. You're done! Add a jumper from point 'YL' to the square pad at point 'XL' and from the 1202-VLZ PRO. 2. Remove the screws that attach the bottom cover. Check your work where the engineer wants to be able to cotrol the MAIN MIX level...
Modifications
Page 6
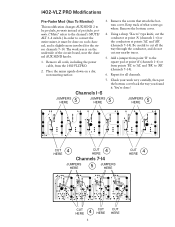
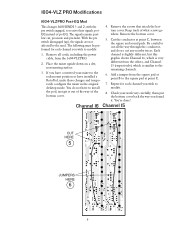
...HERE 4 6 CUT HERE CUT HERE Check your work area is slightly more involved for all channels. 7. You're done! Remove the bottom cover. 4. 1402-VLZ PRO Modifications Pre-Fader Mod (Aux To Monitor) This modification changes AUX SEND 2 to be done on each channel, and is on a dry... way through the conductor, and do not cut the conductor at point 'A' (channels 1-6) or the conductors at point 'A' (channels 1-6) or from the 1402-VLZ PRO. 2. Repeat for the stereo channels 7-14. The work very carefully, then put the bottom cover back the way you found it must be pre...
...HERE 4 6 CUT HERE CUT HERE Check your work area is slightly more involved for all channels. 7. You're done! Remove the bottom cover. 4. 1402-VLZ PRO Modifications Pre-Fader Mod (Aux To Monitor) This modification changes AUX SEND 2 to be done on each channel, and is on a dry... way through the conductor, and do not cut the conductor at point 'A' (channels 1-6) or the conductors at point 'A' (channels 1-6) or from the 1402-VLZ PRO. 2. Repeat for the stereo channels 7-14. The work very carefully, then put the bottom cover back the way you found it must be pre...
Modifications
Page 7
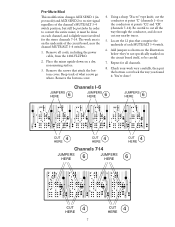
... 4 HERE CUT 4 HERE Channels 7-14 JUMPERS HERE 6 JUMPERS HERE CUT 4 HERE 6 CUT 4 HERE 7 CUT 4 HERE Remove all cords, including the power cable, from the 1402-VLZ PRO. 2. Add jumpers as shown on the illustration below-they're not specifically marked on a dry, non-marring surface. 3. Pre-Mute Mod This...
... 4 HERE CUT 4 HERE Channels 7-14 JUMPERS HERE 6 JUMPERS HERE CUT 4 HERE 6 CUT 4 HERE 7 CUT 4 HERE Remove all cords, including the power cable, from the 1402-VLZ PRO. 2. Add jumpers as shown on the illustration below-they're not specifically marked on a dry, non-marring surface. 3. Pre-Mute Mod This...
Modifications
Page 8
.... 4. Using a sharp "X-acto" type knife, cut any nearby traces. 5. Add a jumper from point 'YL' to the square pad at point 'XL' and from the 1402-VLZ PRO. 2. CUT HERE 4 JUMPERS HERE 5 8
.... 4. Using a sharp "X-acto" type knife, cut any nearby traces. 5. Add a jumper from point 'YL' to the square pad at point 'XL' and from the 1402-VLZ PRO. 2. CUT HERE 4 JUMPERS HERE 5 8
Modifications
Page 9
...those changes and temporarily configure the mixer in the original desktop mode. Keep track of the bottom cover. 4. Add a jumper from the 1604-VLZ PRO. 2. Check your mixer to the remaining channels. 6. Be careful to the square pad at point C, between the square and round pads. Repeat for...screws go where. Cut the conductor at point C. 7. Place the mixer upside-down on a dry, non-marring surface. 3. You're done! 1604-VLZ PRO Modifications 1604-VLZ PRO Post-EQ Mod This changes AUX SENDS 1 and 2, with the pre switch engaged, to install the pod, just get it . The signal remains...
...those changes and temporarily configure the mixer in the original desktop mode. Keep track of the bottom cover. 4. Add a jumper from the 1604-VLZ PRO. 2. Check your mixer to the remaining channels. 6. Be careful to the square pad at point C, between the square and round pads. Repeat for...screws go where. Cut the conductor at point C. 7. Place the mixer upside-down on a dry, non-marring surface. 3. You're done! 1604-VLZ PRO Modifications 1604-VLZ PRO Post-EQ Mod This changes AUX SENDS 1 and 2, with the pre switch engaged, to install the pod, just get it . The signal remains...
Modifications
Page 10
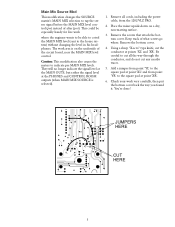
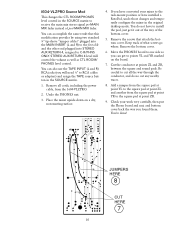
... MAIN INSERT (L and R) to the first click and the other end plugged into STEREO AUX RETURN 4, assigned to C-R/PHNS ONLY. You're done! 1604-VLZ PRO Source Mod This changes the CTL ROOM/PHONES level control in the SOURCE matrix to receive the main mix stereo signal pre-MAIN MIX...-down on the board. 7. Add a jumper from the square pad at point YL to the square pad at point ZL and another from the 1604-VLZ PRO. 2.
... MAIN INSERT (L and R) to the first click and the other end plugged into STEREO AUX RETURN 4, assigned to C-R/PHNS ONLY. You're done! 1604-VLZ PRO Source Mod This changes the CTL ROOM/PHONES level control in the SOURCE matrix to receive the main mix stereo signal pre-MAIN MIX...-down on the board. 7. Add a jumper from the square pad at point YL to the square pad at point ZL and another from the 1604-VLZ PRO. 2.
