
Installation Guide Mac
Page 9
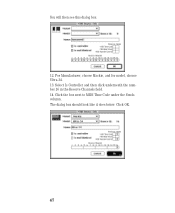
Click OK. 47 You will then see this dialog box: 12. The dialog box should look like it does below. Select Is Controller and then click underneath the number 16 in the Receive Channels field. 14. For Manufacturer, choose Mackie, and for model, choose Ultra-34. 13. Click the box next to MIDI Time Code under the Sends column.
Click OK. 47 You will then see this dialog box: 12. The dialog box should look like it does below. Select Is Controller and then click underneath the number 16 in the Receive Channels field. 14. For Manufacturer, choose Mackie, and for model, choose Ultra-34. 13. Click the box next to MIDI Time Code under the Sends column.

Installation Guide Mac
Page 10
... port that you just added, as current at any given time. 15. Our setup shows the Ultra-34 on port 1 and the SY-88 on the number to . When you're done customizing your Ultra-34 is current, OMS will display a diamond to create as many different studio setups as you want... the interface. 48 To quit Setup, choose Quit from the File menu. NOTE: If you do not make your new studio setup current, OMS (and UltraMix) may not recognize the devices that your studio setup, choose Save from the File menu. If you have a multi-port MIDI interface, click on port...
... port that you just added, as current at any given time. 15. Our setup shows the Ultra-34 on port 1 and the SY-88 on the number to . When you're done customizing your Ultra-34 is current, OMS will display a diamond to create as many different studio setups as you want... the interface. 48 To quit Setup, choose Quit from the File menu. NOTE: If you do not make your new studio setup current, OMS (and UltraMix) may not recognize the devices that your studio setup, choose Save from the File menu. If you have a multi-port MIDI interface, click on port...