

Installation Guide Mac
Page 1
... by itself or with Extensions off. (Hold down the Shift key while restarting.) Insert the UltraMix Install diskette and double-click on its icon. 2. MACINTOSH SYSTEMS You can either install UltraMix Pro by itself to page 52. So we're going any standard Macintosh or PC maneuvers, such as The Band sings...
... by itself or with Extensions off. (Hold down the Shift key while restarting.) Insert the UltraMix Install diskette and double-click on its icon. 2. MACINTOSH SYSTEMS You can either install UltraMix Pro by itself to page 52. So we're going any standard Macintosh or PC maneuvers, such as The Band sings...

Installation Guide Mac
Page 2
Click on Continue. Then you 'll see the following: 4. Next you 'll see this screen: 40 3. Double-click the Installer icon.
Click on Continue. Then you 'll see the following: 4. Next you 'll see this screen: 40 3. Double-click the Installer icon.
Installation Guide Mac
Page 3
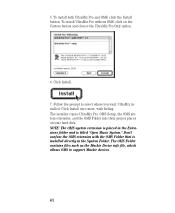
...extension with feeling. The installer copies UltraMix Pro, OMS Setup, the OMS system extension, and the OMS Folder into their proper places on the Custom button and choose the UltraMix Pro Only option. 6. The OMS Folder contains files such as the Mackie Device info file, which allows OMS... to select where you want UltraMix installed. 5. To install UltraMix Pro without OMS, click on your hard disk.
...extension with feeling. The installer copies UltraMix Pro, OMS Setup, the OMS system extension, and the OMS Folder into their proper places on the Custom button and choose the UltraMix Pro Only option. 6. The OMS Folder contains files such as the Mackie Device info file, which allows OMS... to select where you want UltraMix installed. 5. To install UltraMix Pro without OMS, click on your hard disk.
Installation Guide Mac
Page 4
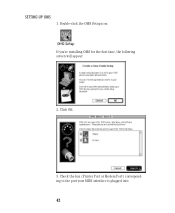
SETTING UP OMS 1. Double-click the OMS Setup icon. If you're installing OMS for the first time, the following screen will appear: 2. Click OK. 3. Check the box (Printer Port or Modem Port) corresponding to the port your MIDI interface is plugged into. 42
SETTING UP OMS 1. Double-click the OMS Setup icon. If you're installing OMS for the first time, the following screen will appear: 2. Click OK. 3. Check the box (Printer Port or Modem Port) corresponding to the port your MIDI interface is plugged into. 42
Installation Guide Mac
Page 5
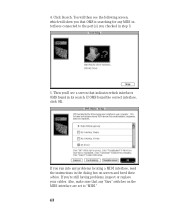
Click Search. If you 'll see the following screen, which interfaces OMS found the correct interface, click OK. 4. If OMS found in its search. Then you run into any problems locating a MIDI interface, read the instructions in step 3. 5. If you checked in the dialog box on the MIDI interface are set to the port(s) you 're still having problems, inspect or replace your cables. Also, make sure that OMS is searching for any "thru" switches on -screen and heed their advice. You will then see a screen that indicates which will show you that any MIDI interfaces connected ...
Click Search. If you 'll see the following screen, which interfaces OMS found the correct interface, click OK. 4. If OMS found in its search. Then you run into any problems locating a MIDI interface, read the instructions in step 3. 5. If you checked in the dialog box on the MIDI interface are set to the port(s) you 're still having problems, inspect or replace your cables. Also, make sure that OMS is searching for any "thru" switches on -screen and heed their advice. You will then see a screen that indicates which will show you that any MIDI interfaces connected ...
Installation Guide Mac
Page 6
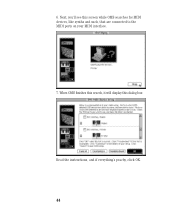
6. Next, you'll see this dialog box: Read the instructions, and if everything's peachy, click OK. 44 When OMS finishes this search, it will display this screen while OMS searches for MIDI devices, like synths and such, that are connected to the MIDI ports on your MIDI interface. 7.
6. Next, you'll see this dialog box: Read the instructions, and if everything's peachy, click OK. 44 When OMS finishes this search, it will display this screen while OMS searches for MIDI devices, like synths and such, that are connected to the MIDI ports on your MIDI interface. 7.

Installation Guide Mac
Page 7
OMS opens a studio setup window that lists your OMS studio setup. Choose Preferences from the Edit menu. Go fer it. At this dialog box: 45 8. You'll then see this point you'll be prompted to save your MIDI interface(s). 9.
OMS opens a studio setup window that lists your OMS studio setup. Choose Preferences from the Edit menu. Go fer it. At this dialog box: 45 8. You'll then see this point you'll be prompted to save your MIDI interface(s). 9.

Installation Guide Mac
Page 8
If it . Leave the "SerialDMA" box alone-if OMS decides your system needs this, the box will be checked. If you don't need it didn't, choose New Device from the studio menu. 46 If OMS found devices in its MIDI device search, indicated by the icon showing a keyboard with a question mark, doubleclick on that icon. Do not second guess OMS! 12. If not, then OMS has decided you use AppleTalk, make sure both of the AppleTalk-related checkboxes are checked. Uncheck the "Report serial overrun..." checkbox.
If it . Leave the "SerialDMA" box alone-if OMS decides your system needs this, the box will be checked. If you don't need it didn't, choose New Device from the studio menu. 46 If OMS found devices in its MIDI device search, indicated by the icon showing a keyboard with a question mark, doubleclick on that icon. Do not second guess OMS! 12. If not, then OMS has decided you use AppleTalk, make sure both of the AppleTalk-related checkboxes are checked. Uncheck the "Report serial overrun..." checkbox.
Installation Guide Mac
Page 9
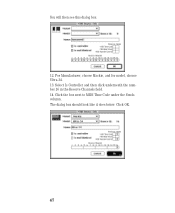
For Manufacturer, choose Mackie, and for model, choose Ultra-34. 13. The dialog box should look like it does below. Click the box next to MIDI Time Code under the Sends column. Select Is Controller and then click underneath the number 16 in the Receive Channels field. 14. Click OK. 47 You will then see this dialog box: 12.
For Manufacturer, choose Mackie, and for model, choose Ultra-34. 13. The dialog box should look like it does below. Click the box next to MIDI Time Code under the Sends column. Select Is Controller and then click underneath the number 16 in the Receive Channels field. 14. Click OK. 47 You will then see this dialog box: 12.

Installation Guide Mac
Page 10
If you do not make your new studio setup current, OMS (and UltraMix) may not recognize the devices that your studio setup, choose Save from the File menu. Both show two-way MIDI communication with the interface. 48 ...
If you do not make your new studio setup current, OMS (and UltraMix) may not recognize the devices that your studio setup, choose Save from the File menu. Both show two-way MIDI communication with the interface. 48 ...

Installation Guide Mac
Page 11
...some other devices connected to your MIDI interface, you must be output from one of UltraMix to your music playback. Important: For UltraMix to recognize a synchronization source, the source device must tell UltraMix which external synchronization source to use. NOTE FOR FREE MIDI SYSTEM (FMS) USERS:...worry about defining a sync source, since that platform takes care of automating only MIDI sound sources using an appropriate interface or translator. UltraMix is a MIDI-based system and therefore uses MIDI time code (MTC) for FMS installation and setup instructions. We're saying this ...
...some other devices connected to your MIDI interface, you must be output from one of UltraMix to your music playback. Important: For UltraMix to recognize a synchronization source, the source device must tell UltraMix which external synchronization source to use. NOTE FOR FREE MIDI SYSTEM (FMS) USERS:...worry about defining a sync source, since that platform takes care of automating only MIDI sound sources using an appropriate interface or translator. UltraMix is a MIDI-based system and therefore uses MIDI time code (MTC) for FMS installation and setup instructions. We're saying this ...
Installation Guide Mac
Page 12
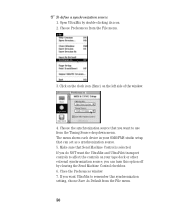
Choose the synchronization source that you want the UltraMix and UltraPilot transport controls to affect the controls on the left side of the window. 4. ...m To define a synchronization source: 1. If you do NOT want to remember this option off by double-clicking its icon. 2. Open UltraMix by clearing the Send Machine Control checkbox. 6. Click on the clock icon (Sync) on your OMS/FMS studio setup that Send Machine Control... can turn this synchronization setting, choose Save As Default from the File menu. 3. If you want UltraMix to use from the Timing Source dropdown menu.
Choose the synchronization source that you want the UltraMix and UltraPilot transport controls to affect the controls on the left side of the window. 4. ...m To define a synchronization source: 1. If you do NOT want to remember this option off by double-clicking its icon. 2. Open UltraMix by clearing the Send Machine Control checkbox. 6. Click on the clock icon (Sync) on your OMS/FMS studio setup that Send Machine Control... can turn this synchronization setting, choose Save As Default from the File menu. 3. If you want UltraMix to use from the Timing Source dropdown menu.
Installation Guide Mac
Page 13
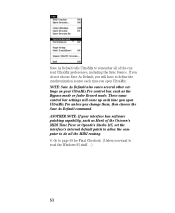
...computer to do not choose Save As Default, you will come up each time you want to page 59 for Final Checkout. (Unless you open UltraMix Pro unless you change them, then choose the Save As Default command. Go to read the Windows 95 stuff...) 51 ANOTHER NOTE: If your... Sync Source. If you do all the MIDI routing. 8. These same control bar settings will have to define the synchronization source each time you open UltraMix. NOTE: Save As Default also saves several other settings on your interface has software patching capability, such as the Bypass mode or fader Record mode.
...computer to do not choose Save As Default, you will come up each time you want to page 59 for Final Checkout. (Unless you open UltraMix Pro unless you change them, then choose the Save As Default command. Go to read the Windows 95 stuff...) 51 ANOTHER NOTE: If your... Sync Source. If you do all the MIDI routing. 8. These same control bar settings will have to define the synchronization source each time you open UltraMix. NOTE: Save As Default also saves several other settings on your interface has software patching capability, such as the Bypass mode or fader Record mode.
Installation Guide Mac
Page 14
... Your First (Fader) Move 1. The transport window and an untitled session window should swap banks. 3. If the corresponding fader on the right side). Open the UltraMix application (if it 's bypassed, the Ext. Click it to sail the sea of the UltraPilot should light, and the glass faders on the screen should... we suggest rereading the previous sections. Sync button in the Transport window should increase. Your tape should roll and the time code numbers in the UltraMix transport window appears lit. If this doesn't work , again we suggest liquid refreshment? 59
... Your First (Fader) Move 1. The transport window and an untitled session window should swap banks. 3. If the corresponding fader on the right side). Open the UltraMix application (if it 's bypassed, the Ext. Click it to sail the sea of the UltraPilot should light, and the glass faders on the screen should... we suggest rereading the previous sections. Sync button in the Transport window should increase. Your tape should roll and the time code numbers in the UltraMix transport window appears lit. If this doesn't work , again we suggest liquid refreshment? 59
Installation Guide Win
Page 1
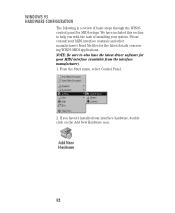
From the Start menu, select Control Panel. 2. WINDOWS 95 HARDWARE CONFIGURATION The following is a review of installing your MIDI interface manuals and other manufacturer's Read Me files for the latest details concerning WIN95 MIDI applications. NOTE: Be sure to help you haven't installed your interface hardware, double click on the Add New Hardware icon. 52 We have included this section to also have the latest driver software for MIDI setups. Please consult your system. If you with the task of basic steps through the WIN95 control panel for your MIDI interface (available ...
From the Start menu, select Control Panel. 2. WINDOWS 95 HARDWARE CONFIGURATION The following is a review of installing your MIDI interface manuals and other manufacturer's Read Me files for the latest details concerning WIN95 MIDI applications. NOTE: Be sure to help you haven't installed your interface hardware, double click on the Add New Hardware icon. 52 We have included this section to also have the latest driver software for MIDI setups. Please consult your system. If you with the task of basic steps through the WIN95 control panel for your MIDI interface (available ...
Installation Guide Win
Page 2
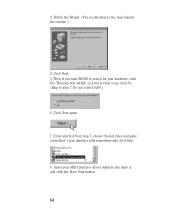
Click Next. 5. Click Next again. 7. This may take awhile, so if you want WIN95 to search for your hardware, click Yes. Follow the Wizard. (Pay no attention to step 7. If you selected No in step 5, choose "Sound, video and game controllers" (your MIDI interface driver diskette into all of this). 8. Insert your interface falls somewhere into drive A: and click the Have Disk button. 53 Then, if you 're rarin' to go, click No. (Skip to the man behind the curtain.) 4. Do not collect $200.) 6. 3.
Click Next. 5. Click Next again. 7. This may take awhile, so if you want WIN95 to search for your hardware, click Yes. Follow the Wizard. (Pay no attention to step 7. If you selected No in step 5, choose "Sound, video and game controllers" (your MIDI interface driver diskette into all of this). 8. Insert your interface falls somewhere into drive A: and click the Have Disk button. 53 Then, if you 're rarin' to go, click No. (Skip to the man behind the curtain.) 4. Do not collect $200.) 6. 3.
Installation Guide Win
Page 3
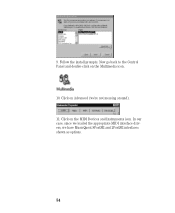
Now go back to the Control Panel and double-click on the MIDI Devices and Instruments icon. Follow the install prompts. In our case, since we loaded the appropriate MIDI interface drivers, we 're not messing around). 11. Click on the Multimedia icon. 10. Click on Advanced (we have MusicQuest 8PortSE and 2PortSE interfaces shown as options. 54 9.
Now go back to the Control Panel and double-click on the MIDI Devices and Instruments icon. Follow the install prompts. In our case, since we loaded the appropriate MIDI interface drivers, we 're not messing around). 11. Click on the Multimedia icon. 10. Click on Advanced (we have MusicQuest 8PortSE and 2PortSE interfaces shown as options. 54 9.
Installation Guide Win
Page 4
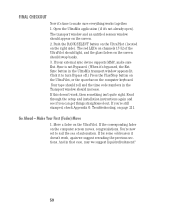
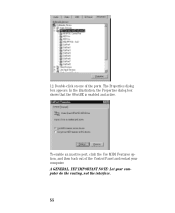
The Properties dialog box appears. To enable an inactive port, click the Use MIDI Features option, and then back out of the ports. A GENERAL, YET IMPORTANT NOTE: Let your computer. 12. Double-click on one of the Control Panel and restart your computer do the routing, not the interface. 55 In the illustration, the Properties dialog box shows that the 8PortSE is enabled and active.
The Properties dialog box appears. To enable an inactive port, click the Use MIDI Features option, and then back out of the ports. A GENERAL, YET IMPORTANT NOTE: Let your computer. 12. Double-click on one of the Control Panel and restart your computer do the routing, not the interface. 55 In the illustration, the Properties dialog box shows that the 8PortSE is enabled and active.
Installation Guide Win
Page 5
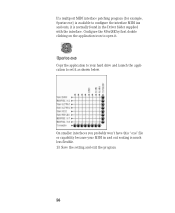
Configure the 8PortSE by first double clicking on the application icon to open it as shown below. On smaller interfaces you probably won't have this ".exe" file or capability because your hard drive and launch the application to set it . Save the setting and exit the program. 56 Copy the application to your MIDI in the Driver folder supplied with the interface. If a multiport MIDI interface patching program (for example, 8portse.exe) is available to configure the interface MIDI ins and outs, it is normally found in and out routing is much less flexible. 13.
Configure the 8PortSE by first double clicking on the application icon to open it as shown below. On smaller interfaces you probably won't have this ".exe" file or capability because your hard drive and launch the application to set it . Save the setting and exit the program. 56 Copy the application to your MIDI in the Driver folder supplied with the interface. If a multiport MIDI interface patching program (for example, 8portse.exe) is available to configure the interface MIDI ins and outs, it is normally found in and out routing is much less flexible. 13.
Installation Guide Win
Page 6
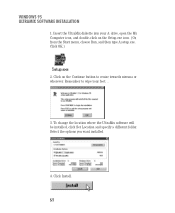
Insert the UltraMix diskette into your feet... 3. Select the options you want installed. 4. Click Install. 57 WINDOWS 95 ULTRAMIX SOFTWARE INSTALLATION 1. To change the location where the UltraMix software will be installed, click Set Location and specify a different folder. Click on the Continue button to wipe your A: drive, open the My Computer icon, and double-click on the Setup.exe icon. (Or, from the Start menu, choose Run, and then type A:setup.exe. Remember to cruise towards nirvana or wherever. Click OK.) 2.
Insert the UltraMix diskette into your feet... 3. Select the options you want installed. 4. Click Install. 57 WINDOWS 95 ULTRAMIX SOFTWARE INSTALLATION 1. To change the location where the UltraMix software will be installed, click Set Location and specify a different folder. Click on the Continue button to wipe your A: drive, open the My Computer icon, and double-click on the Setup.exe icon. (Or, from the Start menu, choose Run, and then type A:setup.exe. Remember to cruise towards nirvana or wherever. Click OK.) 2.