
Installation Guide Mac
Page 3
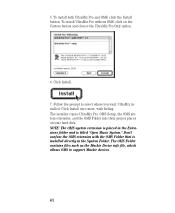
... Music System." The OMS Folder contains files such as the Mackie Device info file, which allows OMS to select where you want UltraMix installed. Click Install. 7. Follow the prompt to support Mackie devices. 41 The installer copies UltraMix Pro, OMS Setup, the OMS system extension, and the ...OMS Folder into their proper places on the Custom button and choose the UltraMix Pro Only option. 6....
... Music System." The OMS Folder contains files such as the Mackie Device info file, which allows OMS to select where you want UltraMix installed. Click Install. 7. Follow the prompt to support Mackie devices. 41 The installer copies UltraMix Pro, OMS Setup, the OMS system extension, and the ...OMS Folder into their proper places on the Custom button and choose the UltraMix Pro Only option. 6....

Installation Guide Mac
Page 10
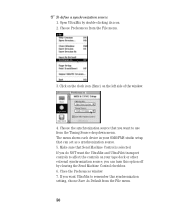
... time. Our setup shows the Ultra-34 on port 1 and the SY-88 on the number to create as many different studio setups as you want, but OMS recognizes only one setup as shown in the picture below, and type the number of the device you do not make your new... studio setup current, OMS (and UltraMix) may not recognize the devices that your studio setup, choose Save from the File menu. If a studio setup is connected to the left of the...
... time. Our setup shows the Ultra-34 on port 1 and the SY-88 on the number to create as many different studio setups as you want, but OMS recognizes only one setup as shown in the picture below, and type the number of the device you do not make your new... studio setup current, OMS (and UltraMix) may not recognize the devices that your studio setup, choose Save from the File menu. If a studio setup is connected to the left of the...
Installation Guide Mac
Page 12
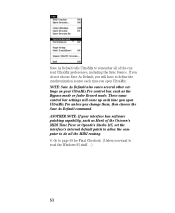
... can turn this synchronization setting, choose Save As Default from the File menu. 3. Choose the synchronization source that you do NOT want to use from the Timing Source dropdown menu. If you want the UltraMix and UltraPilot transport controls to remember this option off by double-clicking its icon. 2. Open... clearing the Send Machine Control checkbox. 6. The menu shows each device in your tape deck or other external synchronization source, you want UltraMix to affect the controls on the left side of the window. 4. Click on the clock icon (Sync) on your OMS/FMS studio ...
... can turn this synchronization setting, choose Save As Default from the File menu. 3. Choose the synchronization source that you do NOT want to use from the Timing Source dropdown menu. If you want the UltraMix and UltraPilot transport controls to remember this option off by double-clicking its icon. 2. Open... clearing the Send Machine Control checkbox. 6. The menu shows each device in your tape deck or other external synchronization source, you want UltraMix to affect the controls on the left side of the window. 4. Click on the clock icon (Sync) on your OMS/FMS studio ...
Installation Guide Mac
Page 13
.... These same control bar settings will have to define the synchronization source each time you open UltraMix Pro unless you want to do not choose Save As Default, you will come up each time you open UltraMix. If you do all of the Unicorn's MIDI Time Piece or Opcode's Studio 4/5, set the interface...'s internal default patch to allow the computer to read the Windows 95 stuff...) 51 Go to remember all the MIDI routing. 8. Save As Default tells UltraMix to page 59 for Final Checkout. (Unless you change them, then choose the Save As Default command. ANOTHER NOTE: If your...
.... These same control bar settings will have to define the synchronization source each time you open UltraMix Pro unless you want to do not choose Save As Default, you will come up each time you open UltraMix. If you do all of the Unicorn's MIDI Time Piece or Opcode's Studio 4/5, set the interface...'s internal default patch to allow the computer to read the Windows 95 stuff...) 51 Go to remember all the MIDI routing. 8. Save As Default tells UltraMix to page 59 for Final Checkout. (Unless you change them, then choose the Save As Default command. ANOTHER NOTE: If your...
Installation Guide Win
Page 2
Then, if you want WIN95 to search for your MIDI interface driver diskette into all of this). 8. This may take awhile, so if you selected No in step 5, choose "Sound, video and game controllers" (your interface falls somewhere into drive A: and click the Have Disk button. 53 Do not collect $200.) 6. Click Next. 5. If you 're rarin' to go, click No. (Skip to the man behind the curtain.) 4. Insert your hardware, click Yes. Click Next again. 7. 3. Follow the Wizard. (Pay no attention to step 7.
Then, if you want WIN95 to search for your MIDI interface driver diskette into all of this). 8. This may take awhile, so if you selected No in step 5, choose "Sound, video and game controllers" (your interface falls somewhere into drive A: and click the Have Disk button. 53 Do not collect $200.) 6. Click Next. 5. If you 're rarin' to go, click No. (Skip to the man behind the curtain.) 4. Insert your hardware, click Yes. Click Next again. 7. 3. Follow the Wizard. (Pay no attention to step 7.
Installation Guide Win
Page 6
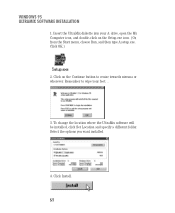
WINDOWS 95 ULTRAMIX SOFTWARE INSTALLATION 1. Insert the UltraMix diskette into your feet... 3. Click on the Setup.exe icon. (Or, from the Start menu, choose Run, and then type A:setup.exe. Remember to wipe your A: drive, open the My Computer icon, and double-click on the Continue button to cruise towards nirvana or wherever. Select the options you want installed. 4. Click Install. 57 To change the location where the UltraMix software will be installed, click Set Location and specify a different folder. Click OK.) 2.
WINDOWS 95 ULTRAMIX SOFTWARE INSTALLATION 1. Insert the UltraMix diskette into your feet... 3. Click on the Setup.exe icon. (Or, from the Start menu, choose Run, and then type A:setup.exe. Remember to wipe your A: drive, open the My Computer icon, and double-click on the Continue button to cruise towards nirvana or wherever. Select the options you want installed. 4. Click Install. 57 To change the location where the UltraMix software will be installed, click Set Location and specify a different folder. Click OK.) 2.
