

Owner's Manual
Page 23
...: Better than -82 dB Maximum Input Levels (rated at 1% THD): Mic input, preamp gain at any channel with 200 pF LOUD Technologies Inc. "Mackie," and the "Running Man" are hereby acknowledged. ©2007-2012 LOUD Technologies Inc. Owner's Manual 23 All other brand names mentioned are trademarks or ... overload LED: +18 dBu AC Power Requirements: Power Consumption: 40 watts Universal AC Power Supply: 100 VAC - 240 VAC, 50-60 Hz Physical Dimensions and Weight: Height: 14.77 in/375 mm (including knobs and connectors) Width: 12.36 in/314 mm Depth: 4.62 in/117 mm (...
...: Better than -82 dB Maximum Input Levels (rated at 1% THD): Mic input, preamp gain at any channel with 200 pF LOUD Technologies Inc. "Mackie," and the "Running Man" are hereby acknowledged. ©2007-2012 LOUD Technologies Inc. Owner's Manual 23 All other brand names mentioned are trademarks or ... overload LED: +18 dBu AC Power Requirements: Power Consumption: 40 watts Universal AC Power Supply: 100 VAC - 240 VAC, 50-60 Hz Physical Dimensions and Weight: Height: 14.77 in/375 mm (including knobs and connectors) Width: 12.36 in/314 mm Depth: 4.62 in/117 mm (...
Owner's Manual
Page 25
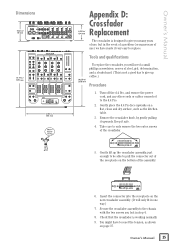
....09 in/ 358 mm To replace the crossfader, you will only fit in step 4. 8. Keep it upwards. Secure the crossfader assembly to the d.4 Pro. 2. Owner's Manual Dimensions 4.62 in/ 117 mm 14.77 in/ 375 mm CUE CUE CUE CUE 12.36 in/ 314 mm WEIGHT 13.5 lb 6.1 kg Appendix D: ... the power cord, and any other cords or cables connected to the chassis with the two screws you lost in one way.) 7. Gently place the d.4 Pro face upwards on the new crossfader assembly. (It will need a small phillips screwdriver, nerves of steel, grit, determination, and a steady hand. (This is not ...
....09 in/ 358 mm To replace the crossfader, you will only fit in step 4. 8. Keep it upwards. Secure the crossfader assembly to the d.4 Pro. 2. Owner's Manual Dimensions 4.62 in/ 117 mm 14.77 in/ 375 mm CUE CUE CUE CUE 12.36 in/ 314 mm WEIGHT 13.5 lb 6.1 kg Appendix D: ... the power cord, and any other cords or cables connected to the chassis with the two screws you lost in one way.) 7. Gently place the d.4 Pro face upwards on the new crossfader assembly. (It will need a small phillips screwdriver, nerves of steel, grit, determination, and a steady hand. (This is not ...