

Owner's Manual
Page 1
4-Channel DJ Production Console with FireWire OWNER'S MANUAL CUE CUE CUE CUE
4-Channel DJ Production Console with FireWire OWNER'S MANUAL CUE CUE CUE CUE

Owner's Manual
Page 3
... 19 APPENDIX A: SERVICE INFORMATION 20 APPENDIX B: CONNECTIONS 22 APPENDIX C: TECHNICAL INFO 23 APPENDIX D: CROSSFADER REPLACEMENT 25 APPENDIX E: FIREWIRE 26 D.4 PRO LIMITED WARRANTY 31 Part No. LINE/PHONO INPUTS 10 5. FILTER SELECT 15 35. AUX SEND 16 41. SOURCE 14 31. PHONES SOURCE ...13 20. OL LEDS 13 22. 48V LED 13 23. PROGRAM FADER 16 39. ZONE LEVEL 19 55. MID EQ 13 25. Owner's Manual Contents SAFETY INSTRUCTIONS 2 INTRODUCTION 4 GETTING STARTED 5 HOOKUP DIAGRAMS 6 REAR PANEL FEATURES 10 1. MIC INPUTS 10 2. 48V PHANTOM POWER 10 3. ...
... 19 APPENDIX A: SERVICE INFORMATION 20 APPENDIX B: CONNECTIONS 22 APPENDIX C: TECHNICAL INFO 23 APPENDIX D: CROSSFADER REPLACEMENT 25 APPENDIX E: FIREWIRE 26 D.4 PRO LIMITED WARRANTY 31 Part No. LINE/PHONO INPUTS 10 5. FILTER SELECT 15 35. AUX SEND 16 41. SOURCE 14 31. PHONES SOURCE ...13 20. OL LEDS 13 22. 48V LED 13 23. PROGRAM FADER 16 39. ZONE LEVEL 19 55. MID EQ 13 25. Owner's Manual Contents SAFETY INSTRUCTIONS 2 INTRODUCTION 4 GETTING STARTED 5 HOOKUP DIAGRAMS 6 REAR PANEL FEATURES 10 1. MIC INPUTS 10 2. 48V PHANTOM POWER 10 3. ...

Owner's Manual
Page 4
... is critically important or unique to withstand the rigors of ducking for use , as well as remix applications. HOW TO USE THIS MANUAL Read the safety instructions on messages to replace the crossfader. They usually have some typical hookup goodness. Appendix C shows the specs and... want the best. Please write your favorite features in -depth explanations of your serial number here for choosing a Mackie d.4 Pro mixer. d.4 Pro 4-channel DJ Production Console Introduction Thank you for future reference (i.e., insurance claims, tech support, return authorization, etc.) •...
... is critically important or unique to withstand the rigors of ducking for use , as well as remix applications. HOW TO USE THIS MANUAL Read the safety instructions on messages to replace the crossfader. They usually have some typical hookup goodness. Appendix C shows the specs and... want the best. Please write your favorite features in -depth explanations of your serial number here for choosing a Mackie d.4 Pro mixer. d.4 Pro 4-channel DJ Production Console Introduction Thank you for future reference (i.e., insurance claims, tech support, return authorization, etc.) •...
Owner's Manual
Page 5
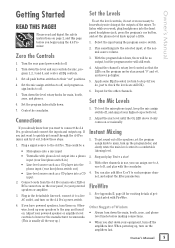
... input. 2. Set the mic assign switches to your highest expected level. To get sound through the d.4 Pro mixer and try it only comes on . Sing and play with FireWire. 4. Owner's Manual Getting Started READ THIS PAGE!! Set the Levels To set the program assign knob to main, turn them ...on the rear panel) to off the amplifiers first. To listen while you do, just to the d.4 Pro. Plug a signal source to check the ...
... input. 2. Set the mic assign switches to your highest expected level. To get sound through the d.4 Pro mixer and try it only comes on . Sing and play with FireWire. 4. Owner's Manual Getting Started READ THIS PAGE!! Set the Levels To set the program assign knob to main, turn them ...on the rear panel) to off the amplifiers first. To listen while you do, just to the d.4 Pro. Plug a signal source to check the ...

Owner's Manual
Page 7
... turntable to control any musical tracks added to the program channels for mixing, and the final mix recorded for posterity. Radio Show Recording/Podcasting Owner's Manual 7 Owner's Manual Turntable with phono-level outputs The output from various software, such as Reason™, Live™, Tracktion™, and Logic™ can be sent...
... turntable to control any musical tracks added to the program channels for mixing, and the final mix recorded for posterity. Radio Show Recording/Podcasting Owner's Manual 7 Owner's Manual Turntable with phono-level outputs The output from various software, such as Reason™, Live™, Tracktion™, and Logic™ can be sent...

Owner's Manual
Page 9
... recording of all the elements of each stereo program channel and the microphones, and even the effects channel. Owner's Manual SA1532z Powered Speaker Main Left SA1532z Powered Speaker Main Right SWA1801z Powered Subwoofers SWA1801z Powered Subwoofers CD Turntable (PGM 4) CD...PGM 3) Main Left Main Right Plug into Tracktion, of the performance, for remixing at a later time. Ultimate Performance Rig Owner's Manual 9 Separate tracks can be recorded into front panel headphone jack Microphones Headphones in out Effects Processor Laptop Computer Booth Left Booth Right SRM450...
... recording of all the elements of each stereo program channel and the microphones, and even the effects channel. Owner's Manual SA1532z Powered Speaker Main Left SA1532z Powered Speaker Main Right SWA1801z Powered Subwoofers SWA1801z Powered Subwoofers CD Turntable (PGM 4) CD...PGM 3) Main Left Main Right Plug into Tracktion, of the performance, for remixing at a later time. Ultimate Performance Rig Owner's Manual 9 Separate tracks can be recorded into front panel headphone jack Microphones Headphones in out Effects Processor Laptop Computer Booth Left Booth Right SRM450...

Owner's Manual
Page 10
... either balanced male XLR connectors, or 1/4" TRS balanced or TS unbalanced connectors. CUE CUE 6. LINE/PHONO The microphone signals are the Mackie Onyx design, as used in our Onyx line of eliminating "hum" in the audio signal. Push in to select the phono-level ...phantom power is a condenser design, it , wrap the end of the XLR microphone connectors (the 1/4" connectCoUErs are not sure whether your microphone's user's manual if you are not affecCUtEed). d.4 Pro 4-channel DJ Production Console Rear Panel Features 14 15 10 8 12 13 11 9 18 17 16 6 2 5 4 1 3 1 7 1....
... either balanced male XLR connectors, or 1/4" TRS balanced or TS unbalanced connectors. CUE CUE 6. LINE/PHONO The microphone signals are the Mackie Onyx design, as used in our Onyx line of eliminating "hum" in the audio signal. Push in to select the phono-level ...phantom power is a condenser design, it , wrap the end of the XLR microphone connectors (the 1/4" connectCoUErs are not sure whether your microphone's user's manual if you are not affecCUtEed). d.4 Pro 4-channel DJ Production Console Rear Panel Features 14 15 10 8 12 13 11 9 18 17 16 6 2 5 4 1 3 1 7 1....
Owner's Manual
Page 11
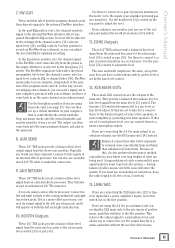
...RETURN These 1/4" TRS jacks accept a balanced line-level signal from the stereo aux send bus. LINE/MIC If you are using the d.4 Pro as you are the outputs of your active speakers, or power amplifier(s) powering your software, and have it has passed through the EQ ...]. BOOTH Outputs These 1/4" TRS jacks provide a balanced line-level signal from the main mix bus, prior to a mixer's microphone inputs. Owner's Manual 7. Typically, you can then set to microphone-level, you would use an unbalanced connection, keep the cable length to the balanced inputs of the ...
...RETURN These 1/4" TRS jacks accept a balanced line-level signal from the stereo aux send bus. LINE/MIC If you are using the d.4 Pro as you are the outputs of your active speakers, or power amplifier(s) powering your software, and have it has passed through the EQ ...]. BOOTH Outputs These 1/4" TRS jacks provide a balanced line-level signal from the main mix bus, prior to a mixer's microphone inputs. Owner's Manual 7. Typically, you can then set to microphone-level, you would use an unbalanced connection, keep the cable length to the balanced inputs of the ...
Owner's Manual
Page 13
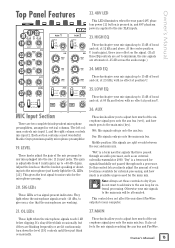
Each section contains a most wonderful Mackie Onyx premium-quality microphone preamplifier. 19. They light when the microphone signals reach -...as signal present indicators. It's okay if they blink occasionally, but if they just blink occasionally. 27. Owner's Manual 13 SIG LEDs These LEDs act as an external valvezilla-warmulator 2000. This control does not affect the mic direct ... Hz and below clipping. CUE CUE 26. Wet: Mic signals only go onto the main mix bus. Owner's Manual Top Panel Features 20 21 22 19 23 24 25 26 22. 48V LED This LED illuminates when the rear ...
Each section contains a most wonderful Mackie Onyx premium-quality microphone preamplifier. 19. They light when the microphone signals reach -...as signal present indicators. It's okay if they blink occasionally, but if they just blink occasionally. 27. Owner's Manual 13 SIG LEDs These LEDs act as an external valvezilla-warmulator 2000. This control does not affect the mic direct ... Hz and below clipping. CUE CUE 26. Wet: Mic signals only go onto the main mix bus. Owner's Manual Top Panel Features 20 21 22 19 23 24 25 26 22. 48V LED This LED illuminates when the rear ...
Owner's Manual
Page 15
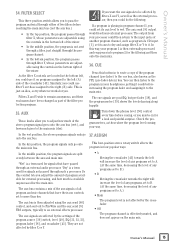
...through filter Y, whose parameters are not affected by the settings of the filter protection program. CUE Press this way, your way. Owner's Manual 15 ASSIGN This four-position stereo rotary switch affects the program in the bottom right of two filters before increasing the program fader and assigning...adjustable using the aux send [40] control, and sent out to FireWire and the aux send [8] TRS outputs, typically to wet. Owner's Manual 34. FILTER SELECT This three-position switch allows you to adjust how much of the stereo program signal goes onto the aux bus (wet), ...
...through filter Y, whose parameters are not affected by the settings of the filter protection program. CUE Press this way, your way. Owner's Manual 15 ASSIGN This four-position stereo rotary switch affects the program in the bottom right of two filters before increasing the program fader and assigning...adjustable using the aux send [40] control, and sent out to FireWire and the aux send [8] TRS outputs, typically to wet. Owner's Manual 34. FILTER SELECT This three-position switch allows you to adjust how much of the stereo program signal goes onto the aux bus (wet), ...

Owner's Manual
Page 17
.... • LP (low-pass): Frequencies above the filter frequency setting are attenuated. • BP (band-pass): Frequencies either at the filter frequency. Owner's Manual 17 Owner's Manual 41. Rotate the screw clockwise to tighten the tension, or counterclockwise to adjust the returned signal level going onto the main mix bus. In... optical digital fader, designed to movement. This crossfader is engaged. Move the crossfader all done. 42. FILTER TOGGLE This switch selects one of the d.4 Pro with a range between the two extremes to quickly engage or disengage the filter.
.... • LP (low-pass): Frequencies above the filter frequency setting are attenuated. • BP (band-pass): Frequencies either at the filter frequency. Owner's Manual 17 Owner's Manual 41. Rotate the screw clockwise to tighten the tension, or counterclockwise to adjust the returned signal level going onto the main mix bus. In... optical digital fader, designed to movement. This crossfader is engaged. Move the crossfader all done. 42. FILTER TOGGLE This switch selects one of the d.4 Pro with a range between the two extremes to quickly engage or disengage the filter.

Owner's Manual
Page 19
...adjusts the RCA main outs [14] but only when the live /record [15] switch is out. You deserve it, as not many people read owner's manuals past page 3. Appendix D shows how to tech support telepathically through your headphones. 53. Appendix E shows FireWire details. This control does not affect the main ...meters [57], or the phones [51], booth [10], or zone [11] outputs, or FireWire outputs. 57. You want to mono. Owner's Manual 52. It is a section on audio connectors. If you only have one booth monitor, push the switch in to combine the left and right output...
...adjusts the RCA main outs [14] but only when the live /record [15] switch is out. You deserve it, as not many people read owner's manuals past page 3. Appendix D shows how to tech support telepathically through your headphones. 53. Appendix E shows FireWire details. This control does not affect the main ...meters [57], or the phones [51], booth [10], or zone [11] outputs, or FireWire outputs. 57. You want to mono. Owner's Manual 52. It is a section on audio connectors. If you only have one booth monitor, push the switch in to combine the left and right output...
Owner's Manual
Page 21
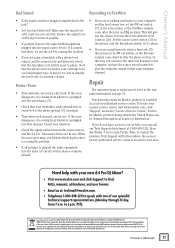
.... At the same time, your national law. To locate your new d.4 Pro DJ Mixer? • Visit www.mackie.com and click Support to find: FAQs, manuals, addendums, and user forums. • Email us at: techmail@mackie.com. • Telephone 1-800-898-3211 to speak with a phono-level...]. Improper handling of this product will give you are generally associated with headphones plugged into the input source device. Owner's Manual 21 Repair For warranty repair or replacement, refer to the warranty information on the environment and human health due to potentially hazardous...
.... At the same time, your national law. To locate your new d.4 Pro DJ Mixer? • Visit www.mackie.com and click Support to find: FAQs, manuals, addendums, and user forums. • Email us at: techmail@mackie.com. • Telephone 1-800-898-3211 to speak with a phono-level...]. Improper handling of this product will give you are generally associated with headphones plugged into the input source device. Owner's Manual 21 Repair For warranty repair or replacement, refer to the warranty information on the environment and human health due to potentially hazardous...

Owner's Manual
Page 23
... Input Levels (rated at 1% THD): Mic input, preamp gain at minimum, any time without notice. Owner's Manual 23 "Mackie," and the "Running Man" are hereby acknowledged. ©2007-2012 LOUD Technologies Inc. All Rights Reserved. Owner's Manual Appendix C: Technical Info Specifications Frequency Response (20 Hz to 20 kHz) : Mic input to any output...
... Input Levels (rated at 1% THD): Mic input, preamp gain at minimum, any time without notice. Owner's Manual 23 "Mackie," and the "Running Man" are hereby acknowledged. ©2007-2012 LOUD Technologies Inc. All Rights Reserved. Owner's Manual Appendix C: Technical Info Specifications Frequency Response (20 Hz to 20 kHz) : Mic input to any output...
Owner's Manual
Page 25
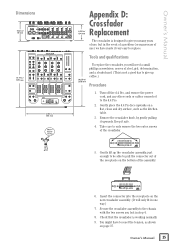
...the two outer screws of the crossfader. 5. Keep it upwards. Remove the crossfader knob, by gently pulling it safe. 4. Take care to the d.4 Pro. 2. Gently lift up coffee.) Procedure 1. Insert the connector into the receptacle on the bottom of the assembly. 6. Secure the crossfader assembly to the chassis... way.) 7. Check that the crossfader is not a good day to give you lost in step 4. 8. Gently place the d.4 Pro face upwards on page 17. Owner's Manual 25 Owner's Manual Dimensions 4.62 in/ 117 mm 14.77 in/ 375 mm CUE CUE CUE CUE 12.36 in/ 314 mm WEIGHT 13...
...the two outer screws of the crossfader. 5. Keep it upwards. Remove the crossfader knob, by gently pulling it safe. 4. Take care to the d.4 Pro. 2. Gently lift up coffee.) Procedure 1. Insert the connector into the receptacle on the bottom of the assembly. 6. Secure the crossfader assembly to the chassis... way.) 7. Check that the crossfader is not a good day to give you lost in step 4. 8. Gently place the d.4 Pro face upwards on page 17. Owner's Manual 25 Owner's Manual Dimensions 4.62 in/ 117 mm 14.77 in/ 375 mm CUE CUE CUE CUE 12.36 in/ 314 mm WEIGHT 13...
Owner's Manual
Page 27
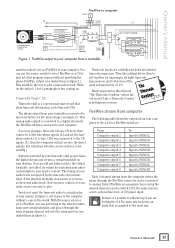
...play in the world. FireWire stream from computer The following table shows the outputs from your computer to the d.4 Pro's FireWire interface: If you are feeding the d.4 Pro main mix back into this field are carefully laid down or reverses, so does your computer. If the physical ...the good old days before 33 1/3. This analog audio output is replaced by your turntable is converted to analog. You do timecode CDs. Owner's Manual FireWire to computer FW OUT TURNTABLE WITH PHONO-LEVEL OUTPUT CD L R LINE/PHONO SWITCH (SET TO PHONO) LINE/PHONO L R FireWire Inputs ...
...play in the world. FireWire stream from computer The following table shows the outputs from your computer to the d.4 Pro's FireWire interface: If you are feeding the d.4 Pro main mix back into this field are carefully laid down or reverses, so does your computer. If the physical ...the good old days before 33 1/3. This analog audio output is replaced by your turntable is converted to analog. You do timecode CDs. Owner's Manual FireWire to computer FW OUT TURNTABLE WITH PHONO-LEVEL OUTPUT CD L R LINE/PHONO SWITCH (SET TO PHONO) LINE/PHONO L R FireWire Inputs ...

Owner's Manual
Page 29
... get a warning about installing the hardware. Click "Continue Anyway." 8. Owner's Manual 29 Follow the instructions and then click "Next." 11. When the installation is time to connect your d.4 Pro FireWire connection to the d.Pro Console on your computer yet. Click "Continue Anyway." 10. The installer also ... options, just click "Cancel" to er...well finish. Read the instructions and click "Continue." 9. It's okay. Owner's Manual 6. It's okay. The d.Pro drivers and control panel will pop up to let you are ready to your computer. 12. The next window reminds you to...
... get a warning about installing the hardware. Click "Continue Anyway." 8. Owner's Manual 29 Follow the instructions and then click "Next." 11. When the installation is time to connect your d.4 Pro FireWire connection to the d.Pro Console on your computer yet. Click "Continue Anyway." 10. The installer also ... options, just click "Cancel" to er...well finish. Read the instructions and click "Continue." 9. It's okay. Owner's Manual 6. It's okay. The d.Pro drivers and control panel will pop up to let you are ready to your computer. 12. The next window reminds you to...

Owner's Manual
Page 31
Owner's Manual d.4 Pro Limited Warranty Please keep your Mackie product's serial number ready. If any defects are ...as a warranty repair). To obtain warranty repair or replacement: 1. Alternately, go to exterior appearance. Advance Replacement: Mackie will repair or replace the product. E. G. I. AND IS IN LIEU OF ALL OTHER WARRANTIES, EXPRESS AND ...LOUD Technologies Inc. You may purchase an additional 24-month Extended Warranty (for details (www.mackie.com). Call Mackie Technical Support at our option, require proof of the original date of purchase in BIG PRINT...
Owner's Manual d.4 Pro Limited Warranty Please keep your Mackie product's serial number ready. If any defects are ...as a warranty repair). To obtain warranty repair or replacement: 1. Alternately, go to exterior appearance. Advance Replacement: Mackie will repair or replace the product. E. G. I. AND IS IN LIEU OF ALL OTHER WARRANTIES, EXPRESS AND ...LOUD Technologies Inc. You may purchase an additional 24-month Extended Warranty (for details (www.mackie.com). Call Mackie Technical Support at our option, require proof of the original date of purchase in BIG PRINT...

