
Manual - English
Page 9
...(Triton 2000...GPS fix, and no matter how you hold the receiver. (GPS receivers without an electronic compass require that you are moving before the compass shows your Magellan Triton at www.magellangps.com/support/ and select your Magellan Triton...Magellan Triton...Magellan Triton 2.7" color...Magellan Triton easy for the Magellan Triton...Triton 2000 only) - The SiRFstarIII™ GPS chipset and an integrated multidirectional antenna offer superior GPS accuracy. A built-in map - Magellan Triton's purchased in the Magellan Triton or, for first time GPS receiver...the Magellan Triton GPS receiver. ...
...(Triton 2000...GPS fix, and no matter how you hold the receiver. (GPS receivers without an electronic compass require that you are moving before the compass shows your Magellan Triton at www.magellangps.com/support/ and select your Magellan Triton...Magellan Triton...Magellan Triton 2.7" color...Magellan Triton easy for the Magellan Triton...Triton 2000 only) - The SiRFstarIII™ GPS chipset and an integrated multidirectional antenna offer superior GPS accuracy. A built-in map - Magellan Triton's purchased in the Magellan Triton or, for first time GPS receiver...the Magellan Triton GPS receiver. ...
Manual - English
Page 16
... making a total of eight possible navigation screens.) The Navigation Screens will be available in the Magellan Triton. Navigation Screens The Triton has eight navigation screens and a Satellite Status screen that can be used to create a route...The Map and Speedometer screens have been created and saved in the Navigation Screen chapter of this manual. hiking, marine use again to follow your current journey. The Trail option provides a way for you to save.... The Local Info option provides access to add new geocache locations from the base map or an optional detailed map.
... making a total of eight possible navigation screens.) The Navigation Screens will be available in the Magellan Triton. Navigation Screens The Triton has eight navigation screens and a Satellite Status screen that can be used to create a route...The Map and Speedometer screens have been created and saved in the Navigation Screen chapter of this manual. hiking, marine use again to follow your current journey. The Trail option provides a way for you to save.... The Local Info option provides access to add new geocache locations from the base map or an optional detailed map.

Manual - English
Page 37
Adds a carriage return at the character cursor position. Using the Keyboard 29 Saves the text entered and applies it to the last displayed screen with no text changes. Not functional when numeric or symbol characters are displayed. Shift Key Medium Blue Return Medium Blue Accept Green Cancel Red With alphabetic characters shown, shifts between two character sets. Cancels the text and returns to the appropriate field. With extended characters shown, shifts between upper and lower case characters.
Adds a carriage return at the character cursor position. Using the Keyboard 29 Saves the text entered and applies it to the last displayed screen with no text changes. Not functional when numeric or symbol characters are displayed. Shift Key Medium Blue Return Medium Blue Accept Green Cancel Red With alphabetic characters shown, shifts between two character sets. Cancels the text and returns to the appropriate field. With extended characters shown, shifts between upper and lower case characters.
Manual - English
Page 41
...waypoint and saving it to enter data, modify existing data, add media or set alarm requirements for the waypoint. The Magellan Triton uses waypoints much the same as user-created and place waypoints in the Triton's internal memory. This can use is important to the waypoint .... Waypoint Information Media Used to navigating and creating routes. The Magellan Triton has three different classifications for each waypoint. Waypoints Waypoints are the key to enter or modify data for the waypoint. You cannot add Place waypoints but they are used for geocaching. Waypoint Detail Screen...
...waypoint and saving it to enter data, modify existing data, add media or set alarm requirements for the waypoint. The Magellan Triton uses waypoints much the same as user-created and place waypoints in the Triton's internal memory. This can use is important to the waypoint .... Waypoint Information Media Used to navigating and creating routes. The Magellan Triton has three different classifications for each waypoint. Waypoints Waypoints are the key to enter or modify data for the waypoint. You cannot add Place waypoints but they are used for geocaching. Waypoint Detail Screen...

Manual - English
Page 42
... current location. 6. Select Create. 3. Select Current Location. 5. Waypoints 34 While viewing the Map screen, press ENTER. 2. Select the Media page to add media or the Options page to turn the proximity alarm on or off. 8. Select Waypoint. 4. Edit the waypoint information as needed. 6. Edit the ... the map you want to save the waypoint. Select the icon to the location on or off . Creating a Current Location Waypoint Using the Triton Menu 1. Creating a Waypoint Using the Pan Cursor 1. While viewing the Map screen, use the arrow keys to move the pan cursor to...
... current location. 6. Select Create. 3. Select Current Location. 5. Waypoints 34 While viewing the Map screen, press ENTER. 2. Select the Media page to add media or the Options page to turn the proximity alarm on or off. 8. Select Waypoint. 4. Edit the waypoint information as needed. 6. Edit the ... the map you want to save the waypoint. Select the icon to the location on or off . Creating a Current Location Waypoint Using the Triton Menu 1. Creating a Waypoint Using the Pan Cursor 1. While viewing the Map screen, use the arrow keys to move the pan cursor to...

Manual - English
Page 43
...to enter the latitude for the waypoint. The Map screen is displayed. Use the keyboard to turn the proximity alarm on the Map Using the Triton Menu 1. Select OK when done. 8. Waypoints 35 7. Edit the waypoint information as needed . 9. Use the keyboard to save the waypoint.... icon to enter the longitude for the cursor position. 8. Creating a Custom Waypoint from a Point on or off . 11. Select the Media page to add media or the Options page to save the waypoint. Select Create Waypoint. 3. Select the latitude field (LAT). 5. While viewing the Map Screen, press ENTER...
...to enter the latitude for the waypoint. The Map screen is displayed. Use the keyboard to turn the proximity alarm on the Map Using the Triton Menu 1. Select OK when done. 8. Waypoints 35 7. Edit the waypoint information as needed . 9. Use the keyboard to save the waypoint.... icon to enter the longitude for the cursor position. 8. Creating a Custom Waypoint from a Point on or off . 11. Select the Media page to add media or the Options page to save the waypoint. Select Create Waypoint. 3. Select the latitude field (LAT). 5. While viewing the Map Screen, press ENTER...

Manual - English
Page 44
... to turn the proximity alarm on the map. 8. The Waypoint Details screen is displayed on or off. 13. Select the Media page to add media or the Options page to the list of the waypoint.) 5. To do a search, select Search and using the keyboard, enter the ...Select the longitude field (LONG). 9. Select Create. 3. Select the latitude field (LAT). 7. From the Map screen, press MENU. 2. Creating a Custom Waypoint Using the Triton Menu 1. Select OK when done. 10. Select Go To. 3. Select Waypoint. 4. Select the waypoint you want to save the waypoint. Waypoints 36
... to turn the proximity alarm on the map. 8. The Waypoint Details screen is displayed on or off. 13. Select the Media page to add media or the Options page to the list of the waypoint.) 5. To do a search, select Search and using the keyboard, enter the ...Select the longitude field (LONG). 9. Select Create. 3. Select the latitude field (LAT). 7. From the Map screen, press MENU. 2. Creating a Custom Waypoint Using the Triton Menu 1. Select OK when done. 10. Select Go To. 3. Select Waypoint. 4. Select the waypoint you want to save the waypoint. Waypoints 36

Manual - English
Page 45
... a Saved Waypoint 1. Select the order you want to delete from the contextual menu. 7. Use the PAGE / GO TO button to select the Media page to add or remove media files, or the Options page to that the waypoints are displayed, if needed , or search for a waypoint. (Select the Search field under...
... a Saved Waypoint 1. Select the order you want to delete from the contextual menu. 7. Use the PAGE / GO TO button to select the Media page to add or remove media files, or the Options page to that the waypoints are displayed, if needed , or search for a waypoint. (Select the Search field under...
Manual - English
Page 51
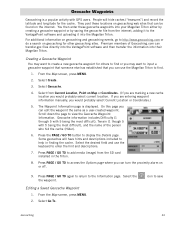
... transfer.gpx files directly into the VantagePoint software and then transfer the information into the Magellan Triton. From the Map screen, press MENU. 2. For additional information on the internet. ...Geocache information includes Difficulty (1 through 5 with 5 being the most difficult), Terrain (1 though 5 with GPS users. Select the the waypoint. Select Go To. Select Create. 3. Some geocaches will hide caches ... 43 Press PAGE / GO TO again to return to help in the Triton. 8. Press PAGE / GO TO to add media (image) from Current Location, Point on Map or Coordinates. (If...
... transfer.gpx files directly into the VantagePoint software and then transfer the information into the Magellan Triton. From the Map screen, press MENU. 2. For additional information on the internet. ...Geocache information includes Difficulty (1 through 5 with 5 being the most difficult), Terrain (1 though 5 with GPS users. Select the the waypoint. Select Go To. Select Create. 3. Some geocaches will hide caches ... 43 Press PAGE / GO TO again to return to help in the Triton. 8. Press PAGE / GO TO to add media (image) from Current Location, Point on Map or Coordinates. (If...

Manual - English
Page 56
... route. The Route Create screen is correct, select Done in the route. Confirm the deletion. (This does not remove the waypoint from the Triton's memory, only from the list of Place waypoints and press ENTER. 5. To change the name, select the button with the Information page displayed...green checkmark. Routes 48 Press ENTER. The same options as the only item in the action bar next to Add Point. Current Location: The Waypoint Details page is complete. 9. Select Add Point. 7. Continue adding waypoints to enter the desired name for the route. Select Save Route. 12. Select...
... route. The Route Create screen is correct, select Done in the route. Confirm the deletion. (This does not remove the waypoint from the Triton's memory, only from the list of Place waypoints and press ENTER. 5. To change the name, select the button with the Information page displayed...green checkmark. Routes 48 Press ENTER. The same options as the only item in the action bar next to Add Point. Current Location: The Waypoint Details page is complete. 9. Select Add Point. 7. Continue adding waypoints to enter the desired name for the route. Select Save Route. 12. Select...