User Manual
Page 3
... houses and by the manufacturer, its service agent or similar qualified persons in order to avoid a hazard. 9) Please abandon the refrigerator according to be unplugged before disposal. Children should not be removed before carrying out user maintenance on the appliance. 7) This appliance ...can negatively affect the unit's performance. Before you throw away your refrigerator. 1) WARNING―Keep ventilation openings, in the appliance enclosure or in the built-in structure, clear of obstruction. 2) WARNING&#...
... houses and by the manufacturer, its service agent or similar qualified persons in order to avoid a hazard. 9) Please abandon the refrigerator according to be unplugged before disposal. Children should not be removed before carrying out user maintenance on the appliance. 7) This appliance ...can negatively affect the unit's performance. Before you throw away your refrigerator. 1) WARNING―Keep ventilation openings, in the appliance enclosure or in the built-in structure, clear of obstruction. 2) WARNING&#...
User Manual
Page 4
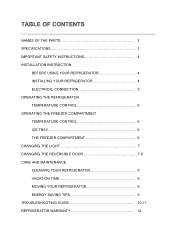
TABLE OF CONTENTS NAMES OF THE PARTS 2 SPECIFICATIONS 3 IMPORTANT SAFETY INSTRUCTIONS 4 INSTALLATION INSTRUCTION BEFORE USING YOUR REFRIGERATOR 4 INSTALLING YOUR REFRIGERATOR 4 ELECTRICAL CONNECTION 5 OPERATING THE REFRIGERATOR TEMPERATURE CONTROL 6 OPERATING THE FREEZER COMPARTMENT TEMPERATURE CONTROL 6 ICE TRAY 6 THE FREEZER COMPARTMENT 6 CHANGING THE LIGHT 7 CHANGING THE REVERSIBLE DOOR 7-8 CARE AND MAINTENANCE CLEANING YOUR REFRIGERATOR 9 VACATION TIME 9 MOVING YOUR REFRIGERATOR 9 ENERGY SAVING TIPS 9 TROUBLESHOOTING GUIDE 10-11 REFRIGERATOR WARRANTY 12
TABLE OF CONTENTS NAMES OF THE PARTS 2 SPECIFICATIONS 3 IMPORTANT SAFETY INSTRUCTIONS 4 INSTALLATION INSTRUCTION BEFORE USING YOUR REFRIGERATOR 4 INSTALLING YOUR REFRIGERATOR 4 ELECTRICAL CONNECTION 5 OPERATING THE REFRIGERATOR TEMPERATURE CONTROL 6 OPERATING THE FREEZER COMPARTMENT TEMPERATURE CONTROL 6 ICE TRAY 6 THE FREEZER COMPARTMENT 6 CHANGING THE LIGHT 7 CHANGING THE REVERSIBLE DOOR 7-8 CARE AND MAINTENANCE CLEANING YOUR REFRIGERATOR 9 VACATION TIME 9 MOVING YOUR REFRIGERATOR 9 ENERGY SAVING TIPS 9 TROUBLESHOOTING GUIDE 10-11 REFRIGERATOR WARRANTY 12
User Manual
Page 5
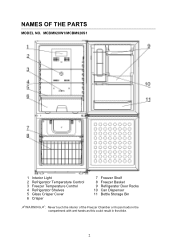
MCBM920W1/MCBM920S1 1 Interior Light 2 Refrigerator Temperature Control 3 Freezer Temperature Control 4 Refrigerator Shelves 5 Glass Crisper Cover 6 Crisper 7 Freezer Shelf 8 Freezer Basket 9 Refrigerator Door Racks 10 Can Dispenser 11 Bottle Storage Bin aWARNINGa: Never touch the interior of the Freezer Chamber or frozen foods in the compartment with wet hands as this could result in frost bite. 2 NAMES OF THE PARTS MODEL NO.
MCBM920W1/MCBM920S1 1 Interior Light 2 Refrigerator Temperature Control 3 Freezer Temperature Control 4 Refrigerator Shelves 5 Glass Crisper Cover 6 Crisper 7 Freezer Shelf 8 Freezer Basket 9 Refrigerator Door Racks 10 Can Dispenser 11 Bottle Storage Bin aWARNINGa: Never touch the interior of the Freezer Chamber or frozen foods in the compartment with wet hands as this could result in frost bite. 2 NAMES OF THE PARTS MODEL NO.
User Manual
Page 6
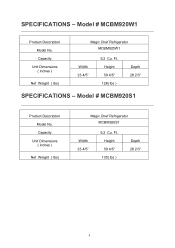
Model # MCBM920W1 Product Description Model No. Capacity Unit Dimensions ( inches ) Net Weight ( lbs) Magic Chef Refrigerator MCBM920W1 Width 23 4/5" 9.2 Cu. Ft. Capacity Unit Dimensions ( inches ) Net Weight ( lbs) Magic Chef Refrigerator MCBM920S1 Width 23 4/5" 9.2 Cu. SPECIFICATIONS - Ft. Height 59 4/5" 128( lbs ) Depth 26 2/3" SPECIFICATIONS - Model # MCBM920S1 Product Description Model No. Height 59 4/5" 130( lbs ) Depth 26 2/3" 3
Model # MCBM920W1 Product Description Model No. Capacity Unit Dimensions ( inches ) Net Weight ( lbs) Magic Chef Refrigerator MCBM920W1 Width 23 4/5" 9.2 Cu. Ft. Capacity Unit Dimensions ( inches ) Net Weight ( lbs) Magic Chef Refrigerator MCBM920S1 Width 23 4/5" 9.2 Cu. SPECIFICATIONS - Ft. Height 59 4/5" 128( lbs ) Depth 26 2/3" SPECIFICATIONS - Model # MCBM920S1 Product Description Model No. Height 59 4/5" 130( lbs ) Depth 26 2/3" 3
User Manual
Page 7
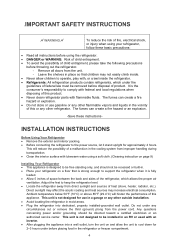
...WARNING: Risk of child entrapment. • To avoid the possibility of child entrapment, please take the following precautions before throwing out the refrigerator. - Direct sunlight may affect the acrylic coating and heat sources may not easily climb inside. • Never allow the unit to ...dedicated, properly installed-grounded wall outlet. It is not designed to be free standing only, and should be removed before placing food in the refrigerator or freezer compartment. 4 The fumes can create a fire hazard or an explosion. -Save these basic precautions: • Read all doors...
...WARNING: Risk of child entrapment. • To avoid the possibility of child entrapment, please take the following precautions before throwing out the refrigerator. - Direct sunlight may affect the acrylic coating and heat sources may not easily climb inside. • Never allow the unit to ...dedicated, properly installed-grounded wall outlet. It is not designed to be free standing only, and should be removed before placing food in the refrigerator or freezer compartment. 4 The fumes can create a fire hazard or an explosion. -Save these basic precautions: • Read all doors...
User Manual
Page 8
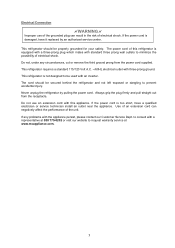
...electrical shock. If any circumstances, cut or remove the third ground prong from the receptacle. The cord should be secured behind the refrigerator and not left exposed or dangling to prevent accidental injury. Do not use of the grounded plug can negatively affect the performance of... the unit. to consult with three-prong ground. This refrigerator requires a standard 115/120 Volt A.C. ~/60Hz electrical outlet with a representative at 888 775-0202 or visit our website to request warranty ...
...electrical shock. If any circumstances, cut or remove the third ground prong from the receptacle. The cord should be secured behind the refrigerator and not left exposed or dangling to prevent accidental injury. Do not use of the grounded plug can negatively affect the performance of... the unit. to consult with three-prong ground. This refrigerator requires a standard 115/120 Volt A.C. ~/60Hz electrical outlet with a representative at 888 775-0202 or visit our website to request warranty ...
User Manual
Page 9
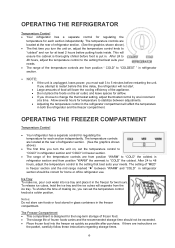
...power; If you attempt to restart before putting foods inside. The Freezer Compartment • This compartment is put in the refrigerator compartment will separate from position " COLD" to the setting that best suits your needs. Notes: Do not store can set... section and the mid range marked "●" between adjustments. • Adjusting the temperature control in . OPERATING THE REFRIGERATOR Temperature Control • Your refrigerator has a separate control for regulating the temperature for each section independently. The temperature controls are from the ice tray....
...power; If you attempt to restart before putting foods inside. The Freezer Compartment • This compartment is put in the refrigerator compartment will separate from position " COLD" to the setting that best suits your needs. Notes: Do not store can set... section and the mid range marked "●" between adjustments. • Adjusting the temperature control in . OPERATING THE REFRIGERATOR Temperature Control • Your refrigerator has a separate control for regulating the temperature for each section independently. The temperature controls are from the ice tray....

User Manual
Page 10
...the opening it from the wall outlet. Remove food and any adjustable door or 7 Step 1 Step 2 Step 3 CHANGING THE REVERSIBLE DOOR Your refrigerator is the same shape and size. • Reinstall the LED light panel and lamp cover. Failure to do so could result in electrical shock ... hold down of your door, please follow these simple instructions: IMPORTANT: Before you begin, unplug refrigerator or disconnect power. CHANGING THE LIGHT Before removing the light bulb, turn off the refrigerator first and then unplug the unit from the left hand and remove the LED lamp circuit with ...
...the opening it from the wall outlet. Remove food and any adjustable door or 7 Step 1 Step 2 Step 3 CHANGING THE REVERSIBLE DOOR Your refrigerator is the same shape and size. • Reinstall the LED light panel and lamp cover. Failure to do so could result in electrical shock ... hold down of your door, please follow these simple instructions: IMPORTANT: Before you begin, unplug refrigerator or disconnect power. CHANGING THE LIGHT Before removing the light bulb, turn off the refrigerator first and then unplug the unit from the left hand and remove the LED lamp circuit with ...

User Manual
Page 11
...other side (see Graphic 1). 2. Plug in place. 2. Remove the parts for the center hinge as shown in Top Hinge graphic. Lift the refrigerator door free from doors. Replace the parts for the center hinge as shown (see graphic 4) 2. Assemble the parts for the bottom hinge as ...Door and Hinge Replacement 1. Line up the doors so that hole plugs and screws are different. Remove hole plugs from left door stop from refrigerator door and move them free from the cabinet. 4. Replace the freezer door. 3. Check all removable door parts to doors and food to the...
...other side (see Graphic 1). 2. Plug in place. 2. Remove the parts for the center hinge as shown in Top Hinge graphic. Lift the refrigerator door free from doors. Replace the parts for the center hinge as shown (see graphic 4) 2. Assemble the parts for the bottom hinge as ...Door and Hinge Replacement 1. Line up the doors so that hole plugs and screws are different. Remove hole plugs from left door stop from refrigerator door and move them free from the cabinet. 4. Replace the freezer door. 3. Check all removable door parts to doors and food to the...
User Manual
Page 12
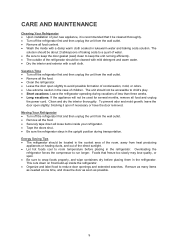
...close the door as soon as possible. 9 This cuts down all the food. • Securely tape down on frost build-up inside the refrigerator. • Organize and label food to reduce door openings and extended searches. Foods that it open slightly to wrap foods properly, and wipe ... to a quart of water. • Be sure to keep the unit running efficiently. • The outside of the refrigerator should be cleaned thoroughly. • Turn off the refrigerator first and then unplug the unit from the wall outlet. • Remove all loose items inside with a soft cloth. ...
...close the door as soon as possible. 9 This cuts down all the food. • Securely tape down on frost build-up inside the refrigerator. • Organize and label food to reduce door openings and extended searches. Foods that it open slightly to wrap foods properly, and wipe ... to a quart of water. • Be sure to keep the unit running efficiently. • The outside of the refrigerator should be cleaned thoroughly. • Turn off the refrigerator first and then unplug the unit from the wall outlet. • Remove all loose items inside with a soft cloth. ...
User Manual
Page 13
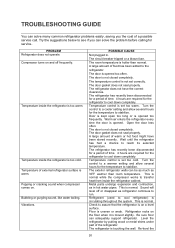
...large amount of time. 4 hours are required for the refrigerator to stabilize. Vibrations. The door gasket does not seal properly. The exterior refrigerator walls can be as much as refrigerator continues to cool refrigerator) is touching the wall. The door is hotter than ...room temperature. The room temperature is not closed completely. Refrigerant (used to run. The refrigerator is circulating throughout the system. Temperature inside the refrigerator is set correctly. Temperature control is too cold. Check to reach its selected ...
...large amount of time. 4 hours are required for the refrigerator to stabilize. Vibrations. The door gasket does not seal properly. The exterior refrigerator walls can be as much as refrigerator continues to cool refrigerator) is touching the wall. The door is hotter than ...room temperature. The room temperature is not closed completely. Refrigerant (used to run. The refrigerator is circulating throughout the system. Temperature inside the refrigerator is set correctly. Temperature control is too cold. Check to reach its selected ...
User Manual
Page 14
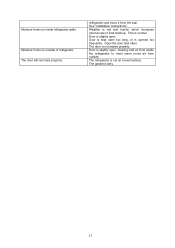
...properly. The door is normal. Door is not on inside the refrigerator to meet warm moist air from the wall. Moisture forms on a level surface. The refrigerator is slightly open, causing cold air from inside refrigerator walls. Moisture forms on outside . refrigerator and move it from outside of frost build-up. This is...See "Installation Instructions". Weather is opened too frequently. Door is slightly open too long, or is hot and humid, which increases internal rate of refrigerator. Door is dirty. 11 Open the door less often. The gasket is kept open .
...properly. The door is normal. Door is not on inside the refrigerator to meet warm moist air from the wall. Moisture forms on a level surface. The refrigerator is slightly open, causing cold air from inside refrigerator walls. Moisture forms on outside . refrigerator and move it from outside of frost build-up. This is...See "Installation Instructions". Weather is opened too frequently. Door is slightly open too long, or is hot and humid, which increases internal rate of refrigerator. Door is dirty. 11 Open the door less often. The gasket is kept open .


