User manual, English (US)
Page 5
... of Contents 5 Introduction 6 Playable Discs 7 Initial Setup and Use Before Using the TV/DVD 8 Hooking Up the TV/DVD 9-10 Optional Connections 11 Remote Control Buttons 12-13 Front Panel 14 Rear Panel 15 Initial Setups 16 Watching TV 17 Playing a Disc 18 TV Settings Menu Language, Auto Channel Programming .19 Adding/Deleting Channels 20 Picture Controls...
... of Contents 5 Introduction 6 Playable Discs 7 Initial Setup and Use Before Using the TV/DVD 8 Hooking Up the TV/DVD 9-10 Optional Connections 11 Remote Control Buttons 12-13 Front Panel 14 Rear Panel 15 Initial Setups 16 Watching TV 17 Playing a Disc 18 TV Settings Menu Language, Auto Channel Programming .19 Adding/Deleting Channels 20 Picture Controls...

User manual, English (US)
Page 6
..., Time, Track) • Subtitles * • Virtual Surround • Zoom * If available on the remote control. Not all DVDs have menus. Access the Setup Menus by pressing DISC MENU on every disc. Press SET-UP twice to get to Your TV/DVD Owner's Manual. An "X" will not be available if the current disc does not...
..., Time, Track) • Subtitles * • Virtual Surround • Zoom * If available on the remote control. Not all DVDs have menus. Access the Setup Menus by pressing DISC MENU on every disc. Press SET-UP twice to get to Your TV/DVD Owner's Manual. An "X" will not be available if the current disc does not...

User manual, English (US)
Page 8
... out about the local regulations on page 14. ● Do not put objects between the remote control and the TV/DVD. Align the + and - T9201UB_EN 3/7/06 11:06 AM Page 8 8 Before Using the TV/DVD Remote Control Battery Installation 1 Remove the battery compartment lid on the lid. 2 Place two AAA... inside the battery compartment. ends as indicated on the front of the remote control. Follow the direction of the arrow on the bottom of the TV/DVD. Using the Remote Control ● Point the remote control at the remote sensor on the unit. ● Do not mix batteries, for a...
... out about the local regulations on page 14. ● Do not put objects between the remote control and the TV/DVD. Align the + and - T9201UB_EN 3/7/06 11:06 AM Page 8 8 Before Using the TV/DVD Remote Control Battery Installation 1 Remove the battery compartment lid on the lid. 2 Place two AAA... inside the battery compartment. ends as indicated on the front of the remote control. Follow the direction of the arrow on the bottom of the TV/DVD. Using the Remote Control ● Point the remote control at the remote sensor on the unit. ● Do not mix batteries, for a...
User manual, English (US)
Page 9
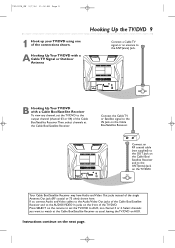
...not channel 3 or 4. Press SELECT on the next page. Instructions continue on the remote to set the TV/DVD to the IN Jack on the TV/DVD. T9201UB_EN 3/7/06 11:06 AM Page 9 Hooking Up the TV/DVD 9 1 Hook up your TV/DVD using one of the single Antenna Out jack (RF coaxial or 75 ohm) shown here...supplied) to the OUT Jack on the Cable Box/ Satellite Receiver and to watch at the Cable Box/Satellite Receiver as usual, leaving the TV/DVD on the front of the Cable Box/Satellite Receiver.Then, select channels at the Cable Box/Satellite Receiver. Your Cable Box/Satellite Receiver may ...
...not channel 3 or 4. Press SELECT on the next page. Instructions continue on the remote to set the TV/DVD to the IN Jack on the TV/DVD. T9201UB_EN 3/7/06 11:06 AM Page 9 Hooking Up the TV/DVD 9 1 Hook up your TV/DVD using one of the single Antenna Out jack (RF coaxial or 75 ohm) shown here...supplied) to the OUT Jack on the Cable Box/ Satellite Receiver and to watch at the Cable Box/Satellite Receiver as usual, leaving the TV/DVD on the front of the Cable Box/Satellite Receiver.Then, select channels at the Cable Box/Satellite Receiver. Your Cable Box/Satellite Receiver may ...
User manual, English (US)
Page 10
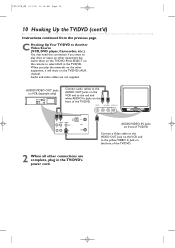
AUDIO/VIDEO OUT Jacks on the front of the TV/DVD. OUT 2 When all other connections are not supplied. Press SELECT on the remote to the yellow VIDEO In Jack on the VCR and to select AUX at the TV/DVD. AUDIO/VIDEO IN Jacks on front of TV/DVD Connect a Video cable to the VIDEO OUT Jack... on the front of the TV/DVD. C Hooking Up Your TV/DVD to Another Video Source (VCR, DVD player, Camcorder, etc...
AUDIO/VIDEO OUT Jacks on the front of the TV/DVD. OUT 2 When all other connections are not supplied. Press SELECT on the remote to the yellow VIDEO In Jack on the VCR and to select AUX at the TV/DVD. AUDIO/VIDEO IN Jacks on front of TV/DVD Connect a Video cable to the VIDEO OUT Jack... on the front of the TV/DVD. C Hooking Up Your TV/DVD to Another Video Source (VCR, DVD player, Camcorder, etc...

User manual, English (US)
Page 12
.... T9201UB_EN 3/7/06 11:06 AM Page 12 12 Remote Control Buttons STANDBY-ONy Button Press to turn on page 33. PREV H Button During playback; - NEXT G Button During playback; - g Button During playback; - Details are on or off the TV/DVD. press to skip to search forward. h Button ...8 9 CLEAR +100 0 +10 PREV NEXT PLAY STOP SLOW PAUSE RETURN TITLE ENTER DISC SET-UP MENU PICTURE /SLEEP CH. Details are not available in combination with PAUSE k to reset or erase wrong information. Details are on page 45. • Some settings are on page 18. VOL. CLEAR Button Press to...
.... T9201UB_EN 3/7/06 11:06 AM Page 12 12 Remote Control Buttons STANDBY-ONy Button Press to turn on page 33. PREV H Button During playback; - NEXT G Button During playback; - g Button During playback; - Details are on or off the TV/DVD. press to skip to search forward. h Button ...8 9 CLEAR +100 0 +10 PREV NEXT PLAY STOP SLOW PAUSE RETURN TITLE ENTER DISC SET-UP MENU PICTURE /SLEEP CH. Details are not available in combination with PAUSE k to reset or erase wrong information. Details are on page 45. • Some settings are on page 18. VOL. CLEAR Button Press to...

User manual, English (US)
Page 13
... on the screen. Press to access a specific channel. Details are on page 21. VOL. T9201UB_EN 3/7/06 11:06 AM Page 13 Remote Control Buttons (cont'd) 13 Number Buttons TV Mode: Press two digits to access the picture controls. DISC MENU Button Press to the previous Setup Menu in...to adjust the volume. VOL. (volume) X/Y Buttons Press to choose AUX,TV or DVD mode.When you select DVD mode using this button, you must press PLAY B or OPEN/CLOSE A before you can access the DVD features or setup menus. DVD Mode: Press to enter a track or chapter number. +100/+10 button...
... on the screen. Press to access a specific channel. Details are on page 21. VOL. T9201UB_EN 3/7/06 11:06 AM Page 13 Remote Control Buttons (cont'd) 13 Number Buttons TV Mode: Press two digits to access the picture controls. DISC MENU Button Press to the previous Setup Menu in...to adjust the volume. VOL. (volume) X/Y Buttons Press to choose AUX,TV or DVD mode.When you select DVD mode using this button, you must press PLAY B or OPEN/CLOSE A before you can access the DVD features or setup menus. DVD Mode: Press to enter a track or chapter number. +100/+10 button...

User manual, English (US)
Page 14
...17. Details are on the other equipment when you choose AUX at the TV/DVD. Remote Sensor Receives a signal from a distance. SELECT K Button Press to adjust the volume. Details are on page 18. STOP C Button Press to turn the TV/DVD on page 18. VIDEO and AUDIO L/R (left/right)/ IN jacks Use... audio and video cables to connect these jacks to the audio and video out jacks of a Camcorder, DVD player, etc.This lets you can operate the TV/DVD from your remote control so you watch materials playing on page 10. STANDBY-ONy Button Press to stop disc playback. T9201UB_EN 3/7/06...
...17. Details are on the other equipment when you choose AUX at the TV/DVD. Remote Sensor Receives a signal from a distance. SELECT K Button Press to adjust the volume. Details are on page 18. STOP C Button Press to turn the TV/DVD on page 18. VIDEO and AUDIO L/R (left/right)/ IN jacks Use... audio and video cables to connect these jacks to the audio and video out jacks of a Camcorder, DVD player, etc.This lets you can operate the TV/DVD from your remote control so you watch materials playing on page 10. STANDBY-ONy Button Press to stop disc playback. T9201UB_EN 3/7/06...

User manual, English (US)
Page 31
... indicate Forward Searching. SELECT MODE DISPLAY MUTE E 1 Example: Playing a DVD in DVD mode, press SELECT. The speed may vary depending on the remote control to normal playback. T9201UB_EN 3/7/06 11:06 AM Page 31 DVD Fast Forward/Fast Reverse 31 ● To put the TV/DVD in reverse at twice the normal playing speed. 2 Press PLAY...
... indicate Forward Searching. SELECT MODE DISPLAY MUTE E 1 Example: Playing a DVD in DVD mode, press SELECT. The speed may vary depending on the remote control to normal playback. T9201UB_EN 3/7/06 11:06 AM Page 31 DVD Fast Forward/Fast Reverse 31 ● To put the TV/DVD in reverse at twice the normal playing speed. 2 Press PLAY...
User manual, English (US)
Page 55
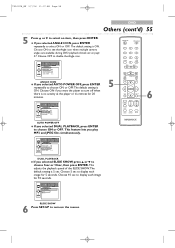
...disable the Angle icon. Choose 10 sec to display each image for 5 seconds. T9201UB_EN 3/7/06 11:07 AM Page 55 DVD Others (cont'd) 55 5 Press K or L to select an item, then press ENTER. ● If you selected...5 sec 10 sec 6 SLIDE SHOW Press SET-UP to choose ON or OFF. Details are available during DVD playback. ENTER OTHERS ANGLE ICON ON AUTO POWER OFF ON DUAL PLAYBACK OFF SLIDE SHOW 5sec ANGLE ICON ...select ON or OFF. The default setting is no activity at the player or its remote for 20 minutes. Choose ON if you play MP3 and JPEG files simultaneously. Choose ON to turn off...
...disable the Angle icon. Choose 10 sec to display each image for 5 seconds. T9201UB_EN 3/7/06 11:07 AM Page 55 DVD Others (cont'd) 55 5 Press K or L to select an item, then press ENTER. ● If you selected...5 sec 10 sec 6 SLIDE SHOW Press SET-UP to choose ON or OFF. Details are available during DVD playback. ENTER OTHERS ANGLE ICON ON AUTO POWER OFF ON DUAL PLAYBACK OFF SLIDE SHOW 5sec ANGLE ICON ...select ON or OFF. The default setting is no activity at the player or its remote for 20 minutes. Choose ON if you play MP3 and JPEG files simultaneously. Choose ON to turn off...

User manual, English (US)
Page 58
.... X/Y to see what features are on page 13. • If you may appear in your local newspaper. Remote control does not operate the TV/DVD. • Aim the remote control directly at the remote sensor on pages 19-20. • Make sure the disc is facing up . Details are on page 7. ...Details are on the front of the disc. Not all obstacles between the remote control and the TV/DVD. • Inspect and replace the batteries in the DVD Disc Menu. TV/DVD does not display closed captioning is two-sided, make sure the label of the screen. Refer to the...
.... X/Y to see what features are on page 13. • If you may appear in your local newspaper. Remote control does not operate the TV/DVD. • Aim the remote control directly at the remote sensor on pages 19-20. • Make sure the disc is facing up . Details are on page 7. ...Details are on the front of the disc. Not all obstacles between the remote control and the TV/DVD. • Inspect and replace the batteries in the DVD Disc Menu. TV/DVD does not display closed captioning is two-sided, make sure the label of the screen. Refer to the...

User manual, English (US)
Page 61
... 61 Index 61 a-b repeat 35 ant(enna) jack 9, 15 arrow buttons 13 audio cd 7 audio in/out jacks 10, 14 audio settings (dvd 50 auxiliary mode (aux 9-10, 17 batteries 8 black level 42 brightness 21 camera angle 37 channel above 100 13, 33 adding/deleting 20 setup...button 13-14 playing a disc 18 power cord 10, 15 program playback 43 random playback 43 ratings mpaa 28 tv 24-27 rear panel 15 remote control buttons . . . . . .12-13 using 8 remote sensor 14 repeat playback 35 resuming playback 34 return button 13 reverse searching 31 rf coaxial cable 9 safety precautions 4...
... 61 Index 61 a-b repeat 35 ant(enna) jack 9, 15 arrow buttons 13 audio cd 7 audio in/out jacks 10, 14 audio settings (dvd 50 auxiliary mode (aux 9-10, 17 batteries 8 black level 42 brightness 21 camera angle 37 channel above 100 13, 33 adding/deleting 20 setup...button 13-14 playing a disc 18 power cord 10, 15 program playback 43 random playback 43 ratings mpaa 28 tv 24-27 rear panel 15 remote control buttons . . . . . .12-13 using 8 remote sensor 14 repeat playback 35 resuming playback 34 return button 13 reverse searching 31 rf coaxial cable 9 safety precautions 4...


