User manual, English (US)
Page 4
...3 Table of Contents 4 Introduction 5 Playable Discs and Video Cassettes 6 Initial DVD/VCR Setup Hookups 7-15 Remote Control Setup 16 First-time DVD/VCR Setup 17 Basic Playback Video Cassette Playback 18 Disc Playback 19 Basic DVD/VCR Controls Display Panel (DVD 20 Display Panel (VCR 21 Front Panel 22 Rear ... Controls Password 56 Parental Levels 57 Audio Language, Stereo Sound Mode 58 DVD Slow Motion, Zoom 59 Programmed Playback 60 Random Playback 61 MP3/JPEG Playback 62 MP3/JPEG Displays 63 DVD Player Setup Options Display 64-65 Language 66-67 Audio 68 On-Screen Displays...
...3 Table of Contents 4 Introduction 5 Playable Discs and Video Cassettes 6 Initial DVD/VCR Setup Hookups 7-15 Remote Control Setup 16 First-time DVD/VCR Setup 17 Basic Playback Video Cassette Playback 18 Disc Playback 19 Basic DVD/VCR Controls Display Panel (DVD 20 Display Panel (VCR 21 Front Panel 22 Rear ... Controls Password 56 Parental Levels 57 Audio Language, Stereo Sound Mode 58 DVD Slow Motion, Zoom 59 Programmed Playback 60 Random Playback 61 MP3/JPEG Playback 62 MP3/JPEG Displays 63 DVD Player Setup Options Display 64-65 Language 66-67 Audio 68 On-Screen Displays...

User manual, English (US)
Page 7
... TV owner's manual for details. If you choose. To see DVD features on pages 8-15. This connection provides sound for both audio and video in the Player, a large DVD Video logo will appear on the TV screen when you have finished hooking up the DVD/VCR, go to the lowest TV channel (01 or 02) and... ANTOUT jack of jacks and connectors on the TV, go to page 17 to the TV. See your TV has an S-Video In jack (which also could be labelled Y Cr Cb, Y Pr Pb, or YUV and may be available. To see DVD or VCR features on the TV, set the TV to choose...
... TV owner's manual for details. If you choose. To see DVD features on pages 8-15. This connection provides sound for both audio and video in the Player, a large DVD Video logo will appear on the TV screen when you have finished hooking up the DVD/VCR, go to the lowest TV channel (01 or 02) and... ANTOUT jack of jacks and connectors on the TV, go to page 17 to the TV. See your TV has an S-Video In jack (which also could be labelled Y Cr Cb, Y Pr Pb, or YUV and may be available. To see DVD or VCR features on the TV, set the TV to choose...

User manual, English (US)
Page 8
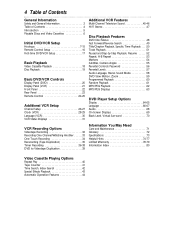
...Insert a videotape and press PLAY B to put the DVD/VCR in the power cords of both the VCR and the DVD Player. During playback, press and hold the (VCR) PLAY... Out) Jack on the back of the DVD/VCR and to the ANTENNA IN Jack on back of the DVD/VCR. Go to page 17 before turning on the DVD/VCR. So, set your TV to channel...DVD/VCR VCR AUDIO OUT AUDIO IN L L R R ANT-OUT VIDEO OUT VIDEO IN 1Antenna or Cable TV signal DVD S-VIDEO COMPONENT AUDIO OUT VIDEO OUT OUT Y DIGITAL AUDIO OUT CB L COAXIAL CR R DVD/VCR VCR AUDIO OUT AUDIO IN ANT-IN L L R R ANT-OUT VIDEO OUT VIDEO...
...Insert a videotape and press PLAY B to put the DVD/VCR in the power cords of both the VCR and the DVD Player. During playback, press and hold the (VCR) PLAY... Out) Jack on the back of the DVD/VCR and to the ANTENNA IN Jack on back of the DVD/VCR. Go to page 17 before turning on the DVD/VCR. So, set your TV to channel...DVD/VCR VCR AUDIO OUT AUDIO IN L L R R ANT-OUT VIDEO OUT VIDEO IN 1Antenna or Cable TV signal DVD S-VIDEO COMPONENT AUDIO OUT VIDEO OUT OUT Y DIGITAL AUDIO OUT CB L COAXIAL CR R DVD/VCR VCR AUDIO OUT AUDIO IN ANT-IN L L R R ANT-OUT VIDEO OUT VIDEO...
User manual, English (US)
Page 11
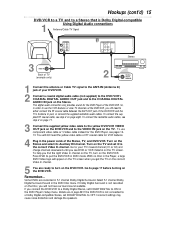
... Using the supplied red, white, and yellow cables This connection will let you use the red cable. The VIDEO IN jack on the DVD/VCR. Match the cable colors to put the DVD/VCR in the Player, a large DVD Video logo will appear on the TV screen when you get the TV on the correct Audio... OUT (left /right AUDIO OUT jacks of your lowest TV channel (01 or 02), then change channels downward until you see VCR or DVD playback on the TV and set it to the correct Audio/Video In channel. Go to page 17 to the red and white AUDIO IN jacks on the TV.
... Using the supplied red, white, and yellow cables This connection will let you use the red cable. The VIDEO IN jack on the DVD/VCR. Match the cable colors to put the DVD/VCR in the Player, a large DVD Video logo will appear on the TV screen when you get the TV on the correct Audio... OUT (left /right AUDIO OUT jacks of your lowest TV channel (01 or 02), then change channels downward until you see VCR or DVD playback on the TV and set it to the correct Audio/Video In channel. Go to page 17 to the red and white AUDIO IN jacks on the TV.
User manual, English (US)
Page 12
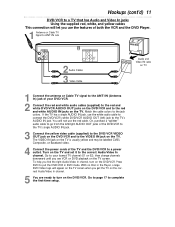
... jacks on page 68. Turn on the DVD/VCR. Go to page 17 before turning on the DVD/VCR. 6 After you are usually red, blue, and green. Press DVD to put the DVD/VCR in the DVD Player's Setup menu. The Component Video connection only supplies video (picture) for DVD Player features. If you complete the VCR setup as described on...
... jacks on page 68. Turn on the DVD/VCR. Go to page 17 before turning on the DVD/VCR. 6 After you are usually red, blue, and green. Press DVD to put the DVD/VCR in the DVD Player's Setup menu. The Component Video connection only supplies video (picture) for DVD Player features. If you complete the VCR setup as described on...

User manual, English (US)
Page 13
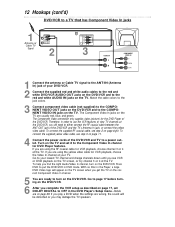
... and to put the DVD/VCR in the DVD Player's Setup menu. The S-Video connection only supplies video (picture) for VCR playback, choose channel 3 or 4 at your TV. Match the cable colors to the jack colors. 3 Connect an S-Video cable (not supplied) to the S-VIDEO OUT jack on page 17, set it to either connect the RF coaxial...
... and to put the DVD/VCR in the DVD Player's Setup menu. The S-Video connection only supplies video (picture) for VCR playback, choose channel 3 or 4 at your TV. Match the cable colors to the jack colors. 3 Connect an S-Video cable (not supplied) to the S-VIDEO OUT jack on page 17, set it to either connect the RF coaxial...
User manual, English (US)
Page 14
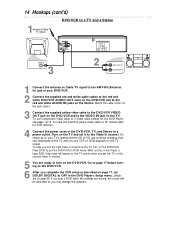
... RF coaxial cable for the DVD Player, see VCR or DVD playback on the TV screen. To help you find the right Video In channel at the TV until you may damage the speakers. Turn on page 17, set it to put the DVD/VCR in the Player, a large DVD Video logo will be distorted or... you see pages 12-13. 14 Hookups (cont'd) 1Antenna/Cable TV Signal DVD/VCR to a TV and a Stereo ANT-IN DVD/VCR VCR AUDIO OUT AUDIO IN L L R R ANT-OUT VIDEO OUT VIDEO IN DVD S-VIDEO COMPONENT AUDIO OUT VIDEO ...
... RF coaxial cable for the DVD Player, see VCR or DVD playback on the TV screen. To help you find the right Video In channel at the TV until you may damage the speakers. Turn on page 17, set it to put the DVD/VCR in the Player, a large DVD Video logo will be distorted or... you see pages 12-13. 14 Hookups (cont'd) 1Antenna/Cable TV Signal DVD/VCR to a TV and a Stereo ANT-IN DVD/VCR VCR AUDIO OUT AUDIO IN L L R R ANT-OUT VIDEO OUT VIDEO IN DVD S-VIDEO COMPONENT AUDIO OUT VIDEO ...
User manual, English (US)
Page 15
.... 5 You are ready to turn on the DVD/VCR. To help you still need the yellow video cable or RF coaxial cable for VCR features. 4 Plug in the Player, a large DVD Video logo will not have surround sound available. Turn on page eight. Go to page 17 before turning on the TV. To use the... VCR features or view TV channels at the DVD/VCR, you find the right Video In channel on the TV, turn on...
.... 5 You are ready to turn on the DVD/VCR. To help you still need the yellow video cable or RF coaxial cable for VCR features. 4 Plug in the Player, a large DVD Video logo will not have surround sound available. Turn on page eight. Go to page 17 before turning on the TV. To use the... VCR features or view TV channels at the DVD/VCR, you find the right Video In channel on the TV, turn on...

User manual, English (US)
Page 17
... programming. These menus may not appear if you have turned on the DVD/VCR before to the DVD/VCR's ANT-IN jack and press B again. • Repeat this feature and play a tape immediately, insert a tape with its AUDIO/VIDEO IN channel, depending on how you try to program channels when there ...B to select memorized channels. Connect an antenna or Cable TV signal to find the Audio/Video In channel of the DVD/VCR, programming will be in VCR mode. First-time DVD/VCR Setup 17 Before turning on your DVD/VCR, make sure batteries are in VCR mode, press VCR so the green VCR light ...
... programming. These menus may not appear if you have turned on the DVD/VCR before to the DVD/VCR's ANT-IN jack and press B again. • Repeat this feature and play a tape immediately, insert a tape with its AUDIO/VIDEO IN channel, depending on how you try to program channels when there ...B to select memorized channels. Connect an antenna or Cable TV signal to find the Audio/Video In channel of the DVD/VCR, programming will be in VCR mode. First-time DVD/VCR Setup 17 Before turning on your DVD/VCR, make sure batteries are in VCR mode, press VCR so the green VCR light ...

User manual, English (US)
Page 50
...selected Title or Chapter will appear in DVD mode. 2 During DVD or Audio CD playback, press SEARCH MODE until CH (for Chapter) or TT (for example). 3 Enter the Title or Chapter number using the Number buttons. Within a few seconds, playback will start to play. 12/17 4 / 4 1 TIMER SET STANDBY...-ON SETUP AUDIO SUBTITLE ANGLE REC SKIP/ CH TITLE REPEAT C-RESET CLEAR MODE REPEAT A-B SKIP/ CH RETURN DISPLAY DVD VCR DISC MENU OK 3 STOP PLAY REW FF PAUSE SPEED 123 SLOW 456...
...selected Title or Chapter will appear in DVD mode. 2 During DVD or Audio CD playback, press SEARCH MODE until CH (for Chapter) or TT (for example). 3 Enter the Title or Chapter number using the Number buttons. Within a few seconds, playback will start to play. 12/17 4 / 4 1 TIMER SET STANDBY...-ON SETUP AUDIO SUBTITLE ANGLE REC SKIP/ CH TITLE REPEAT C-RESET CLEAR MODE REPEAT A-B SKIP/ CH RETURN DISPLAY DVD VCR DISC MENU OK 3 STOP PLAY REW FF PAUSE SPEED 123 SLOW 456...

User manual, English (US)
Page 57
...password (4737) to play . PARENTAL PARENTAL LEVEL ALL CHANGE OK RATING EXPLANATIONS • ALL - NC-17 - Restricted; Parental Guidance suggested. • 1- LANGUAGE AUDIO ORIGINAL SUBTITLE OFF DISC MENU ENGLISH PLAYER MENU ENGLISH OK 4 Press B to select (the lock), then press OK. 2,8 1 TIMER SET...password to begin playback. PG13 Unsuitable for viewers under 18. • 4 - Some DVDs may let you want. After making your DVDs. The level you set will indicate the DVD cannot play a DVD. General Audience; Press o or p repeatedly to move to the next or previous ...
...password (4737) to play . PARENTAL PARENTAL LEVEL ALL CHANGE OK RATING EXPLANATIONS • ALL - NC-17 - Restricted; Parental Guidance suggested. • 1- LANGUAGE AUDIO ORIGINAL SUBTITLE OFF DISC MENU ENGLISH PLAYER MENU ENGLISH OK 4 Press B to select (the lock), then press OK. 2,8 1 TIMER SET...password to begin playback. PG13 Unsuitable for viewers under 18. • 4 - Some DVDs may let you want. After making your DVDs. The level you set will indicate the DVD cannot play a DVD. General Audience; Press o or p repeatedly to move to the next or previous ...
User manual, English (US)
Page 73
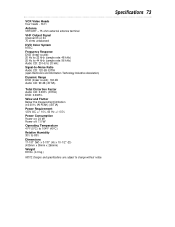
VCR Video Heads Four heads - Specifications 73 Hi-Fi Antenna VHF/UHF - 75 ohm external antenna terminal VHF Output Signal Channel 03 or 04 75 ohms unbalanced DVD Color System NTSC Frequency Response DVD (linear sound): 20 Hz to 22 kHz (sample rate: 48 kHz...: 0.003% (JEITIA) DVD: 0.0025% Wow and Flutter Below the measurement limitation (±0.001% W PEAK) (JEITIA) Power Requirement 120V AC +/- 10%, 60 Hz +/- 0.5% Power Consumption Power on: 24 W Power off: 7.0 W Operating Temperature 41°F (5°C) to 104°F (40°C) Relative Humidity 30% to 80% Dimensions 17-1/8" (W) x 3-7/8" (H) ...
VCR Video Heads Four heads - Specifications 73 Hi-Fi Antenna VHF/UHF - 75 ohm external antenna terminal VHF Output Signal Channel 03 or 04 75 ohms unbalanced DVD Color System NTSC Frequency Response DVD (linear sound): 20 Hz to 22 kHz (sample rate: 48 kHz...: 0.003% (JEITIA) DVD: 0.0025% Wow and Flutter Below the measurement limitation (±0.001% W PEAK) (JEITIA) Power Requirement 120V AC +/- 10%, 60 Hz +/- 0.5% Power Consumption Power on: 24 W Power off: 7.0 W Operating Temperature 41°F (5°C) to 104°F (40°C) Relative Humidity 30% to 80% Dimensions 17-1/8" (W) x 3-7/8" (H) ...

User manual, English (US)
Page 80
...close button 19, 22 output button 22 parental controls 56-57 password 56 pause button 25, 43, 52, 59 play button 18-19, 22, 24 player menu 66 playing discs 19 playing tapes 18 power cord 23 program 60 quick setup 65, 66, 68 random 61 rear panel 23 rec (record... angle 55 cassette compartment 21 channel adding 27 deleting 27 selection 24 setup 17, 26 chapters 50 clock 21, 28-29 coaxial (digital audio out) jack . .15, 23 component video out jacks . . . .12, 23 connections 7-15 contents, table of 4 controls dvd/vcr 22-23 remote 24-25 copyright protection 35, 77 counter 31...
...close button 19, 22 output button 22 parental controls 56-57 password 56 pause button 25, 43, 52, 59 play button 18-19, 22, 24 player menu 66 playing discs 19 playing tapes 18 power cord 23 program 60 quick setup 65, 66, 68 random 61 rear panel 23 rec (record... angle 55 cassette compartment 21 channel adding 27 deleting 27 selection 24 setup 17, 26 chapters 50 clock 21, 28-29 coaxial (digital audio out) jack . .15, 23 component video out jacks . . . .12, 23 connections 7-15 contents, table of 4 controls dvd/vcr 22-23 remote 24-25 copyright protection 35, 77 counter 31...


