

User manual, English (US)
Page 4
...Read carefully the information located at the bottom or rear of Dolby Laboratories. "Dolby" and the double-D symbol are trademarks of your DVD Recorder and enter below the Serial No. OCH SPARREN AR URKOPPLAD.BETRAKTA EJ STRÅLEN. Box 671539 Marietta, GA 30006-0026 1-... Power Beam divergence Semiconductor laser InGaAlP (DVD) AIGaAs (CD) 658 nm (DVD) 790 nm (CD) 30 mW (DVD+RW write) 1.0 mW (DVD read) 1.0 mW (CD read) 84 degrees (DVD) 61 degrees (CD) Declaration of Conformity Model MRV 660 Trade Name Magnavox Responsible Party Philips Consumer Electronics North America...
...Read carefully the information located at the bottom or rear of Dolby Laboratories. "Dolby" and the double-D symbol are trademarks of your DVD Recorder and enter below the Serial No. OCH SPARREN AR URKOPPLAD.BETRAKTA EJ STRÅLEN. Box 671539 Marietta, GA 30006-0026 1-... Power Beam divergence Semiconductor laser InGaAlP (DVD) AIGaAs (CD) 658 nm (DVD) 790 nm (CD) 30 mW (DVD+RW write) 1.0 mW (DVD read) 1.0 mW (CD read) 84 degrees (DVD) 61 degrees (CD) Declaration of Conformity Model MRV 660 Trade Name Magnavox Responsible Party Philips Consumer Electronics North America...
User manual, English (US)
Page 5
...Use of this copyright protection technology must be made at the end of all other recordings.This helps to -day use of your new DVD recorder easier for you can create slide shows and play them on a DVD player. Reverse engineering or disassembly is prohibited. (U.S. Patent Number 4,631,603, 4,... feature is only available for the transfer of high bandwidth digital signals as 'FireWire' and 'IEEE 1394.' English Special Functions Your DVD recorder has a number of special functions that is protected by method claims of certain US patent and other intellectual property rights owned by...
...Use of this copyright protection technology must be made at the end of all other recordings.This helps to -day use of your new DVD recorder easier for you can create slide shows and play them on a DVD player. Reverse engineering or disassembly is prohibited. (U.S. Patent Number 4,631,603, 4,... feature is only available for the transfer of high bandwidth digital signals as 'FireWire' and 'IEEE 1394.' English Special Functions Your DVD recorder has a number of special functions that is protected by method claims of certain US patent and other intellectual property rights owned by...

User manual, English (US)
Page 6
... 15 Connecting to Additional Devices Using the input jacks (IN-EXT 1 or IN-EXT2 16 Connecting a Satellite Receiver/ Cable Box 16 Connecting a VCR/DVD player 17 Connecting a camcorder to the front jacks 18 Option 1: Using DV In jack 18 Option 2: Using S-VIDEO In or VIDEO In jack 18 ...to operate the system 22 Using the alphanumeric keypad to enter the characters 22 Front Panel 23 Jacks behind the flap 23 Installing the DVD Recorder First Installation 24-25 TV channel programming 26 Automatic TV channel search 26 Setting favorite TV channels 26 Selecting the channel input signal ...
... 15 Connecting to Additional Devices Using the input jacks (IN-EXT 1 or IN-EXT2 16 Connecting a Satellite Receiver/ Cable Box 16 Connecting a VCR/DVD player 17 Connecting a camcorder to the front jacks 18 Option 1: Using DV In jack 18 Option 2: Using S-VIDEO In or VIDEO In jack 18 ...to operate the system 22 Using the alphanumeric keypad to enter the characters 22 Front Panel 23 Jacks behind the flap 23 Installing the DVD Recorder First Installation 24-25 TV channel programming 26 Automatic TV channel search 26 Setting favorite TV channels 26 Selecting the channel input signal ...

User manual, English (US)
Page 8
... to a recycling center. Please observe the local regulations regarding disposal of getting an electric shock. Allow at a higher power than regular DVD or CD players, cleaning CDs intended for ventilation - Place the set on non-polluting paper. CAUTION! Please leave all maintenance work to... disruptions, picture distortions). Avoid high temperatures, moisture, water and dust - High voltage! Since the optical unit (laser) of the DVD recorder operates at least 10 cm (4.5") clearance from the rear and the top of other equipment that can be recycled. About recycling These operating...
... to a recycling center. Please observe the local regulations regarding disposal of getting an electric shock. Allow at a higher power than regular DVD or CD players, cleaning CDs intended for ventilation - Place the set on non-polluting paper. CAUTION! Please leave all maintenance work to... disruptions, picture distortions). Avoid high temperatures, moisture, water and dust - High voltage! Since the optical unit (laser) of the DVD recorder operates at least 10 cm (4.5") clearance from the rear and the top of other equipment that can be recycled. About recycling These operating...

User manual, English (US)
Page 9
... have to read this user manual before they can be played on other regions cannot be played on this DVD recorder. Helpful Hints: - If you make on some DVD players and DVDROM drives. Remote control and batteries - ALL 1 MRV660_17_Eng40 9 9 9/3/05, 10:24 AM 3139 246 ... be played in all regions of the world, thus all regions ('ALL'.) DVDs from other DVD players. If you to record the TV programs or duplicate camcorder recordings to a DVD+RW or DVD+R and play Region 1 DVDs or DVDs manufactured to a specific region code. General Information Accessories supplied - Quick Use ...
... have to read this user manual before they can be played on other regions cannot be played on this DVD recorder. Helpful Hints: - If you make on some DVD players and DVDROM drives. Remote control and batteries - ALL 1 MRV660_17_Eng40 9 9 9/3/05, 10:24 AM 3139 246 ... be played in all regions of the world, thus all regions ('ALL'.) DVDs from other DVD players. If you to record the TV programs or duplicate camcorder recordings to a DVD+RW or DVD+R and play Region 1 DVDs or DVDs manufactured to a specific region code. General Information Accessories supplied - Quick Use ...
User manual, English (US)
Page 10
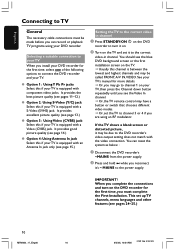
... with a S-Video (SVHS) jack. English Connecting to the correct video-in channel 1 Press STANDBY-ON 2 on the DVD recorder to turn on the DVD recorder for the first time, you are using your DVD recorder. See your TV's manual for more details. ➜ Or, you may go to channel 1 on your TV is ... the Video In channel. ➜ Or, the TV remote control may be made before you can reset the system as below : 1 Disconnect the DVD recorder's ~MAINS from the power supply. 2 Press and hold ∞ while you reconnect it to TV General The necessary cable connections must complete the First...
... with a S-Video (SVHS) jack. English Connecting to the correct video-in channel 1 Press STANDBY-ON 2 on the DVD recorder to turn on the DVD recorder for the first time, you are using your DVD recorder. See your TV's manual for more details. ➜ Or, you may go to channel 1 on your TV is ... the Video In channel. ➜ Or, the TV remote control may be made before you can reset the system as below : 1 Disconnect the DVD recorder's ~MAINS from the power supply. 2 Press and hold ∞ while you reconnect it to TV General The necessary cable connections must complete the First...
User manual, English (US)
Page 11
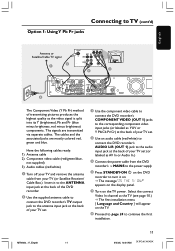
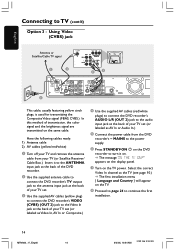
...Cb Pr/Cr) at the back of your TV set. 4 Use an audio cable (red/white) to connect the DVD recorder's AUDIO L/R (OUT 1) jack to the audio input jack at the TV (see page 10.) ➜ The first... Box.) Insert it to the ANTENNA input jack at the back of the DVD recorder. 2 Use the supplied antenna cable to connect the DVD recorder's TV output jack to the antenna input jack at the back of your TV... set. 3 Use the component video cable to connect the DVD recorder's COMPONENT VIDEO (OUT 1) jacks to the corresponding component video input jacks (or labeled as the video...
...Cb Pr/Cr) at the back of your TV set. 4 Use an audio cable (red/white) to connect the DVD recorder's AUDIO L/R (OUT 1) jack to the audio input jack at the TV (see page 10.) ➜ The first... Box.) Insert it to the ANTENNA input jack at the back of the DVD recorder. 2 Use the supplied antenna cable to connect the DVD recorder's TV output jack to the antenna input jack at the back of your TV... set. 3 Use the component video cable to connect the DVD recorder's COMPONENT VIDEO (OUT 1) jacks to the corresponding component video input jacks (or labeled as the video...
User manual, English (US)
Page 13
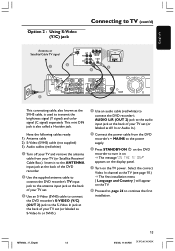
... input jack to the antenna input jack at the back of your TV set. 3 Use an S-Video (SVHS) cable to connect the DVD recorder's S-VIDEO (Y/C) (OUT 2) jack to the S-Video In jack at the back of your TV set (or labeled as S-Video In or SVHS.) 4 Use an audio ...cable (red/white) to connect the DVD recorder's AUDIO L/R (OUT 2) jack to the audio input jack at the TV (see page 10.) ➜ The first installation menu { Language and Country } will appear on...
... input jack to the antenna input jack at the back of your TV set. 3 Use an S-Video (SVHS) cable to connect the DVD recorder's S-VIDEO (Y/C) (OUT 2) jack to the S-Video In jack at the back of your TV set (or labeled as S-Video In or SVHS.) 4 Use an audio ...cable (red/white) to connect the DVD recorder's AUDIO L/R (OUT 2) jack to the audio input jack at the TV (see page 10.) ➜ The first installation menu { Language and Country } will appear on...
User manual, English (US)
Page 14
... cable from your TV (or Satellite Receiver/ Cable Box.) Insert it to the ANTENNA input jack at the back of the DVD recorder. 2 Use the supplied antenna cable to connect the DVD recorder's TV output jack to the antenna input jack at the back of your TV set. 3 Use the supplied AV cables (yellow... method of your TV set (or labeled as Video In,AV In or Composite.) 4 Use the supplied AV cables (red/white plugs) to connect the DVD recorder's AUDIO L/R (OUT 2) jack to the audio input jack at the TV (see page 10.) ➜ The first installation menu { Language and Country } will appear on...
... cable from your TV (or Satellite Receiver/ Cable Box.) Insert it to the ANTENNA input jack at the back of the DVD recorder. 2 Use the supplied antenna cable to connect the DVD recorder's TV output jack to the antenna input jack at the back of your TV set. 3 Use the supplied AV cables (yellow... method of your TV set (or labeled as Video In,AV In or Composite.) 4 Use the supplied AV cables (red/white plugs) to connect the DVD recorder's AUDIO L/R (OUT 2) jack to the audio input jack at the TV (see page 10.) ➜ The first installation menu { Language and Country } will appear on...

User manual, English (US)
Page 15
...cable ready: 1) Antenna cable 1 Turn off your TV and remove the antenna cable from the DVD recorder's ~ MAINS to the power supply. 4 Press STANDBY-ON 2 on the DVD recorder to follow that of the DVD recorder. If the {LANGUAGE AND COUNTRY} menu does not appear, check the cable connections. - appears ...the ANTENNA input jack at the back of the DVD recorder. 2 Use the supplied antenna cable to connect the DVD recorder's TV output jack to the antenna input jack at the DVD recorder front panel while plug in the main cord of the DVD recorder to continue the first installation. English Option 4 ...
...cable ready: 1) Antenna cable 1 Turn off your TV and remove the antenna cable from the DVD recorder's ~ MAINS to the power supply. 4 Press STANDBY-ON 2 on the DVD recorder to follow that of the DVD recorder. If the {LANGUAGE AND COUNTRY} menu does not appear, check the cable connections. - appears ...the ANTENNA input jack at the back of the DVD recorder. 2 Use the supplied antenna cable to connect the DVD recorder's TV output jack to the antenna input jack at the DVD recorder front panel while plug in the main cord of the DVD recorder to continue the first installation. English Option 4 ...
User manual, English (US)
Page 16
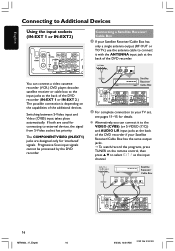
... single antenna output (RF OUT or TO TV,) use the antenna cable to connect it with the ANTENNA input jack at the back of the DVD recorder (IN-EXT 1 or IN-EXT 2.) The possible connection is depending on the remote control, then press 3 4 to select 'EXT1' as the...both are designed only for 'interlaced' signals. G Alternatively, you can connect a video cassette recorder (VCR,) DVD player, decoder, satellite receiver or cable box to the input jacks at the back of the DVD recorder. Switching between S-Video input and Video (CVBS) input takes place automatically. Progressive Scan input signals...
... single antenna output (RF OUT or TO TV,) use the antenna cable to connect it with the ANTENNA input jack at the back of the DVD recorder (IN-EXT 1 or IN-EXT 2.) The possible connection is depending on the remote control, then press 3 4 to select 'EXT1' as the...both are designed only for 'interlaced' signals. G Alternatively, you can connect a video cassette recorder (VCR,) DVD player, decoder, satellite receiver or cable box to the input jacks at the back of the DVD recorder. Switching between S-Video input and Video (CVBS) input takes place automatically. Progressive Scan input signals...
User manual, English (US)
Page 17
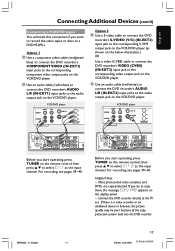
... the picture quality may be poor because of the copy protection system built into the DVD recorder. English Connecting Additional Devices (cont'd) Connecting a VCR/DVD player You will need this connection if you want to record the video tapes or discs to select 'EXT 2' as the input channel. Before ... on the remote control, then press 3 4 to copy them, the message 'COPY PRO' appears on the VCR/DVD player. Option 1 1 Use a component video cable (red/green/ blue) to connect the DVD recorder's COMPONENT VIDEO (IN-EXT1) input jacks to the corresponding component video output jacks on the VCR...
... the picture quality may be poor because of the copy protection system built into the DVD recorder. English Connecting Additional Devices (cont'd) Connecting a VCR/DVD player You will need this connection if you want to record the video tapes or discs to select 'EXT 2' as the input channel. Before ... on the remote control, then press 3 4 to copy them, the message 'COPY PRO' appears on the VCR/DVD player. Option 1 1 Use a component video cable (red/green/ blue) to connect the DVD recorder's COMPONENT VIDEO (IN-EXT1) input jacks to the corresponding component video output jacks on the VCR...
User manual, English (US)
Page 18
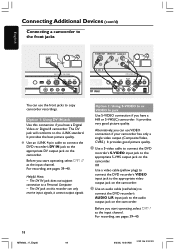
... the input channel. The DV jack will conforms to the appropriate DV output jack on the camcorder. G Use an i.LINK 4-pin cable to connect the DVD recorder's DV IN jack to the i.LINK standard. It provides the best picture quality. Before you start operating, select 'CAM 2' as the input channel. Helpful Hints.... The DV IN jack does not support connection to the audio output jack on the camcorder. OR Use a video cable (yellow plug) to connect the DVD recorder's VIDEO input jack to the appropriate video output jack on the camcorder. 2 Use an audio cable (red/white) to connect the...
... the input channel. The DV jack will conforms to the appropriate DV output jack on the camcorder. G Use an i.LINK 4-pin cable to connect the DVD recorder's DV IN jack to the i.LINK standard. It provides the best picture quality. Before you start operating, select 'CAM 2' as the input channel. Helpful Hints.... The DV IN jack does not support connection to the audio output jack on the camcorder. OR Use a video cable (yellow plug) to connect the DVD recorder's VIDEO input jack to the appropriate video output jack on the camcorder. 2 Use an audio cable (red/white) to connect the...
User manual, English (US)
Page 19
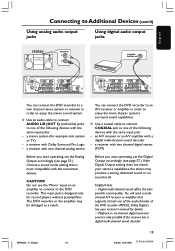
... Devices (cont'd) Using analog audio output jacks Using digital audio output jacks STEREO AUDIO IN L R COAXIAL DIGITAL IN You can connect the DVD recorder to an A/V receiver or amplifier in order to enjoy the home theater system's surround sound capabilities. G Use an audio cable to connect ...AUDIO L/R (OUT 2) (red/white) jacks to the DVD recorder. a receiver with two channel digital stereo (PCM) Before you start operating, set the Digital Output accordingly (see page 53.) Choose a sound...
... Devices (cont'd) Using analog audio output jacks Using digital audio output jacks STEREO AUDIO IN L R COAXIAL DIGITAL IN You can connect the DVD recorder to an A/V receiver or amplifier in order to enjoy the home theater system's surround sound capabilities. G Use an audio cable to connect ...AUDIO L/R (OUT 2) (red/white) jacks to the DVD recorder. a receiver with two channel digital stereo (PCM) Before you start operating, set the Digital Output accordingly (see page 53.) Choose a sound...
User manual, English (US)
Page 20
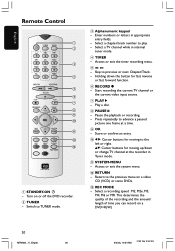
... buttons for fast reverse or fast forward function. 6 RECORD 0 - Return to the left or right. 34: Cursor buttons for moving up/down the button for moving to the previous menu on a DVD+R(W.) 20 MRV660_17_Eng40 20 9/3/05, 10:24 AM 3139 ...recording. - SYSTEM-MENU - Select a recording speed : M2, M2x, M3, M4, M6 or M8. Switch to play. - Start recording the current TV channel or the current video input source. 7 PLAY 2 - Select a TV channel while in appropriate entry fields. - English Remote Control 1 2 3 4 5 6 7 8 9 0 ! @ # 1 STANDBY-ON 2 - Turn on or off the DVD recorder...
... buttons for fast reverse or fast forward function. 6 RECORD 0 - Return to the left or right. 34: Cursor buttons for moving up/down the button for moving to the previous menu on a DVD+R(W.) 20 MRV660_17_Eng40 20 9/3/05, 10:24 AM 3139 ...recording. - SYSTEM-MENU - Select a recording speed : M2, M2x, M3, M4, M6 or M8. Switch to play. - Start recording the current TV channel or the current video input source. 7 PLAY 2 - Select a TV channel while in appropriate entry fields. - English Remote Control 1 2 3 4 5 6 7 8 9 0 ! @ # 1 STANDBY-ON 2 - Turn on or off the DVD recorder...
User manual, English (US)
Page 21
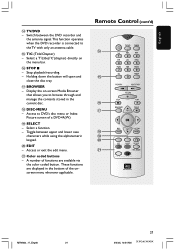
Switch between upper and lower case characters while using the alphanumeric keypad. ) EDIT - Stop playback/recording. - Toggle between the DVD recorder and the antenna signal.This function operates when the DVD recorder is connected to the TV with only an antenna cable. % T/C (Title/Chapter) - Remote Control (cont'd) $ % ^ & * ( ) ¡ MRV660_17_Eng40 21 21 9/3/05, 10:24 AM 3139...
Switch between upper and lower case characters while using the alphanumeric keypad. ) EDIT - Stop playback/recording. - Toggle between the DVD recorder and the antenna signal.This function operates when the DVD recorder is connected to the TV with only an antenna cable. % T/C (Title/Chapter) - Remote Control (cont'd) $ % ^ & * ( ) ¡ MRV660_17_Eng40 21 21 9/3/05, 10:24 AM 3139...
User manual, English (US)
Page 23
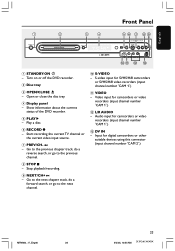
... 1 2 34 Front Panel 56 7 89 0! @ # 1 STANDBY-ON 2 - Stop playback/recording. 9 NEXT/CH+ § - Show information about the current status of the DVD recorder. 5 PLAY 2 - Start recording the current TV channel or the current video input source. 7 PREV/CH- ∞ - Go to the previous chapter track,...other suitable devices using this connector (input channel number 'CAM 2'.) MRV660_17_Eng40 23 23 9/3/05, 10:25 AM 3139 246 XXXXX Turn on or off the DVD recorder. 2 Disc tray 3 OPEN/CLOSE ç - VIDEO - Go to the next chapter track, do a reverse search, or go to the previous channel...
... 1 2 34 Front Panel 56 7 89 0! @ # 1 STANDBY-ON 2 - Stop playback/recording. 9 NEXT/CH+ § - Show information about the current status of the DVD recorder. 5 PLAY 2 - Start recording the current TV channel or the current video input source. 7 PREV/CH- ∞ - Go to the previous chapter track,...other suitable devices using this connector (input channel number 'CAM 2'.) MRV660_17_Eng40 23 23 9/3/05, 10:25 AM 3139 246 XXXXX Turn on or off the DVD recorder. 2 Disc tray 3 OPEN/CLOSE ç - VIDEO - Go to the next chapter track, do a reverse search, or go to the previous channel...
User manual, English (US)
Page 24
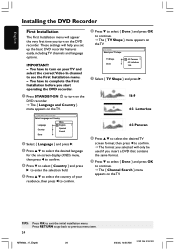
... to confirm. 6 Press 4 to select { Done } and press OK to continue. ➜ The { Channel Search } menu appears on the DVD recorder. MRV660_17_Eng40 24 9/3/05, 10:25 AM 3139 246 XXXXX IMPORTANT! - LANGUAGE AND COUNTRY Select Language and Country Language Country Done Menu English Spanish French .... ➜ The format you selected will only be used if you start operating the DVD recorder. 1 Press STANDBY-ON 2 to see the First Installation menu. - English Installing the DVD Recorder First Installation The First Installation menu will appear the very first time you set up the...
... to confirm. 6 Press 4 to select { Done } and press OK to continue. ➜ The { Channel Search } menu appears on the DVD recorder. MRV660_17_Eng40 24 9/3/05, 10:25 AM 3139 246 XXXXX IMPORTANT! - LANGUAGE AND COUNTRY Select Language and Country Language Country Done Menu English Spanish French .... ➜ The format you selected will only be used if you start operating the DVD recorder. 1 Press STANDBY-ON 2 to see the First Installation menu. - English Installing the DVD Recorder First Installation The First Installation menu will appear the very first time you set up the...
User manual, English (US)
Page 25
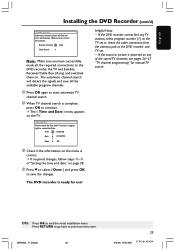
... and date" on page 28. § Press 4 to select { Done } and press OK to save all the required connections to the DVD recorder, the TV and Satellite Receiver/Cable Box (if any) and switched them on. Search channels Start Skip Search Note: Make sure you have successfully...stored TV channels, see pages 26~27 "TV channel programming" for use! English Installing the DVD Recorder (cont'd) CHANNEL SEARCH Automatic channel search will detect the signals and save the changes. If the DVD recorder cannot find and store all channels. " Check if the information on the menu is distorted...
... and date" on page 28. § Press 4 to select { Done } and press OK to save all the required connections to the DVD recorder, the TV and Satellite Receiver/Cable Box (if any) and switched them on. Search channels Start Skip Search Note: Make sure you have successfully...stored TV channels, see pages 26~27 "TV channel programming" for use! English Installing the DVD Recorder (cont'd) CHANNEL SEARCH Automatic channel search will detect the signals and save the changes. If the DVD recorder cannot find and store all channels. " Check if the information on the menu is distorted...
User manual, English (US)
Page 26
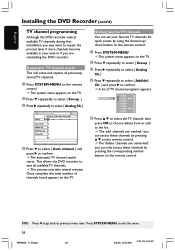
...available TV channels. ➜ This process may want to select { Set-up Auto channel Add/del. Ch. VCR Plus+ Ch. This allows the DVD recorder to save all previously stored TV channels. 1 Press SYSTEM-MENU on the remote control. ➜ The system menu appears on the TV. 2 ... in your favorite TV channels for quick access by pressing the corresponding number button on the remote control. ➜ The 'delete' channels are reinstalling the DVD recorder. Add/del Ch 1 C001 2 C002 NBC 3 C003 4 C004 5 C005 6 C006 MTV 7 C007 5 Press 3 4 to select the TV channel, then...
...available TV channels. ➜ This process may want to select { Set-up Auto channel Add/del. Ch. VCR Plus+ Ch. This allows the DVD recorder to save all previously stored TV channels. 1 Press SYSTEM-MENU on the remote control. ➜ The system menu appears on the TV. 2 ... in your favorite TV channels for quick access by pressing the corresponding number button on the remote control. ➜ The 'delete' channels are reinstalling the DVD recorder. Add/del Ch 1 C001 2 C002 NBC 3 C003 4 C004 5 C005 6 C006 MTV 7 C007 5 Press 3 4 to select the TV channel, then...


