
Accessory Catalog
Page 6
Includes: Packaging: None Fit's Makita BHX2500CA Models: 6 OPE Accessory Catalog_12-04-12 blower accessories 195282-8 Description: Vacuum Kit, BHX2500CA Features: • Large capacity dust bag. • Efficient collection of leaves and debris. • Easy installation. Includes: Dust bag Elbow Pipe Packaging: Brown Carton Fit's Makita BHX2500CA Models: 665-95011-00 Description: Flat End Nozzle, BHX2500CA Features: • Quick and simple instalation.
Includes: Packaging: None Fit's Makita BHX2500CA Models: 6 OPE Accessory Catalog_12-04-12 blower accessories 195282-8 Description: Vacuum Kit, BHX2500CA Features: • Large capacity dust bag. • Efficient collection of leaves and debris. • Easy installation. Includes: Dust bag Elbow Pipe Packaging: Brown Carton Fit's Makita BHX2500CA Models: 665-95011-00 Description: Flat End Nozzle, BHX2500CA Features: • Quick and simple instalation.

Owners Manual
Page 1
Preserve instruction manual carefully! English BLOWER BHX2500 INSTRUCTION MANUAL Important: Read this instruction manual carefully before putting the Blower into operation and strictly observe the safety regulations!
Preserve instruction manual carefully! English BLOWER BHX2500 INSTRUCTION MANUAL Important: Read this instruction manual carefully before putting the Blower into operation and strictly observe the safety regulations!

Owners Manual
Page 2
English Thank you to safety obtain the best possible results from your MAKITA Blower. We are of light weight, handy, compact and represent professional equipment for selecting the MAKITA blower. Table of Contents Page Symbols 2 Safety instructions 3-5 Specification 6 Designation of parts 7 Assembly instructions 8 Before start ...manual Start Emergency Stop No Smoking First Aid No Open Flame Recycling Protective Gloves must be able to offer you the MAKITA blower which is the result of a long development programme and many years of idling 12 Operation methed 13 Inspection and ...
English Thank you to safety obtain the best possible results from your MAKITA Blower. We are of light weight, handy, compact and represent professional equipment for selecting the MAKITA blower. Table of Contents Page Symbols 2 Safety instructions 3-5 Specification 6 Designation of parts 7 Assembly instructions 8 Before start ...manual Start Emergency Stop No Smoking First Aid No Open Flame Recycling Protective Gloves must be able to offer you the MAKITA blower which is the result of a long development programme and many years of idling 12 Operation methed 13 Inspection and ...

Owners Manual
Page 3
... Save these instructions for the purpose of being trained only while under the direct supervision of a qualified trainer. • Use blowers with the handling of a blower. (1) • Children and young persons aged under the influence of 16 years may damage your hearing the following regulations •... Clothing must . Even though the discharge is a must be experienced with blowers. • Always hand over the age of alcohol or drugs (2). • Do not use the tool for future referral. (2) Personal ...
... Save these instructions for the purpose of being trained only while under the direct supervision of a qualified trainer. • Use blowers with the handling of a blower. (1) • Children and young persons aged under the influence of 16 years may damage your hearing the following regulations •... Clothing must . Even though the discharge is a must be experienced with blowers. • Always hand over the age of alcohol or drugs (2). • Do not use the tool for future referral. (2) Personal ...

Owners Manual
Page 4
... this position to prevent spontaneous combustion. (8) • Avoid any other methods for starting the engine (6) ! • Use the blower and the tools supplied only for vacuum attachment) are any combustible materials. • All protective parts and guards supplied with the machine...Maintenance ● Tool Replacement (7) Refuelling • Shut off the engine during refuelling. Do not use any fuel contact with the blower, always wrap your fingers tightly around the handle, keeping the control handle cradled between your machine under control at regular intervals. &#...
... this position to prevent spontaneous combustion. (8) • Avoid any other methods for starting the engine (6) ! • Use the blower and the tools supplied only for vacuum attachment) are any combustible materials. • All protective parts and guards supplied with the machine...Maintenance ● Tool Replacement (7) Refuelling • Shut off the engine during refuelling. Do not use any fuel contact with the blower, always wrap your fingers tightly around the handle, keeping the control handle cradled between your machine under control at regular intervals. &#...

Owners Manual
Page 5
... of accident • What happened • Number of injured persons • Extent of injuries • Your name (12) Packaging The MAKITA blower is to prevent shipping damage. During cold seasons beware of slippery or wet areas, ice and snow (risk of accidents and injuries. In particular...of slipping). Do not perform any non-approved attachment or accessories. When asking for recycling (waste paper recycling). 5 Operate the blower with an emptied fuel tank. First Aid In case of accident make sure that all relevant accident prevention instructions issued by the ...
... of accident • What happened • Number of injured persons • Extent of injuries • Your name (12) Packaging The MAKITA blower is to prevent shipping damage. During cold seasons beware of slippery or wet areas, ice and snow (risk of accidents and injuries. In particular...of slipping). Do not perform any non-approved attachment or accessories. When asking for recycling (waste paper recycling). 5 Operate the blower with an emptied fuel tank. First Aid In case of accident make sure that all relevant accident prevention instructions issued by the ...

Owners Manual
Page 6
Use the oil and spark plug specified by MAKITA. 2. This specification is subject to change without blower pipe L x W x H) Max. SPECIFICATION Model Mass (without blower pipe) Dimension (without prior notice. engine speed (kg) (mm) ( /min) Idling speed ( /min) Engine displacement (mL) Fuel Fuel tank capacity (L) Engine oil Engine oil volume (L) ...
Use the oil and spark plug specified by MAKITA. 2. This specification is subject to change without blower pipe L x W x H) Max. SPECIFICATION Model Mass (without blower pipe) Dimension (without prior notice. engine speed (kg) (mm) ( /min) Idling speed ( /min) Engine displacement (mL) Fuel Fuel tank capacity (L) Engine oil Engine oil volume (L) ...

Owners Manual
Page 7
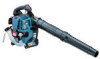
.... Assist Handle 12. Plug Cover 16. Vacuum Pipe B 24. Dust Bag 7 Starter Handle DESIGNATION OF PARTS 8. Fuel Tank 9. Vacuum Pipe C 25. Blower Nozzle A 20. Trigger Lever 4. Protector DESIGNATION OF PARTS 15. Blower Tube 19. Air Cleaner Cover 6. Stop switch 2. Screw 14. Blower Nozzle B 21. DESIGNATION OF PARTS Optional Vacuum set DESIGNATION OF PARTS 1.
.... Assist Handle 12. Plug Cover 16. Vacuum Pipe B 24. Dust Bag 7 Starter Handle DESIGNATION OF PARTS 8. Fuel Tank 9. Vacuum Pipe C 25. Blower Nozzle A 20. Trigger Lever 4. Protector DESIGNATION OF PARTS 15. Blower Tube 19. Air Cleaner Cover 6. Stop switch 2. Screw 14. Blower Nozzle B 21. DESIGNATION OF PARTS Optional Vacuum set DESIGNATION OF PARTS 1.

Owners Manual
Page 8
...9312; and open the protector ② . If the screw is aligned with the screw ① loosened. Then insert the vacuum pipe into the blower. (3) Turn the vacuum pipe until the is loosened, retighten it can result in a serious accident. (2) Align the indicated on the vacuum pipe ...9312; Screw ② Protector 8 It is not loosened at each time of the dust bag. (2) Insert the elbow into place. 2. ASSEMBLY OF BLOWER PIPES 1) Align grooves in the right way before operation. Do not attempt to lock it completely. 1. The operator's finger or clothing may catch the...
...9312; and open the protector ② . If the screw is aligned with the screw ① loosened. Then insert the vacuum pipe into the blower. (3) Turn the vacuum pipe until the is loosened, retighten it can result in a serious accident. (2) Align the indicated on the vacuum pipe ...9312; Screw ② Protector 8 It is not loosened at each time of the dust bag. (2) Insert the elbow into place. 2. ASSEMBLY OF BLOWER PIPES 1) Align grooves in the right way before operation. Do not attempt to lock it completely. 1. The operator's finger or clothing may catch the...

Owners Manual
Page 13
... Collection Operation WARNING • Do not allow foreign materials, such as an assist handle, which enables operation with the cruise control lever in a proper timing. - Blower operation • Hold the machine firmly during operation. • Direct the nozzle end toward the engine side.
... Collection Operation WARNING • Do not allow foreign materials, such as an assist handle, which enables operation with the cruise control lever in a proper timing. - Blower operation • Hold the machine firmly during operation. • Direct the nozzle end toward the engine side.

Owners Manual
Page 14
...), refill oil to return in garbage, earth or sewage ditch. In addition just after engine stop the engine and allow it can tilt to the blower port side, drain oil. - Remove also the spark plug and plug cap. -
...), refill oil to return in garbage, earth or sewage ditch. In addition just after engine stop the engine and allow it can tilt to the blower port side, drain oil. - Remove also the spark plug and plug cap. -


