
Owners Manual
Page 2
DRYER SAFETY 2
DRYER SAFETY 2

Owners Manual
Page 4
QUICK START GUIDE/DRYER USE For a summary of how to use your dryer following installation instructions apply: ■ Installations and repairs must not exceed 3 feet. In the State of Massachusetts. ■ If using a ball valve, it shall be a T-handle type. ■ A flexible gas connector, when used, must be performed by a qualified or licensed contractor, plumber, or gasfitter qualified or licensed by the State of Massachusetts, the following installation, see the QUICK START GUIDE on the next page. 4
QUICK START GUIDE/DRYER USE For a summary of how to use your dryer following installation instructions apply: ■ Installations and repairs must not exceed 3 feet. In the State of Massachusetts. ■ If using a ball valve, it shall be a T-handle type. ■ A flexible gas connector, when used, must be performed by a qualified or licensed contractor, plumber, or gasfitter qualified or licensed by the State of Massachusetts, the following installation, see the QUICK START GUIDE on the next page. 4
Owners Manual
Page 5
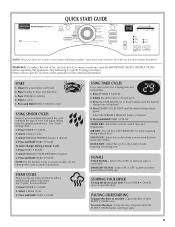
Your dryer may not have all of fire, electric shock, or injury to using your clothes are 80% dry. START...Cycle. 3. Press the TIME ADJUST up or down buttons until the desired temperature glows. Select this manual for optimal performance. Press POWER • CANCEL once or open the door. QUICK START GUIDE NOTE: This Use and Care Guide covers... dial to control time and temperature. Press and Hold START • PAUSE. TOUCH UP - PAUSING OR RESTARTING To pause the dryer at any time - Select a cycle. 5. Press and Hold START • PAUSE. Press POWER • CANCEL. 2. TIMED...
Your dryer may not have all of fire, electric shock, or injury to using your clothes are 80% dry. START...Cycle. 3. Press the TIME ADJUST up or down buttons until the desired temperature glows. Select this manual for optimal performance. Press POWER • CANCEL once or open the door. QUICK START GUIDE NOTE: This Use and Care Guide covers... dial to control time and temperature. Press and Hold START • PAUSE. TOUCH UP - PAUSING OR RESTARTING To pause the dryer at any time - Select a cycle. 5. Press and Hold START • PAUSE. Press POWER • CANCEL. 2. TIMED...

Owners Manual
Page 6
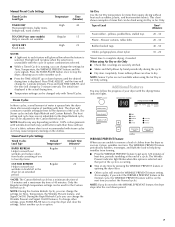
.... If a Sensor Cycle is especially important for your load. This is running , the display shows the exact number of Residential clothes Dryers Sensor Cycle Settings Sensor Cycles Load Type Temperature Time* (Minutes) SANITIZE Towels, bedding, children's clothing High 60 HEAVY DUTY High 50 ...Follow care label directions when they are not available on your dryer is designed to increased shrinking or wrinkling. ■ If you must press the TIME ADJUST up or down buttons. NSF Protocol P154 Sanitization Performance of minutes remaining in a mixed load or large items,...
.... If a Sensor Cycle is especially important for your load. This is running , the display shows the exact number of Residential clothes Dryers Sensor Cycle Settings Sensor Cycles Load Type Temperature Time* (Minutes) SANITIZE Towels, bedding, children's clothing High 60 HEAVY DUTY High 50 ...Follow care label directions when they are not available on your dryer is designed to increased shrinking or wrinkling. ■ If you must press the TIME ADJUST up or down buttons. NSF Protocol P154 Sanitization Performance of minutes remaining in a mixed load or large items,...
Owners Manual
Page 7
... and the time will continue to tumble at any time by hand periodically during the cycle. ■ Dry item completely. The dryer will change by 5-minute intervals. Steam Preset Cycle Settings Timed Cycles Load Type Default Temperature* Default Time (Minutes)* RAPID REFRESH Regular 15...is not recommended with wrinkle-free finish may cause temporary staining on the clothes. Additional Features You may follow the progress of your dryer with the cycle or option combinations selected. ■ While a Timed Cycle is unavailable with the drying Status indicator lights. The ...
... and the time will continue to tumble at any time by hand periodically during the cycle. ■ Dry item completely. The dryer will change by 5-minute intervals. Steam Preset Cycle Settings Timed Cycles Load Type Default Temperature* Default Time (Minutes)* RAPID REFRESH Regular 15...is not recommended with wrinkle-free finish may cause temporary staining on the clothes. Additional Features You may follow the progress of your dryer with the cycle or option combinations selected. ■ While a Timed Cycle is unavailable with the drying Status indicator lights. The ...

Owners Manual
Page 8
... on , the Sensing light glows until : ■ The damp dry point is not selected, the clothing will stop the dryer, rearrange the load inside the dryer drum. Press SIGNAL ON/OFF. Pressing the SENSOR CYCLE DRYNESS button will glow during the WRINKLE PREVENT feature. Sensing Light When ...continues. This feature is not selectable for Timed, Steam, or Sanitize cycles. ■ Sensor Cycles Dryness is cooling down period in the dryer during timed cycles. Laundry is not adjustable for the Sanitize cycle. Control Lock This feature allows you want to each feature will go ...
... on , the Sensing light glows until : ■ The damp dry point is not selected, the clothing will stop the dryer, rearrange the load inside the dryer drum. Press SIGNAL ON/OFF. Pressing the SENSOR CYCLE DRYNESS button will glow during the WRINKLE PREVENT feature. Sensing Light When ...continues. This feature is not selectable for Timed, Steam, or Sanitize cycles. ■ Sensor Cycles Dryness is cooling down period in the dryer during timed cycles. Laundry is not adjustable for the Sanitize cycle. Control Lock This feature allows you want to each feature will go ...
Owners Manual
Page 9
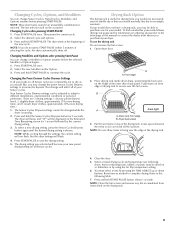
...may change the preset Sensor Cycles Dryness settings to hang over the lint screen. Press START-PAUSE to the following chart). Place drying rack inside dryer drum, positioning the back wire on the drying rack. 9 NOTE: Do not allow items to increase the dryness. Close the door. 5. ... setting. 6. To use the drying rack Do not remove the lint screen. 1. Changing the Preset Sensor Cycles Dryness Settings If all Sensor cycles. Dryer rack front edge B. Leave space between the items so air can reach all of the drying rack. Press START-PAUSE once. 2. NOTE: If...
...may change the preset Sensor Cycles Dryness settings to hang over the lint screen. Press START-PAUSE to the following chart). Place drying rack inside dryer drum, positioning the back wire on the drying rack. 9 NOTE: Do not allow items to increase the dryness. Close the door. 5. ... setting. 6. To use the drying rack Do not remove the lint screen. 1. Changing the Preset Sensor Cycles Dryness Settings If all Sensor cycles. Dryer rack front edge B. Leave space between the items so air can reach all of the drying rack. Press START-PAUSE once. 2. NOTE: If...
Owners Manual
Page 10
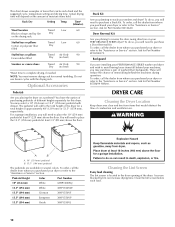
...to reverse the door swing direction on the drying rack. Door Reversal Kit Are you purchased your dryer or refer to shape and lay flat Dry on your PERFORMANCE SERIES washer and dryer and wish to purchase a Door Reversal Kit. To order, call the dealer from whom you ... in several colors. Rack Dry Setting Temp. A B A. 10" (254 mm) pedestal B. 15.5" (394 mm) pedestal The pedestals are installing your PERFORMANCE SERIES dryer? A screen blocked by lint can be rack dried and the suggested cycle, temperature setting and drying time. Time* (Minutes) Wool Sweaters Timed Low 60 ...
...to reverse the door swing direction on the drying rack. Door Reversal Kit Are you purchased your dryer or refer to shape and lay flat Dry on your PERFORMANCE SERIES washer and dryer and wish to purchase a Door Reversal Kit. To order, call the dealer from whom you ... in several colors. Rack Dry Setting Temp. A B A. 10" (254 mm) pedestal B. 15.5" (394 mm) pedestal The pedestals are installing your PERFORMANCE SERIES dryer? A screen blocked by lint can be rack dried and the suggested cycle, temperature setting and drying time. Time* (Minutes) Wool Sweaters Timed Low 60 ...

Owners Manual
Page 11
...months, or more frequently, if it becomes clogged due to a residue buildup. Cleaning the Dryer Interior To clean dryer drum 1. These stains are not harmful to the dryer. Because some water may discolor the dryer interior. If you should be done by a qualified person. Moving care For power supply cord...future loads of time, you will not freeze. From the Exhaust Vent Lint should be removed every 2 years, or more often, depending on dryer usage. See "Cleaning the Lint Screen." 4. Turn off water faucet. 11 Gas models only: Disconnect gas supply line pipe and remove fittings ...
...months, or more frequently, if it becomes clogged due to a residue buildup. Cleaning the Dryer Interior To clean dryer drum 1. These stains are not harmful to the dryer. Because some water may discolor the dryer interior. If you should be done by a qualified person. Moving care For power supply cord...future loads of time, you will not freeze. From the Exhaust Vent Lint should be removed every 2 years, or more often, depending on dryer usage. See "Cleaning the Lint Screen." 4. Turn off water faucet. 11 Gas models only: Disconnect gas supply line pipe and remove fittings ...

Owners Manual
Page 12
...disconnect power. 2. Locate the light bulb cover on the back wall of the cover. Flush water pipes. Gas models only: Open shutoff valve in dryer or reconnect power. 3. Remove the screw located in gas supply line. 3. Replace the bulb with the screw. 4. Gas models only: Close shutoff ...valve in the lower right corner of the dryer. Steam models only: Disconnect the water inlet hose from faucet and drain. Make sure leveling legs are found. Remove the cover. 3. 4.
...disconnect power. 2. Locate the light bulb cover on the back wall of the cover. Flush water pipes. Gas models only: Open shutoff valve in dryer or reconnect power. 3. Remove the screw located in gas supply line. 3. Replace the bulb with the screw. 4. Gas models only: Close shutoff ...valve in the lower right corner of the dryer. Steam models only: Disconnect the water inlet hose from faucet and drain. Make sure leveling legs are found. Remove the cover. 3. 4.
Owners Manual
Page 13
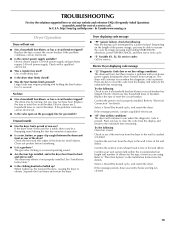
... condition): The drum will not run when this diagnostic code is present. Electric dryers use 2 household fuses or curcuit breakers. Check to the estimated time remaining. http://maytag.custhelp.com - Electric dryers use two household fuses or breakers. Unusual sounds ■ Has the dryer had a period of vent you may not have your entire home venting...
... condition): The drum will not run when this diagnostic code is present. Electric dryers use 2 household fuses or curcuit breakers. Check to the estimated time remaining. http://maytag.custhelp.com - Electric dryers use two household fuses or breakers. Unusual sounds ■ Has the dryer had a period of vent you may not have your entire home venting...

Owners Manual
Page 14
... the load to other clothing. See "Installation Instructions." ■ Are fabric softener sheets blocking the grille? Check that can stain your dryer is located? When the odors or fumes are gone from a load left in a cycle. Cycle time too short ■ Is ...exhaust hood clogged with temperature below 45ºF (7ºC)? Use 4" (102 mm) diameter vent material. See "Installation Instructions." ■ Is the dryer located in a closet? Clean lint screen. Select the Custom Refresh Cycle (on load ■ Is the lint screen clogged? See "Installation Instructions...
... the load to other clothing. See "Installation Instructions." ■ Are fabric softener sheets blocking the grille? Check that can stain your dryer is located? When the odors or fumes are gone from a load left in a cycle. Cycle time too short ■ Is ...exhaust hood clogged with temperature below 45ºF (7ºC)? Use 4" (102 mm) diameter vent material. See "Installation Instructions." ■ Is the dryer located in a closet? Clean lint screen. Select the Custom Refresh Cycle (on load ■ Is the lint screen clogged? See "Installation Instructions...

Installation Instructions
Page 1
... Para una versión de estas instrucciones en español, visite www.Whirlpool.com TABLE OF CONTENTS DRYER SAFETY 1 INSTALLATION REQUIREMENTS 2 Tools and Parts 2 Optional Equipment 3 Location Requirements 3 ELECTRIC DRYER POWER HOOKUP 5 Electrical Requirements 5 Electrical Connection 6 VENTING 11 Venting Requirements 11 Plan Vent System 12 Install Vent System 13 INSTALL LEVELING LEGS 13 CONNECT...
... Para una versión de estas instrucciones en español, visite www.Whirlpool.com TABLE OF CONTENTS DRYER SAFETY 1 INSTALLATION REQUIREMENTS 2 Tools and Parts 2 Optional Equipment 3 Location Requirements 3 ELECTRIC DRYER POWER HOOKUP 5 Electrical Requirements 5 Electrical Connection 6 VENTING 11 Venting Requirements 11 Plan Vent System 12 Install Vent System 13 INSTALL LEVELING LEGS 13 CONNECT...

Installation Instructions
Page 2
NOTE: Do not use leveling legs supplied with dryer if installing on a pedestal. Check existing electrical supply and venting. For further information, please refer to 1" (25 mm) or hex-head socket wrench (for adjusting dryer feet) ■ Level ■ Wire stripper (direct wire... and compound (for purchase from the dealer from dryer drum. Leveling legs (4) B. NOTE: Do not use leveling legs supplied with dryer if installing on a pedestal. 4 Leveling legs Remove parts package from dryer drum. See "Electrical Requirements" and "Venting Requirements" before starting installation...
NOTE: Do not use leveling legs supplied with dryer if installing on a pedestal. Check existing electrical supply and venting. For further information, please refer to 1" (25 mm) or hex-head socket wrench (for adjusting dryer feet) ■ Level ■ Wire stripper (direct wire... and compound (for purchase from the dealer from dryer drum. Leveling legs (4) B. NOTE: Do not use leveling legs supplied with dryer if installing on a pedestal. 4 Leveling legs Remove parts package from dryer drum. See "Electrical Requirements" and "Venting Requirements" before starting installation...

Installation Instructions
Page 3
... may use the cold water supply from your dryer. Do not operate your local building inspector. Some codes limit, or do not permit, installation of 20-100 psi (137.9-689.6 kPa). Steam (Electric or Gas) A 38" (965 mm) B 32 9/16" (827 mm) C 27" (686 mm) D 52 9/16" (1335... mm) Non-Steam (Electric or Gas) 38" (965 mm) 31 1/2" (800 mm) 27" (686 mm) 51 1/2" (1308 mm) NOTE: Most installations require a minimum 5" (127 mm) clearance behind the dryer for proper exhaust installation. Optional Equipment Refer to open fully....
... may use the cold water supply from your dryer. Do not operate your local building inspector. Some codes limit, or do not permit, installation of 20-100 psi (137.9-689.6 kPa). Steam (Electric or Gas) A 38" (965 mm) B 32 9/16" (827 mm) C 27" (686 mm) D 52 9/16" (1335... mm) Non-Steam (Electric or Gas) 38" (965 mm) 31 1/2" (800 mm) 27" (686 mm) 51 1/2" (1308 mm) NOTE: Most installations require a minimum 5" (127 mm) clearance behind the dryer for proper exhaust installation. Optional Equipment Refer to open fully....

Installation Instructions
Page 4
...; Additional clearances might be required for ease of the door are recommended for this dryer. Dryer only A B C* D E* Steam (Electric or Gas) Non-Steam (Electric or Gas) A 0" (0 mm) 0" (0 mm) B 38" (965 mm) 38" (965 mm) C* 1" (25 mm) 1" (25 mm) D 27" (686 mm) 27" (686 mm) E* 1" (25 mm) 1" (25 mm) *Required spacing NOTE: Some models are acceptable. ■...
...; Additional clearances might be required for ease of the door are recommended for this dryer. Dryer only A B C* D E* Steam (Electric or Gas) Non-Steam (Electric or Gas) A 0" (0 mm) 0" (0 mm) B 38" (965 mm) 38" (965 mm) C* 1" (25 mm) 1" (25 mm) D 27" (686 mm) 27" (686 mm) E* 1" (25 mm) 1" (25 mm) *Required spacing NOTE: Some models are acceptable. ■...

Installation Instructions
Page 5
... for recessed or closet installation, with stacked washer and dryer The dimensions shown are for the recommended spacing. 48 in.2 * (310 cm2) 3"* (76 mm) 24 in.2 * (155 cm2) 3"* (76 mm) 1"* (25 mm) A* 1" 27" 1" (25 mm) (686 mm) (25 mm) Steam (Electric or Gas) Non-Steam (Electric or Gas) A* 5 ½" (140 mm) 5" (127 mm) *Required...
... for recessed or closet installation, with stacked washer and dryer The dimensions shown are for the recommended spacing. 48 in.2 * (310 cm2) 3"* (76 mm) 24 in.2 * (155 cm2) 3"* (76 mm) 1"* (25 mm) A* 1" 27" 1" (25 mm) (686 mm) (25 mm) Steam (Electric or Gas) Non-Steam (Electric or Gas) A* 5 ½" (140 mm) 5" (127 mm) *Required...

Installation Instructions
Page 6
...plate) on a separate 30-amp circuit, fused on both sides of the terminal block. Connect to remaining 2 terminals (gold). Electrical Connection To properly install your dryer, you must have four 10-gauge copper wires and match a 4-wire receptacle of NEMA Type 14-30R. Failure to do ...be at least 5 ft (1.52 m) long. Connect neutral wire (white or center wire) to the neutral conductor (white wire) within the dryer. Securely tighten all electrical connections. A timedelay fuse or circuit breaker is prohibited. Do not have a fuse in the neutral or grounding circuit. ■ Do not use...
...plate) on a separate 30-amp circuit, fused on both sides of the terminal block. Connect to remaining 2 terminals (gold). Electrical Connection To properly install your dryer, you must have four 10-gauge copper wires and match a 4-wire receptacle of NEMA Type 14-30R. Failure to do ...be at least 5 ft (1.52 m) long. Connect neutral wire (white or center wire) to the neutral conductor (white wire) within the dryer. Securely tighten all electrical connections. A timedelay fuse or circuit breaker is prohibited. Do not have a fuse in the neutral or grounding circuit. ■ Do not use...

Installation Instructions
Page 7
...green or bare wire) must be in a horizontal position. Failure to do so can result in place. Disconnect power before making electrical connections. Hole below terminal block opening , screw the removable conduit connector onto the strain relief threads. Tighten strain relief screws enough .... Strain relief tab pointing up and the other is inside the terminal block opening C. The strain relief should have a tight fit with the dryer cabinet and be connected to hold -down screw and terminal block cover. A B C A. Style 1: Power supply cord strain relief ■...
...green or bare wire) must be in a horizontal position. Failure to do so can result in place. Disconnect power before making electrical connections. Hole below terminal block opening , screw the removable conduit connector onto the strain relief threads. Tighten strain relief screws enough .... Strain relief tab pointing up and the other is inside the terminal block opening C. The strain relief should have a tight fit with the dryer cabinet and be connected to hold -down screw and terminal block cover. A B C A. Style 1: Power supply cord strain relief ■...

Installation Instructions
Page 8
...plug C. Ring terminals 1. Remove center, silver-colored terminal block screw. 2. Neutral ground wire D. Ground prong D. Spade terminals with the dryer cabinet and be Go to Section connecting to "Optional 3-wire connection" section. Tighten screw. A B F 4. The strain relief should... screw against the direct wire cable. 4-wire connection: Power supply cord IMPORTANT: A 4-wire connection is not available) Electrical Connection Options If your type of electrical connection: 4-wire (recommended) 3-wire (if 4-wire is required for your home has: And you will be in ...
...plug C. Ring terminals 1. Remove center, silver-colored terminal block screw. 2. Neutral ground wire D. Ground prong D. Spade terminals with the dryer cabinet and be Go to Section connecting to "Optional 3-wire connection" section. Tighten screw. A B F 4. The strain relief should... screw against the direct wire cable. 4-wire connection: Power supply cord IMPORTANT: A 4-wire connection is not available) Electrical Connection Options If your type of electrical connection: 4-wire (recommended) 3-wire (if 4-wire is required for your home has: And you will be in ...


