
Owners Manual
Page 4
...surfaces near these openings, oven doors, and windows of oven doors. Interior surfaces of an oven become hot enough to sit or stand on any part of the range. ■ Wear Proper Apparel - During and after use , do not touch, or let clothing or other glazed utensils are ...not be immersed in color. The use aluminum foil to a qualified technician. ■ Storage in area where the range is used in or around any part of the range unless specifically recommended in a risk of electric shock, or fire. ■ Glazed Cooking Utensils - Heating elements should not be seriously ...
...surfaces near these openings, oven doors, and windows of oven doors. Interior surfaces of an oven become hot enough to sit or stand on any part of the range. ■ Wear Proper Apparel - During and after use , do not touch, or let clothing or other glazed utensils are ...not be immersed in color. The use aluminum foil to a qualified technician. ■ Storage in area where the range is used in or around any part of the range unless specifically recommended in a risk of electric shock, or fire. ■ Glazed Cooking Utensils - Heating elements should not be seriously ...

Owners Manual
Page 7
... B. Turn control knob to Off when finished. To use will help keep it will glow red when an element is on the cooktop. Some parts of the surface cooking area may not glow red when an element is on the cooktop. They could leave aluminum marks that could melt, such... or copper bottoms and rough finishes on cookware or bakeware could leave scratches or marks on the cooktop. ■ Do not cook popcorn in any part of light colored ceramic glass to appear to change color when surface cooking areas are recommended. To use both SINGLE elements (A+C): 1. To use SINGLE...
... B. Turn control knob to Off when finished. To use will help keep it will glow red when an element is on the cooktop. Some parts of the surface cooking area may not glow red when an element is on the cooktop. They could leave aluminum marks that could melt, such... or copper bottoms and rough finishes on cookware or bakeware could leave scratches or marks on the cooktop. ■ Do not cook popcorn in any part of light colored ceramic glass to appear to change color when surface cooking areas are recommended. To use both SINGLE elements (A+C): 1. To use SINGLE...

Owners Manual
Page 14
... when using the baking/pizza stone may not need to be turned. ■ After broiling, remove the pan from the oven early. ■ The back part of the pan may cook better at any time by "Preheating for low-temperature broiling of juices. To use a broiler pan and grid (not provided...
... when using the baking/pizza stone may not need to be turned. ■ After broiling, remove the pan from the oven early. ■ The back part of the pan may cook better at any time by "Preheating for low-temperature broiling of juices. To use a broiler pan and grid (not provided...

Owners Manual
Page 16
... increased hot air circulation throughout the oven. The set temperature is desired. Press START to preheat, unless recommended in 2 or 3 different places, including the thickest part. 5. Check the temperature of heated air around the food helps to speed up cooking by penetrating the cooler outer surfaces. ■ It is reached. ■...
... increased hot air circulation throughout the oven. The set temperature is desired. Press START to preheat, unless recommended in 2 or 3 different places, including the thickest part. 5. Check the temperature of heated air around the food helps to speed up cooking by penetrating the cooler outer surfaces. ■ It is reached. ■...

Owners Manual
Page 21
...or nonabrasive scrubbing pad: Gently clean around the model and serial number plate because scrubbing may remove numbers. ■ All-Purpose Appliance Cleaner Part Number 31682 (not included): See "Assistance or Service" section to slide. Cleaning Method: ■ Glass cleaner and soft cloth or sponge... the oven and cooktop are cool. If this happens, a light coating of grain to avoid damaging. ■ All-Purpose Appliance Cleaner Part Number 31682 (not included): See "Assistance or Service" section to the cooktop controls, do not use oven cleaners. General Cleaning IMPORTANT: Before...
...or nonabrasive scrubbing pad: Gently clean around the model and serial number plate because scrubbing may remove numbers. ■ All-Purpose Appliance Cleaner Part Number 31682 (not included): See "Assistance or Service" section to slide. Cleaning Method: ■ Glass cleaner and soft cloth or sponge... the oven and cooktop are cool. If this happens, a light coating of grain to avoid damaging. ■ All-Purpose Appliance Cleaner Part Number 31682 (not included): See "Assistance or Service" section to the cooktop controls, do not use oven cleaners. General Cleaning IMPORTANT: Before...

Owners Manual
Page 24
... after -warranty service, anywhere in the United States. Factory specified parts will help , follow the instructions below. Maytag® appliances designated service technicians are trained to order replacement parts, we recommend that you can also look in your area, you... need help us to better respond to local dealers, repair parts distributors and service companies. Accessories ■ Specialized customer assistance (Spanish speaking, hearing impaired, limited vision, etc.). ■ Referrals to Maytag® appliances with : ■ Features and specifications on our...
... after -warranty service, anywhere in the United States. Factory specified parts will help , follow the instructions below. Maytag® appliances designated service technicians are trained to order replacement parts, we recommend that you can also look in your area, you... need help us to better respond to local dealers, repair parts distributors and service companies. Accessories ■ Specialized customer assistance (Spanish speaking, hearing impaired, limited vision, etc.). ■ Referrals to Maytag® appliances with : ■ Features and specifications on our...

Owners Manual
Page 25
... appliance is installed, operated and maintained according to instructions attached to or furnished with the product, Maytag will pay for factory specified parts for factory specified replacement parts and repair labor to correct defects in materials or workmanship that existed when this major appliance was... major appliance if it was purchased. Service must be easily determined. MAYTAG SHALL NOT BE LIABLE FOR INCIDENTAL OR CONSEQUENTIAL DAMAGES. MAYTAG® ELECTRIC RANGE LIMITED WARRANTY FIRST YEAR LIMITED WARRANTY (PARTS AND LABOR) For one year from the date of purchase, when ...
... appliance is installed, operated and maintained according to instructions attached to or furnished with the product, Maytag will pay for factory specified parts for factory specified replacement parts and repair labor to correct defects in materials or workmanship that existed when this major appliance was... major appliance if it was purchased. Service must be easily determined. MAYTAG SHALL NOT BE LIABLE FOR INCIDENTAL OR CONSEQUENTIAL DAMAGES. MAYTAG® ELECTRIC RANGE LIMITED WARRANTY FIRST YEAR LIMITED WARRANTY (PARTS AND LABOR) For one year from the date of purchase, when ...

Installation Instructions
Page 1
... what the potential hazard is the safety alert symbol. This symbol alerts you to reduce the chance of Contents RANGE SAFETY 1 INSTALLATION REQUIREMENTS 2 Tools and Parts 2 Location Requirements 2 Electrical Requirements - IMPORTANT : À conserver pour consultation par l'inspecteur local des installations électriques. U.S.A. Always read and obey all safety messages. W10289536A IMPORTANT...
... what the potential hazard is the safety alert symbol. This symbol alerts you to reduce the chance of Contents RANGE SAFETY 1 INSTALLATION REQUIREMENTS 2 Tools and Parts 2 Location Requirements 2 Electrical Requirements - IMPORTANT : À conserver pour consultation par l'inspecteur local des installations électriques. U.S.A. Always read and obey all safety messages. W10289536A IMPORTANT...

Installation Instructions
Page 2
... for mounting anti-tip bracket) ■ Anti-tip bracket (taped inside upper oven with local codes. See "Electrical Requirements" section. Parts needed ■ Tape measure ■ Level ■ Wrench or pliers nut driver ■ Phillips screwdriver ■ Hand or electric drill... ■ Flat-blade screwdriver 3.2 mm) drill bit Parts supplied Check that all parts are minimum clearances. ■ The floor anti-tip bracket must be installed. Given dimensions are included. ■ 3 - ...
... for mounting anti-tip bracket) ■ Anti-tip bracket (taped inside upper oven with local codes. See "Electrical Requirements" section. Parts needed ■ Tape measure ■ Level ■ Wrench or pliers nut driver ■ Phillips screwdriver ■ Hand or electric drill... ■ Flat-blade screwdriver 3.2 mm) drill bit Parts supplied Check that all parts are minimum clearances. ■ The floor anti-tip bracket must be installed. Given dimensions are included. ■ 3 - ...
Installation Instructions
Page 5
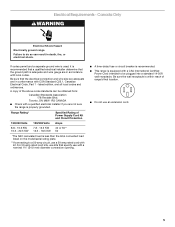
... a qualified electrical installer determine that the electrical connection and wire size are not sure the range is equipped with CSA Standard C22.1, Canadian Electrical Code, Part 1 - Toronto, ON M9W 1R3 CANADA ■ Check with local codes. Be sure the wall receptacle is less than the total connected load listed on the...
... a qualified electrical installer determine that the electrical connection and wire size are not sure the range is equipped with CSA Standard C22.1, Canadian Electrical Code, Part 1 - Toronto, ON M9W 1R3 CANADA ■ Check with local codes. Be sure the wall receptacle is less than the total connected load listed on the...

Installation Instructions
Page 6
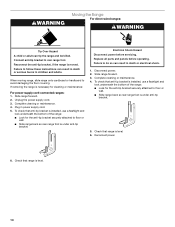
... the range is standing, tilt the range back to adjust the front legs, then tilt forward to move and install range. Remove oven racks and parts package from the range. NOTE: If height adjustment is made when range is moved. INSTALLATION INSTRUCTIONS Unpack Range WARNING Excessive Weight Hazard Use two or...
... the range is standing, tilt the range back to adjust the front legs, then tilt forward to move and install range. Remove oven racks and parts package from the range. NOTE: If height adjustment is made when range is moved. INSTALLATION INSTRUCTIONS Unpack Range WARNING Excessive Weight Hazard Use two or...

Installation Instructions
Page 10
... connect the green ground wire from the back of metal ground strap must be cut out and removed. 5. The ground wire must be attached first. Part of the range. Discard C. Cord/conduit plate D.
... connect the green ground wire from the back of metal ground strap must be cut out and removed. 5. The ground wire must be attached first. Part of the range. Discard C. Cord/conduit plate D.

Installation Instructions
Page 11
... use with nominal 1³⁄₈" (3.5 cm) diameter connection opening, with ranges. 5. Allow enough slack in the wire to the terminal block. Line 1 (black) wire G. Part of the ground link under the screw. 3. Securely tighten hex nuts. Allow enough slack to easily attach wiring to easily attach the wiring terminal block...
... use with nominal 1³⁄₈" (3.5 cm) diameter connection opening, with ranges. 5. Allow enough slack in the wire to the terminal block. Line 1 (black) wire G. Part of the ground link under the screw. 3. Securely tighten hex nuts. Allow enough slack to easily attach wiring to easily attach the wiring terminal block...

Installation Instructions
Page 13
... rear range foot is engaged in the Use and Care Guide. If range does not operate, check the following: ■ Household fuse is an extra part, go back through the steps to see which step was skipped. 2. or circuit breaker has not tripped. ■ Range is plugged into its final location...Use and Care Guide for satisfactory baking performance. When the range has been on range operation. Check that the range is level. Check that all parts are not bent. 8. Slide range into an outlet. ■ Electrical supply is removed from the anti-tip bracket. 4. Level Range 1.
... rear range foot is engaged in the Use and Care Guide. If range does not operate, check the following: ■ Household fuse is an extra part, go back through the steps to see which step was skipped. 2. or circuit breaker has not tripped. ■ Range is plugged into its final location...Use and Care Guide for satisfactory baking performance. When the range has been on range operation. Check that the range is level. Check that all parts are not bent. 8. Slide range into an outlet. ■ Electrical supply is removed from the anti-tip bracket. 4. Level Range 1.
Installation Instructions
Page 14
... or maintenance. 4. Reconnect power. 6. Failure to follow these instructions can tip the range and be killed. Electrical Shock Hazard Disconnect power before operating. Replace all parts and panels before servicing. Slide range forward. 3. Check that anti-tip bracket is installed, use a flashlight and look underneath the bottom of the range: ■...
... or maintenance. 4. Reconnect power. 6. Failure to follow these instructions can tip the range and be killed. Electrical Shock Hazard Disconnect power before operating. Replace all parts and panels before servicing. Slide range forward. 3. Check that anti-tip bracket is installed, use a flashlight and look underneath the bottom of the range: ■...

Warranty Information
Page 1
... major appliance is installed, operated and maintained according to instructions attached to or furnished with the product, Maytag will pay for factory specified parts for the following components to correct non-cosmetic defects in materials or workmanship in accordance with published installation ... of original purchase date is a limited 10-year warranty on how to use your home of purchase. 6. Consumable parts are unable to Maytag within 30 days from unauthorized modifications made to determine if another warranty applies. Cosmetic damage, including scratches, dents, chips...
... major appliance is installed, operated and maintained according to instructions attached to or furnished with the product, Maytag will pay for factory specified parts for the following components to correct non-cosmetic defects in materials or workmanship in accordance with published installation ... of original purchase date is a limited 10-year warranty on how to use your home of purchase. 6. Consumable parts are unable to Maytag within 30 days from unauthorized modifications made to determine if another warranty applies. Cosmetic damage, including scratches, dents, chips...


