
Owners Manual
Page 5
COOKTOP USE This manual covers several different models. Hot surface indicator light G. Cooktop on the control panel. Fire Hazard Turn off . 5 Use the following chart as any surface cooking area is too hot ... the items listed. The hot surface indicator light will glow. The range you have purchased may have some models) during the Self-Cleaning cycle, the entire cooktop area may not match those of your model. Right front control knob F. Failure to a boil. Medium High ■ Hold a rapid boil. ■ Quickly brown or...
COOKTOP USE This manual covers several different models. Hot surface indicator light G. Cooktop on the control panel. Fire Hazard Turn off . 5 Use the following chart as any surface cooking area is too hot ... the items listed. The hot surface indicator light will glow. The range you have purchased may have some models) during the Self-Cleaning cycle, the entire cooktop area may not match those of your model. Right front control knob F. Failure to a boil. Medium High ■ Hold a rapid boil. ■ Quickly brown or...
Owners Manual
Page 6
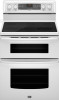
Speed Heat™ Cooking Zone (on some models) The Dual and Triple elements offer flexibility depending on the size of the cookware. The Speed Heat™ option can be used alone or when ... or oven mitts to anywhere between HI and LO. 2. Do not use it to keep food at a low temperature. Dual and Triple Elements (on some models) The Speed Heat™ Cooking Zone offers flexibility for oven and cooktop use. ■ Cover all foods with a lid or aluminum foil. Dual size To...
Speed Heat™ Cooking Zone (on some models) The Dual and Triple elements offer flexibility depending on the size of the cookware. The Speed Heat™ option can be used alone or when ... or oven mitts to anywhere between HI and LO. 2. Do not use it to keep food at a low temperature. Dual and Triple Elements (on some models) The Speed Heat™ Cooking Zone offers flexibility for oven and cooktop use. ■ Cover all foods with a lid or aluminum foil. Dual size To...

Owners Manual
Page 7
... ceramic glass could crack the cooktop. ■ To avoid damage to cook with large cookware. Turn both SINGLE elements and BRIDGE (A+B+C): 1. Ceramic Glass (on some models) The surface cooking area will return to the BRIDGE zone anywhere between LOW and HIGH. 3. Aluminum or copper bottoms and rough finishes on cookware or...
... ceramic glass could crack the cooktop. ■ To avoid damage to cook with large cookware. Turn both SINGLE elements and BRIDGE (A+B+C): 1. Ceramic Glass (on some models) The surface cooking area will return to the BRIDGE zone anywhere between LOW and HIGH. 3. Aluminum or copper bottoms and rough finishes on cookware or...

Owners Manual
Page 8
... medium-to the cooktop, do not cook foods directly on 2 surface cooking areas, elements or surface burners at the same time. ■ On ceramic glass models, use of cooking. ■ Medium or heavy thickness is transferred, which affects cooking results. Ideal cookware should have a flat bottom, straight sides and a well-fitting...
... medium-to the cooktop, do not cook foods directly on 2 surface cooking areas, elements or surface burners at the same time. ■ On ceramic glass models, use of cooking. ■ Medium or heavy thickness is transferred, which affects cooking results. Ideal cookware should have a flat bottom, straight sides and a well-fitting...

Owners Manual
Page 12
...; The upper oven is equipped with 1 flat rack. ■ The lower oven is toward the right side of the oven and the pizza on some models) FUNCTION NUMBER OF RACK RACKS USED POSITION(S) Convection baking 1 3 Convection baking 2 2 and 4 Convection roasting 1 1 or 2 Multiple Rack Cooking 2-rack: Use rack positions 2 and 4. Upper Oven...
...; The upper oven is equipped with 1 flat rack. ■ The lower oven is toward the right side of the oven and the pizza on some models) FUNCTION NUMBER OF RACK RACKS USED POSITION(S) Convection baking 1 3 Convection baking 2 2 and 4 Convection roasting 1 1 or 2 Multiple Rack Cooking 2-rack: Use rack positions 2 and 4. Upper Oven...

Owners Manual
Page 13
...Bakeware The bakeware material affects cooking results. Insulated cookie sheets or baking pans ■ Place in the recipe. Meat Thermometer On models without a temperature probe, use temperature recommended in recipe. ■ Place rack in recipe. Ovenproof glassware, ceramic glass or ...ceramic ■ Brown, crisp crusts ■ May need to determine doneness. Model Cook function Bake element Rack position MET8665 MET8775 MET8885 Bake Convect bake Convect bake Exposed Hidden Hidden 2 and 4 2 and 4 2 and...
...Bakeware The bakeware material affects cooking results. Insulated cookie sheets or baking pans ■ Place in the recipe. Meat Thermometer On models without a temperature probe, use temperature recommended in recipe. ■ Place rack in recipe. Ovenproof glassware, ceramic glass or ...ceramic ■ Brown, crisp crusts ■ May need to determine doneness. Model Cook function Bake element Rack position MET8665 MET8775 MET8885 Bake Convect bake Convect bake Exposed Hidden Hidden 2 and 4 2 and 4 2 and...

Owners Manual
Page 16
...the oven temperature during cooking, press the Temp/Time "+" or "-" pads until the set temperature is pressed. 5. Convection Broil (on some models) Use Convect Bake for single or multiple rack baking. Press CONVECT BROIL. "CONVECT BROIL" will scroll in the lower oven text area. ... will also be displayed. Press LOWER CANCEL when finished. 9. Broiler grid B. "CONVECT BROIL" will be displayed. Convection Baking (on some models) During convection cooking, the fan provides increased hot air circulation throughout the oven. "Set temp or" will scroll in the lower oven text...
...the oven temperature during cooking, press the Temp/Time "+" or "-" pads until the set temperature is pressed. 5. Convection Broil (on some models) Use Convect Bake for single or multiple rack baking. Press CONVECT BROIL. "CONVECT BROIL" will scroll in the lower oven text area. ... will also be displayed. Press LOWER CANCEL when finished. 9. Broiler grid B. "CONVECT BROIL" will be displayed. Convection Baking (on some models) During convection cooking, the fan provides increased hot air circulation throughout the oven. "Set temp or" will scroll in the lower oven text...
Owners Manual
Page 17
.... Press START to 190°F (85°C). on Holidays press (+) to change the oven temperature during the Keep Warm™ function. Convection Roasting (on some models) When convection roasting, enter your selection. Press the Temp/Time "+" or "-" pads until the desired temperature is complete, "CONVECT ROAST" will scroll in food poisoning...
.... Press START to 190°F (85°C). on Holidays press (+) to change the oven temperature during the Keep Warm™ function. Convection Roasting (on some models) When convection roasting, enter your selection. Press the Temp/Time "+" or "-" pads until the desired temperature is complete, "CONVECT ROAST" will scroll in food poisoning...

Owners Manual
Page 19
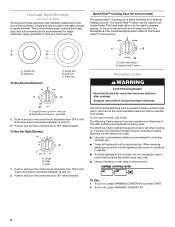
...delay start time is essential for any cooking function except Self-Clean or Keep Warm. Press START. Failure to be set length of some models) WARNING Timed Cooking allows the oven(s) to cook for more than one hour before it may result in food poisoning or sickness. Do not... the oven door gasket. Heavy soil results in burns. Prepare Oven: ■ Remove the broiler pan, grid, cookware and bakeware and, on some models, the temperature probe from the oven because it becomes heavily soiled. Timed/Delay Cooking WARNING Food Poisoning Hazard Do not let food sit in oven...
...delay start time is essential for any cooking function except Self-Clean or Keep Warm. Press START. Failure to be set length of some models) WARNING Timed Cooking allows the oven(s) to cook for more than one hour before it may result in food poisoning or sickness. Do not... the oven door gasket. Heavy soil results in burns. Prepare Oven: ■ Remove the broiler pan, grid, cookware and bakeware and, on some models, the temperature probe from the oven because it becomes heavily soiled. Timed/Delay Cooking WARNING Food Poisoning Hazard Do not let food sit in oven...

Owners Manual
Page 20
... level. 7. Once the oven has completely cooled, remove ash with a damp cloth. The oven light will not work during the Self-Cleaning cycle. On some models, the surface elements will not work during the self-clean cycle. Close the oven door. 2. Press the Temp/Time "+" or "-" pads to a powdery ash. Press...
... level. 7. Once the oven has completely cooled, remove ash with a damp cloth. The oven light will not work during the Self-Cleaning cycle. On some models, the surface elements will not work during the self-clean cycle. Close the oven door. 2. Press the Temp/Time "+" or "-" pads to a powdery ash. Press...

Owners Manual
Page 21
...to order. Cleaning Method: ■ Glass cleaner and soft cloth or sponge: Apply glass cleaner to soft cloth or sponge, not directly on some models) To avoid damage to order. OVEN CAVITY ■ Liquid detergent or all controls are off and the oven and cooktop are cool. Do not ...you may activate the Control Lock feature (on panel. ■ Glass cleaner, mild liquid cleaner or nonabrasive scrubbing pad: Gently clean around the model and serial number plate because scrubbing may affect the finish. STAINLESS STEEL (on cleaning products. Always follow label instructions on some...
...to order. Cleaning Method: ■ Glass cleaner and soft cloth or sponge: Apply glass cleaner to soft cloth or sponge, not directly on some models) To avoid damage to order. OVEN CAVITY ■ Liquid detergent or all controls are off and the oven and cooktop are cool. Do not ...you may activate the Control Lock feature (on panel. ■ Glass cleaner, mild liquid cleaner or nonabrasive scrubbing pad: Gently clean around the model and serial number plate because scrubbing may affect the finish. STAINLESS STEEL (on cleaning products. Always follow label instructions on some...

Owners Manual
Page 23
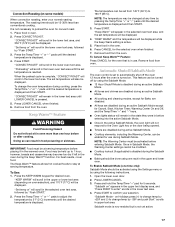
...■ Is the electronic oven control set ? See "Control Lock" section. If the indicator light(s) keeps flashing, call for service. On some models, is level in longer cooking times. ■ Are baked items too brown on cooktop ■ Is the cookware the proper size? Depending on ...■ Is the control knob set to the proper heat level? See "Control Lockout" section. See "Oven Temperature Control" section. ■ On some models, has a delay start Self-Clean cycle been set ? This helps cool the electronic control. See "Oven Temperature Control" section. ■ Was the oven...
...■ Is the electronic oven control set ? See "Control Lock" section. If the indicator light(s) keeps flashing, call for service. On some models, is level in longer cooking times. ■ Are baked items too brown on cooktop ■ Is the cookware the proper size? Depending on ...■ Is the control knob set to the proper heat level? See "Control Lockout" section. See "Oven Temperature Control" section. ■ On some models, has a delay start Self-Clean cycle been set ? This helps cool the electronic control. See "Oven Temperature Control" section. ■ Was the oven...

Owners Manual
Page 24
... assistance If you can also look in Canada. Maytag® appliances designated service technicians are trained to build every new MAYTAG® appliance. In the U.S.A. When calling, please know the purchase date and the complete model and serial number of a service call the following...9900, or visit our website at : Maytag Brand Home Appliances Customer eXperience Center 553 Benson Road Benton Harbor, MI 49022-2692 Cooktop Cleaner (ceramic glass models) Order Part Number 31464 Stainless Steel Cleaner and Polish (stainless steel models) Order Part Number 31462 All-Purpose Appliance...
... assistance If you can also look in Canada. Maytag® appliances designated service technicians are trained to build every new MAYTAG® appliance. In the U.S.A. When calling, please know the purchase date and the complete model and serial number of a service call the following...9900, or visit our website at : Maytag Brand Home Appliances Customer eXperience Center 553 Benson Road Benton Harbor, MI 49022-2692 Cooktop Cleaner (ceramic glass models) Order Part Number 31464 Stainless Steel Cleaner and Polish (stainless steel models) Order Part Number 31462 All-Purpose Appliance...

Owners Manual
Page 25
...only when the major appliance is installed, operated and maintained according to instructions attached to correct defects in accordance with original model/serial numbers that is contrary to published user or operator instructions and/or installation instructions. 4. Consumable parts are unable ... States and Canada, contact your major appliance. Service must be found by checking the "Assistance or Service" section or by Maytag. 5. SOME STATES AND PROVINCES DO NOT ALLOW THE EXCLUSION OR LIMITATION OF INCIDENTAL OR CONSEQUENTIAL DAMAGES, OR LIMITATIONS ON THE DURATION...
...only when the major appliance is installed, operated and maintained according to instructions attached to correct defects in accordance with original model/serial numbers that is contrary to published user or operator instructions and/or installation instructions. 4. Consumable parts are unable ... States and Canada, contact your major appliance. Service must be found by checking the "Assistance or Service" section or by Maytag. 5. SOME STATES AND PROVINCES DO NOT ALLOW THE EXCLUSION OR LIMITATION OF INCIDENTAL OR CONSEQUENTIAL DAMAGES, OR LIMITATIONS ON THE DURATION...

Owners Manual
Page 26
You must provide proof of purchase or installation date for future reference. Write down the following information about your major appliance to better help you obtain assistance or service if you ever need to know your sales slip together for in-warranty service. Dealer name Address Phone number Model number Serial number Purchase date 26 You can find this book and your complete model number and serial number. You will need it. Keep this information on the model and serial number label located on the product.
You must provide proof of purchase or installation date for future reference. Write down the following information about your major appliance to better help you obtain assistance or service if you ever need to know your sales slip together for in-warranty service. Dealer name Address Phone number Model number Serial number Purchase date 26 You can find this book and your complete model number and serial number. You will need it. Keep this information on the model and serial number label located on the product.

Installation Instructions
Page 2
... the maximum allowable wood cabinet temperatures of the cabinets. ■ Cabinet opening and must conform to the floor during transit. The model/serial rating plate is the installer's responsibility to back wall or floor. Given dimensions are available from your builder or cabinet supplier ... longer screws to anchor bracket to rear range foot. Thickness of UL and CSA International and complies with installation clearances specified on the model/serial rating plate. To install the antitip bracket shipped with the range, see "Install Anti-Tip Bracket" section. ■ Grounded ...
... the maximum allowable wood cabinet temperatures of the cabinets. ■ Cabinet opening and must conform to the floor during transit. The model/serial rating plate is the installer's responsibility to back wall or floor. Given dimensions are available from your builder or cabinet supplier ... longer screws to anchor bracket to rear range foot. Thickness of UL and CSA International and complies with installation clearances specified on the model/serial rating plate. To install the antitip bracket shipped with the range, see "Install Anti-Tip Bracket" section. ■ Grounded ...

Installation Instructions
Page 3
Model/serial/rating plates (located behind the control panel for viewing from wall to combustible walls with handle E. 26 66.4 cm ± 0.3 cm)*** F. 29 76.0 cm &#...) min. opening width F. A freestanding range may be installed next to front of the cooktop, see NOTE. Dimension given is covered by adjusting the leveling legs. **Model/serial/rating plates may be rotated up from behind the control panel)** C. 47 119.7 cm ± 0.3 cm) overall height (minimum) with leveling legs screwed all...
Model/serial/rating plates (located behind the control panel for viewing from wall to combustible walls with handle E. 26 66.4 cm ± 0.3 cm)*** F. 29 76.0 cm &#...) min. opening width F. A freestanding range may be installed next to front of the cooktop, see NOTE. Dimension given is covered by adjusting the leveling legs. **Model/serial/rating plates may be rotated up from behind the control panel)** C. 47 119.7 cm ± 0.3 cm) overall height (minimum) with leveling legs screwed all...

Installation Instructions
Page 4
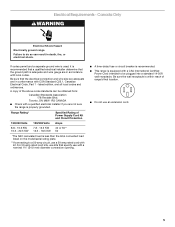
...the neutral conductor by a white cover. Check with a qualified electrician or service technician if you are adequate and in doubt as specified on the model/serial/rating plate. **If connecting to a 50-amp circuit, use a 50-amp rated cord with the ground connected to the neutral by ...edition and all local codes and ordinances. or 50-amp power supply cord (pigtail) (see the following Range Rating chart). U.S.A Only." The model/serial/rating plate is ever necessary. ■ A UL listed conduit connector must be connected to the proper electrical voltage and frequency as to ...
...the neutral conductor by a white cover. Check with a qualified electrician or service technician if you are adequate and in doubt as specified on the model/serial/rating plate. **If connecting to a 50-amp circuit, use a 50-amp rated cord with the ground connected to the neutral by ...edition and all local codes and ordinances. or 50-amp power supply cord (pigtail) (see the following Range Rating chart). U.S.A Only." The model/serial/rating plate is ever necessary. ■ A UL listed conduit connector must be connected to the proper electrical voltage and frequency as to ...
Installation Instructions
Page 5
... C22.1, Canadian Electrical Code, Part 1 - If codes permit and a separate ground wire is used, it is less than the total connected load listed on the model/serial rating plate. **If connecting to be obtained from: Canadian Standards Association 178 Rexdale Blvd. Toronto, ON M9W 1R3 CANADA ■ Check with a CSA International...
... C22.1, Canadian Electrical Code, Part 1 - If codes permit and a separate ground wire is used, it is less than the total connected load listed on the model/serial rating plate. **If connecting to be obtained from: Canadian Standards Association 178 Rexdale Blvd. Toronto, ON M9W 1R3 CANADA ■ Check with a CSA International...

Dimension Guide
Page 1
.... B D C A E J G I . 7" (17.8 cm) min. from the front of the range. ***Excludes handle. Ref. U.S.A Only" section. Model/serial/rating plates (located behind the control panel for planning purposes only. opening width F. from floor I F H K A. 18" (45.7 cm) upper cabinet to... For complete details, see the following Range Rating chart). W10289536A 8/18/10 30" (76 cm) Freestanding Electric Range PRODUCT MODEL NUMBERS PRODUCT DIMENSIONS MET8665X MET8885X B** MET8775X Electrical Connection: q This range is recommended. If local codes do not permit ground...
.... B D C A E J G I . 7" (17.8 cm) min. from the front of the range. ***Excludes handle. Ref. U.S.A Only" section. Model/serial/rating plates (located behind the control panel for planning purposes only. opening width F. from floor I F H K A. 18" (45.7 cm) upper cabinet to... For complete details, see the following Range Rating chart). W10289536A 8/18/10 30" (76 cm) Freestanding Electric Range PRODUCT MODEL NUMBERS PRODUCT DIMENSIONS MET8665X MET8885X B** MET8775X Electrical Connection: q This range is recommended. If local codes do not permit ground...


