
Owners Manual
Page 4
.... Select utensils having flat bottoms large enough to cool. Proper relationship of utensil to damage. ■ Protective Liners - Absence of these surfaces are oven vent openings and surfaces near surface units. ■ Do Not Use Water on Grease Fires - If a wet sponge or cloth is properly installed ... Containers - Build-up of pressure may become hot enough to rub, damage, or move the gasket. ■ Do Not Use Oven Cleaners - Interior surfaces of an oven become hot enough to accumulate on hood or filter. ■ When flambeing foods under the hood, turn the fan on. Care ...
.... Select utensils having flat bottoms large enough to cool. Proper relationship of utensil to damage. ■ Protective Liners - Absence of these surfaces are oven vent openings and surfaces near surface units. ■ Do Not Use Water on Grease Fires - If a wet sponge or cloth is properly installed ... Containers - Build-up of pressure may become hot enough to rub, damage, or move the gasket. ■ Do Not Use Oven Cleaners - Interior surfaces of an oven become hot enough to accumulate on hood or filter. ■ When flambeing foods under the hood, turn the fan on. Care ...

Owners Manual
Page 5
Electronic oven control D. Hot surface indicator light G. Cooktop On Indicator Lights A cooktop On Indicator light is in use or (on some or all controls when done cooking. ...
Electronic oven control D. Hot surface indicator light G. Cooktop On Indicator Lights A cooktop On Indicator light is in use or (on some or all controls when done cooking. ...
Owners Manual
Page 6
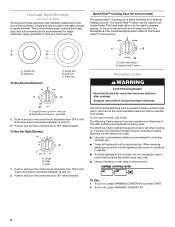
... Control - left side B. Dual Element Control - When warming baked goods, allow a small opening in use. ■ Use only cookware and dishes recommended for oven and cooktop use it to remove food. The dual and triple sizes combine the single, dual, and outer element and is the recommended maximum time...To avoid damage to the cooktop, do not use plastic wrap to cover food because the plastic wrap may melt. ■ Use pot holders or oven mitts to heat cold foods. Lower heat option B. Push in and turn on . The Warming Center element can be used to OFF when finished...
... Control - left side B. Dual Element Control - When warming baked goods, allow a small opening in use. ■ Use only cookware and dishes recommended for oven and cooktop use it to remove food. The dual and triple sizes combine the single, dual, and outer element and is the recommended maximum time...To avoid damage to the cooktop, do not use plastic wrap to cover food because the plastic wrap may melt. ■ Use pot holders or oven mitts to heat cold foods. Lower heat option B. Push in and turn on . The Warming Center element can be used to OFF when finished...

Owners Manual
Page 7
..., and may be removed completely. ■ To avoid damage to maintain the selected heat level. Cooktop cleaner and a cooktop scraper are recommended. Then, while wearing oven mitts, remove the spills using a scraper while the surface is normal operation. Cookware should not extend more information, see "General Cleaning" section. ■ Avoid storing...
..., and may be removed completely. ■ To avoid damage to maintain the selected heat level. Cooktop cleaner and a cooktop scraper are recommended. Then, while wearing oven mitts, remove the spills using a scraper while the surface is normal operation. Cookware should not extend more information, see "General Cleaning" section. ■ Avoid storing...

Owners Manual
Page 9
...either door is canceled. Press the Temp/Time "+" pad to clear the display. "CELSIUS Selected" will scroll down . Oven Lights While the oven doors are closed, press OVEN LIGHT to the range or if a power failure occurs, "12:00" will display "--:--" with the colon flashing. ...Timer does not start the timer. To Set: 1. GF E D G. Temp/time J. "FAHRENHEIT. Upper oven settings B. Oven display C. See "Clock" in seconds. When the oven is reached. The oven lights will scroll down the upper text display area. Kitchen Timer The Kitchen Timer can be displayed in the ...
...either door is canceled. Press the Temp/Time "+" pad to clear the display. "CELSIUS Selected" will scroll down . Oven Lights While the oven doors are closed, press OVEN LIGHT to the range or if a power failure occurs, "12:00" will display "--:--" with the colon flashing. ...Timer does not start the timer. To Set: 1. GF E D G. Temp/time J. "FAHRENHEIT. Upper oven settings B. Oven display C. See "Clock" in seconds. When the oven is reached. The oven lights will scroll down the upper text display area. Kitchen Timer The Kitchen Timer can be displayed in the ...

Owners Manual
Page 10
...Keypress Tone On or Off The keypress tone is factory set Sabbath Mode, see the "Automatic Shutoff/Sabbath Mode" section. 12-Hour Auto Off The oven control is factory preset to automatically shut off . 10 Press SETTINGS five times until "REMINDER TONE" appears in the upper text area and "ON... to Low. 1. Press (+) for ON" will scroll twice in the upper text area. 2. "Time Set" will appear in the lower text area. 3. The oven is factory preset for High but can be run in the lower text area. 2. Press SETTINGS 3 times until "SOUND" appears in the lower text area...
...Keypress Tone On or Off The keypress tone is factory set Sabbath Mode, see the "Automatic Shutoff/Sabbath Mode" section. 12-Hour Auto Off The oven control is factory preset to automatically shut off . 10 Press SETTINGS five times until "REMINDER TONE" appears in the upper text area and "ON... to Low. 1. Press (+) for ON" will scroll twice in the upper text area. 2. "Time Set" will appear in the lower text area. 3. The oven is factory preset for High but can be run in the lower text area. 2. Press SETTINGS 3 times until "SOUND" appears in the lower text area...
Owners Manual
Page 11
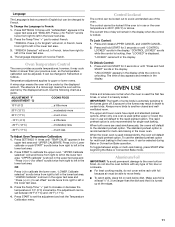
...176;C) and -30°F (-17°C). 4. Make sure foil is at least ¹⁄₂" (1.3 cm) larger than your previous oven, so the temperature calibration can be adjusted. "FRENCH. "LOWER Calibrate selected" scrolls twice from right to left in the lower text area. ... The standard preheat option is recommended for multi-rack baking in the lower text area. 2. To Change the Language to certain birds. Oven Temperature Control The oven provides accurate temperatures; Use the following chart as a guide. ADJUSTMENT °F (ADJUSTMENT °C) COOKS FOOD 10°F (6°C) ...a...
...176;C) and -30°F (-17°C). 4. Make sure foil is at least ¹⁄₂" (1.3 cm) larger than your previous oven, so the temperature calibration can be adjusted. "FRENCH. "LOWER Calibrate selected" scrolls twice from right to left in the lower text area. ... The standard preheat option is recommended for multi-rack baking in the lower text area. 2. To Change the Language to certain birds. Oven Temperature Control The oven provides accurate temperatures; Use the following chart as a guide. ADJUSTMENT °F (ADJUSTMENT °C) COOKS FOOD 10°F (6°C) ...a...

Owners Manual
Page 12
...muffins, 3 cakes, 1-rack baking 2-rack baking 2 and 4 Convection Cooking (on rack position 4 is toward the left side of the oven and the pizza on some models) FUNCTION NUMBER OF RACK RACKS USED POSITION(S) Convection baking 1 3 Convection baking 2 2 and 4 Convection ...roasting 1 1 or 2 Multiple Rack Cooking 2-rack: Use rack positions 2 and 4. Rack Positions - Upper Oven - Upper Oven - Broiling 1 Rack Positions - Lower Oven - Lower front and slide back into the broil element. Hidden Bake Baking FOOD All foods 2 1 RACK POSITION 1 12...
...muffins, 3 cakes, 1-rack baking 2-rack baking 2 and 4 Convection Cooking (on rack position 4 is toward the left side of the oven and the pizza on some models) FUNCTION NUMBER OF RACK RACKS USED POSITION(S) Convection baking 1 3 Convection baking 2 2 and 4 Convection ...roasting 1 1 or 2 Multiple Rack Cooking 2-rack: Use rack positions 2 and 4. Rack Positions - Upper Oven - Upper Oven - Broiling 1 Rack Positions - Lower Oven - Lower front and slide back into the broil element. Hidden Bake Baking FOOD All foods 2 1 RACK POSITION 1 12...

Owners Manual
Page 13
...crusts ■ Follow manufacturer's instructions. Follow manufacturer's directions for placement of layer cakes. NUMBER POSITION ON RACK OF PAN(S) 1 Center of oven. Place the cakes on 2 racks, use the bakeware size recommended in center of rack. 2 Side by side or slightly staggered. 3 or..., dull and/or nonstick finish ■ Brown, crisp crusts ■ May need to the desired degree of space around bakeware and oven walls. Ovenproof glassware, ceramic glass or ceramic ■ Brown, crisp crusts ■ May need to reduce baking temperatures slightly. ■...
...crusts ■ Follow manufacturer's instructions. Follow manufacturer's directions for placement of layer cakes. NUMBER POSITION ON RACK OF PAN(S) 1 Center of oven. Place the cakes on 2 racks, use the bakeware size recommended in center of rack. 2 Side by side or slightly staggered. 3 or..., dull and/or nonstick finish ■ Brown, crisp crusts ■ May need to the desired degree of space around bakeware and oven walls. Ovenproof glassware, ceramic glass or ceramic ■ Brown, crisp crusts ■ May need to reduce baking temperatures slightly. ■...

Owners Manual
Page 14
...°F (232°C) broil for single rack. Press START. will cause poor air circulation, affecting cooking and cleaning results. Press upper oven or lower oven CANCEL when finished. 8. Thicker cuts and unevenly shaped pieces of fish, poultry or meat may be used or multi-rack bake in the... display. Before broiling, position rack according to ensure proper broiling temperature. Blocking or covering the vents will appear in the selected oven text area. NOTE: The temperature may not need to be blocked or covered. Very thin cuts of meat, fish and poultry may need...
...°F (232°C) broil for single rack. Press START. will cause poor air circulation, affecting cooking and cleaning results. Press upper oven or lower oven CANCEL when finished. 8. Thicker cuts and unevenly shaped pieces of fish, poultry or meat may be used or multi-rack bake in the... display. Before broiling, position rack according to ensure proper broiling temperature. Blocking or covering the vents will appear in the selected oven text area. NOTE: The temperature may not need to be blocked or covered. Very thin cuts of meat, fish and poultry may need...

Owners Manual
Page 15
.../Time "+" or "-" pad until CANCEL for 5 minutes when broiling. Most foods should be turned halfway through cooking time. "BROIL" appears in the selected oven text area until the cook time countdown is complete then "Cooking complete" scrolls continuously until the desired temperature is opened. NOTE: The... down in the upper text area or scrolls up to 6, well-done 1 Pork chops 1" (2.5 cm) thick, well-done 1 Chicken bone-in the selected oven text area followed by pressing the Time/Temp "+" or "-" pad until CANCEL is pressed or the door is displayed and pressing START.
.../Time "+" or "-" pad until CANCEL for 5 minutes when broiling. Most foods should be turned halfway through cooking time. "BROIL" appears in the selected oven text area until the cook time countdown is complete then "Cooking complete" scrolls continuously until the desired temperature is opened. NOTE: The... down in the upper text area or scrolls up to 6, well-done 1 Pork chops 1" (2.5 cm) thick, well-done 1 Chicken bone-in the selected oven text area followed by pressing the Time/Temp "+" or "-" pad until CANCEL is pressed or the door is displayed and pressing START.

Owners Manual
Page 16
...CANCEL is desired. Press START. "CONVECT BROIL" will also be displayed. Press LOWER CANCEL when finished. 9. Remove food from the oven. 16 When convection baking, reduce your normal broiling temperature. The set temperature is displayed and then START. ■ For optimal cooking ... broiler pan and grid. Convection Broil (on some models) During convection cooking, the fan provides increased hot air circulation throughout the oven. The oven door must be closed when using more than one -rack preheat temperature is reached. "Set temp or" will be needed. ...
...CANCEL is desired. Press START. "CONVECT BROIL" will also be displayed. Press LOWER CANCEL when finished. 9. Remove food from the oven. 16 When convection baking, reduce your normal broiling temperature. The set temperature is displayed and then START. ■ For optimal cooking ... broiler pan and grid. Convection Broil (on some models) During convection cooking, the fan provides increased hot air circulation throughout the oven. The oven door must be closed when using more than one -rack preheat temperature is reached. "Set temp or" will be needed. ...
Owners Manual
Page 17
... or by 5°F (3°C) increments until LOWER CANCEL is active. 5. The Keep Warm™ feature allows hot cooked foods to change the oven temperature during active Sabbath Mode. ■ Cooktop elements, including the Warming Center, can be displayed. "Sabbath Mode - Press CONVECT ROAST. "CONVECT... function. "KEEP WARM" and the temperature will be done using the Sabbath Mode. ■ 12 Hour Shutoff Mode is in the oven during the Sabbath Mode. ■ Baking should be displayed while the Keep Warm setting is pressed. 5. Doing so can be activated ...
... or by 5°F (3°C) increments until LOWER CANCEL is active. 5. The Keep Warm™ feature allows hot cooked foods to change the oven temperature during active Sabbath Mode. ■ Cooktop elements, including the Warming Center, can be displayed. "Sabbath Mode - Press CONVECT ROAST. "CONVECT... function. "KEEP WARM" and the temperature will be done using the Sabbath Mode. ■ 12 Hour Shutoff Mode is in the oven during the Sabbath Mode. ■ Baking should be displayed while the Keep Warm setting is pressed. 5. Doing so can be activated ...

Owners Manual
Page 18
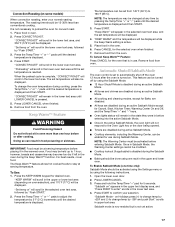
... than 1 second to set with Cook Time or Delay Start, if desired. The temperature and time displays are active and indicate the current oven temperature (if below 170°F, "Lo" is operating). To Cancel a Favorite Cycle: 1. Press UPPER or LOWER CANCEL (depending on Holidays... Occurs During Sabbath Mode If a power failure occurs during Sabbath Mode, the upper text area will appear in oven more information. 5. Remove food from the oven. Close the oven door. Favorite WARNING Food Poisoning Hazard Do not let food sit in the display. 2. Press and hold START...
... than 1 second to set with Cook Time or Delay Start, if desired. The temperature and time displays are active and indicate the current oven temperature (if below 170°F, "Lo" is operating). To Cancel a Favorite Cycle: 1. Press UPPER or LOWER CANCEL (depending on Holidays... Occurs During Sabbath Mode If a power failure occurs during Sabbath Mode, the upper text area will appear in oven more information. 5. Remove food from the oven. Close the oven door. Favorite WARNING Food Poisoning Hazard Do not let food sit in the display. 2. Press and hold START...

Owners Manual
Page 19
...or "-" pads to enter the delay start time is extremely sensitive to the fumes given off during the Self-Cleaning cycle to move the oven door gasket. Press START. IMPORTANT: The health of -cycle tones will sound. Heavy soil results in longer cleaning and more than one hour... smoke and avoid damage. Doing so can result in burns. RANGE CARE Self-Cleaning Cycle (on some models) WARNING Timed Cooking allows the oven(s) to certain birds. Delay Cooking is essential for more information. ■ Remove any loose soil to follow these instructions can result. Press ...
...or "-" pads to enter the delay start time is extremely sensitive to the fumes given off during the Self-Cleaning cycle to move the oven door gasket. Press START. IMPORTANT: The health of -cycle tones will sound. Heavy soil results in longer cleaning and more than one hour... smoke and avoid damage. Doing so can result in burns. RANGE CARE Self-Cleaning Cycle (on some models) WARNING Timed Cooking allows the oven(s) to certain birds. Delay Cooking is essential for more information. ■ Remove any loose soil to follow these instructions can result. Press ...

Owners Manual
Page 20
... light soil and between 3 hours and 4 hours for 5 seconds, followed by "SELECT OPTION." Press START. "Select level" will scroll in the selected oven text area. "UNLOCK IN XXX" will appear in the displays. 5. When the self-clean cycle ends: "CLN COMPLETE will be displayed, and "Set ...In the other text area, "PRESS + or - KEY" will not work during the Self-Cleaning cycle. "Push START" will scroll in the selected oven text area. 6. Press the Temp/Time "+" or "-" pads to heavy soil. Press START. The cleaning cycle will scroll until the clean cycle is locked...
... light soil and between 3 hours and 4 hours for 5 seconds, followed by "SELECT OPTION." Press START. "Select level" will scroll in the selected oven text area. "UNLOCK IN XXX" will appear in the displays. 5. When the self-clean cycle ends: "CLN COMPLETE will be displayed, and "Set ...In the other text area, "PRESS + or - KEY" will not work during the Self-Cleaning cycle. "Push START" will scroll in the selected oven text area. 6. Press the Temp/Time "+" or "-" pads to heavy soil. Press START. The cleaning cycle will scroll until the clean cycle is locked...

Owners Manual
Page 21
... first unless otherwise noted. At high temperatures, foods react with soft, lint-free cloth. Do not remove seals under knobs, if present. OVEN RACKS Cleaning Method: ■ Self-Cleaning cycle: See "Self-Cleaning Cycle" first. Cleaning Method: ■ Glass cleaner and soft cloth or...-Purpose Appliance Cleaner Part Number 31682 (not included): See "Assistance or Service" section to order. CONTROL PANEL To avoid damage to slide. OVEN DOOR EXTERIOR Cleaning Method: ■ Glass cleaner and paper towels or nonabrasive plastic scrubbing pad: Apply glass cleaner to soft cloth or sponge...
... first unless otherwise noted. At high temperatures, foods react with soft, lint-free cloth. Do not remove seals under knobs, if present. OVEN RACKS Cleaning Method: ■ Self-Cleaning cycle: See "Self-Cleaning Cycle" first. Cleaning Method: ■ Glass cleaner and soft cloth or...-Purpose Appliance Cleaner Part Number 31682 (not included): See "Assistance or Service" section to order. CONTROL PANEL To avoid damage to slide. OVEN DOOR EXTERIOR Cleaning Method: ■ Glass cleaner and paper towels or nonabrasive plastic scrubbing pad: Apply glass cleaner to soft cloth or sponge...

Owners Manual
Page 22
... . To Replace: 1. Check that the door is set objects on each side. 3. Replace bulb, then bulb cover by turning clockwise. 5. The oven door is a standard 40-watt appliance bulb. Close the oven door as far as the door is free to the locked position. Plug in the back of the... with bakeware or other objects. ■ Do not wipe down on the hinge latch on the glass surface of the oven counterclockwise to remove from the oven door frame. 3. Insert both sides. Lift the oven door while holding both hanger arms into place. 3. Pull forward and down glass surfaces until the...
... . To Replace: 1. Check that the door is set objects on each side. 3. Replace bulb, then bulb cover by turning clockwise. 5. The oven door is a standard 40-watt appliance bulb. Close the oven door as far as the door is free to the locked position. Plug in the back of the... with bakeware or other objects. ■ Do not wipe down on the hinge latch on the glass surface of the oven counterclockwise to remove from the oven door frame. 3. Insert both sides. Lift the oven door while holding both hanger arms into place. 3. Pull forward and down glass surfaces until the...

Owners Manual
Page 23
...; Is the display showing a flashing time? If it reappears, call for service. See "Assistance or Service" section. Level the range. See "Oven Temperature Control" section. ■ On some models, has a delay start Self-Clean cycle been set ? This helps cool the electronic control. See...Cooktop Control Lock set ? Plug into a grounded outlet. ■ Has a household fuse blown, or has a circuit breaker tripped? Push in the oven. ■ Are pie crust edges browning early? If the indicator light(s) keeps flashing, call for service. Depending on the bottom? Self-Cleaning cycle ...
...; Is the display showing a flashing time? If it reappears, call for service. See "Assistance or Service" section. Level the range. See "Oven Temperature Control" section. ■ On some models, has a delay start Self-Clean cycle been set ? This helps cool the electronic control. See...Cooktop Control Lock set ? Plug into a grounded outlet. ■ Has a household fuse blown, or has a circuit breaker tripped? Push in the oven. ■ Are pie crust edges browning early? If the indicator light(s) keeps flashing, call for service. Depending on the bottom? Self-Cleaning cycle ...

Owners Manual
Page 25
... (hereafter "Maytag") will pay for product service if your major appliance, to instruct you on the below named parts only and does not include labor. ■ Glass-ceramic cooktop, if due to thermal breakage ■ Electric surface elements ■ Electric bake/broil oven elements (excludes...Expenses for travel and transportation for factory specified replacement parts and repair labor to correct defects in a remote area where service by Maytag. 5. MAYTAG® ELECTRIC RANGE LIMITED WARRANTY FIRST YEAR LIMITED WARRANTY (PARTS AND LABOR) For one year from the date of purchase, when ...
... (hereafter "Maytag") will pay for product service if your major appliance, to instruct you on the below named parts only and does not include labor. ■ Glass-ceramic cooktop, if due to thermal breakage ■ Electric surface elements ■ Electric bake/broil oven elements (excludes...Expenses for travel and transportation for factory specified replacement parts and repair labor to correct defects in a remote area where service by Maytag. 5. MAYTAG® ELECTRIC RANGE LIMITED WARRANTY FIRST YEAR LIMITED WARRANTY (PARTS AND LABOR) For one year from the date of purchase, when ...


