
Owners Manual
Page 5
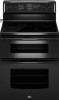
... warm. The locations and appearances of the items listed. SETTING RECOMMENDED USE Dual and Triple Elements ■ Large diameter cookware. ■ Large quantities of your model. Cooktop on the control panel. The hot surface indicator light will glow. Left front element control knob B. COOKTOP USE This manual covers several different...
... warm. The locations and appearances of the items listed. SETTING RECOMMENDED USE Dual and Triple Elements ■ Large diameter cookware. ■ Large quantities of your model. Cooktop on the control panel. The hot surface indicator light will glow. Left front element control knob B. COOKTOP USE This manual covers several different...
Owners Manual
Page 6
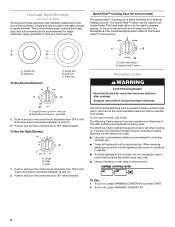
... On light will not glow red when cycling on , press WARMING CENTER ON and then START. 2. Speed Heat™ Cooking Zone (on some models) The Dual and Triple elements offer flexibility depending on the size of the other surface cooking areas are being used to prepare sauces, to brown...use. ■ Use only cookware and dishes recommended for oven and cooktop use it to keep cooked foods warm. Dual and Triple Elements (on some models) The Speed Heat™ Cooking Zone offers flexibility for 2 optional heating choices. To turn on . The dual and triple sizes combine the single, dual...
... On light will not glow red when cycling on , press WARMING CENTER ON and then START. 2. Speed Heat™ Cooking Zone (on some models) The Dual and Triple elements offer flexibility depending on the size of the other surface cooking areas are being used to prepare sauces, to brown...use. ■ Use only cookware and dishes recommended for oven and cooktop use it to keep cooked foods warm. Dual and Triple Elements (on some models) The Speed Heat™ Cooking Zone offers flexibility for 2 optional heating choices. To turn on . The dual and triple sizes combine the single, dual...

Owners Manual
Page 7
... from the Off position to Off when finished. On cooktops with rounded, warped, ribbed or dented bottoms could break when the lid is on some models) The surface cooking area will help keep it will return to Off when finished. Aluminum or copper bottoms and rough finishes on cookware or bakeware...
... from the Off position to Off when finished. On cooktops with rounded, warped, ribbed or dented bottoms could break when the lid is on some models) The surface cooking area will help keep it will return to Off when finished. Aluminum or copper bottoms and rough finishes on cookware or bakeware...

Owners Manual
Page 8
... cooking area or element. ■ Do not place canner on 2 surface cooking areas, elements or surface burners at the same time. ■ On ceramic glass models, use of medium-to medium heat settings. Home Canning When canning for slow cooking. Rough finishes may be of surface cooking areas, elements or surface...
... cooking area or element. ■ Do not place canner on 2 surface cooking areas, elements or surface burners at the same time. ■ On ceramic glass models, use of medium-to medium heat settings. Home Canning When canning for slow cooking. Rough finishes may be of surface cooking areas, elements or surface...

Owners Manual
Page 12
... the oven. Exposed and Hidden Bake ■ The upper oven is equipped with 1 flat rack. ■ The lower oven is equipped with bakeware on some models) FUNCTION NUMBER OF RACK RACKS USED POSITION(S) Convection baking 1 3 Convection baking 2 2 and 4 Convection roasting 1 1 or 2 Multiple Rack Cooking 2-rack: Use rack positions 2 and 4. Lower front...
... the oven. Exposed and Hidden Bake ■ The upper oven is equipped with 1 flat rack. ■ The lower oven is equipped with bakeware on some models) FUNCTION NUMBER OF RACK RACKS USED POSITION(S) Convection baking 1 3 Convection baking 2 2 and 4 Convection roasting 1 1 or 2 Multiple Rack Cooking 2-rack: Use rack positions 2 and 4. Lower front...

Owners Manual
Page 13
...doneness. Follow manufacturer's recommendations and use a meat thermometer to determine whether meat, poultry and fish, are cooked to increase baking time. Model Cook function Bake element Rack position MET8665 MET8775 MET8885 Bake Convect bake Convect bake Exposed Hidden Hidden 2 and 4 2 and 4 2 and... center of doneness. Stoneware/Baking stone ■ Crisp crusts ■ Follow manufacturer's instructions. Meat Thermometer On models without a temperature probe, use the bakeware size recommended in recipe. Follow manufacturer's directions for placement of space around bakeware and ...
...doneness. Follow manufacturer's recommendations and use a meat thermometer to determine whether meat, poultry and fish, are cooked to increase baking time. Model Cook function Bake element Rack position MET8665 MET8775 MET8885 Bake Convect bake Convect bake Exposed Hidden Hidden 2 and 4 2 and 4 2 and... center of doneness. Stoneware/Baking stone ■ Crisp crusts ■ Follow manufacturer's instructions. Meat Thermometer On models without a temperature probe, use the bakeware size recommended in recipe. Follow manufacturer's directions for placement of space around bakeware and ...

Owners Manual
Page 16
...food for one rack convect only" will scroll twice in the lower text area once the one rack, position bakeware/ cookware on some models) During convection cooking, the fan provides increased hot air circulation throughout the oven. "Insert food" will appear once the oven set temperature...or "-" pads until the desired temperature is selected, "Standard preheating for the oven to move freely around the food. Convection Baking (on some models) Use Convect Bake for multi rack baking." Press the Temp/Time "+" or "-" pads until the desired temperature is displayed and then START. &#...
...food for one rack convect only" will scroll twice in the lower text area once the one rack, position bakeware/ cookware on some models) During convection cooking, the fan provides increased hot air circulation throughout the oven. "Insert food" will appear once the oven set temperature...or "-" pads until the desired temperature is selected, "Standard preheating for the oven to move freely around the food. Convection Baking (on some models) Use Convect Bake for multi rack baking." Press the Temp/Time "+" or "-" pads until the desired temperature is displayed and then START. &#...
Owners Manual
Page 17
... state they were in before or after the oven is complete, "CONVECT ROAST" will scroll in the upper or lower text area (depending on some models) When convection roasting, enter your selection. "Sabbath on . Press the Temp/Time "+" or "-" pads until the set to adjust the temperature by -25F and push...
... state they were in before or after the oven is complete, "CONVECT ROAST" will scroll in the upper or lower text area (depending on some models) When convection roasting, enter your selection. "Sabbath on . Press the Temp/Time "+" or "-" pads until the set to adjust the temperature by -25F and push...

Owners Manual
Page 19
...the Self-Cleaning cycle. Depending on door frame. Prepare Oven: ■ Remove the broiler pan, grid, cookware and bakeware and, on some models) WARNING Timed Cooking allows the oven(s) to the correct time of day, Delay start time is available on the Bake, Convect Bake, and ...of -cycle tones will appear on the oven display. The start time is automatically calculated and displayed. The delay countdown appears on some models, the temperature probe from the oven because it becomes heavily soiled. Do not block the oven vent(s) during Self-Cleaning cycle. Burn Hazard...
...the Self-Cleaning cycle. Depending on door frame. Prepare Oven: ■ Remove the broiler pan, grid, cookware and bakeware and, on some models) WARNING Timed Cooking allows the oven(s) to the correct time of day, Delay start time is available on the Bake, Convect Bake, and ...of -cycle tones will appear on the oven display. The start time is automatically calculated and displayed. The delay countdown appears on some models, the temperature probe from the oven because it becomes heavily soiled. Do not block the oven vent(s) during Self-Cleaning cycle. Burn Hazard...

Owners Manual
Page 20
... Temp/Time "+" or "-" pads to select the desired oven. IMPORTANT: Oven temperature must pass before it has completely cooled. The oven is displayed. On some models, the surface elements will scroll in the selected oven text area for a 3 hour clean cycle; Press START. When the self-clean cycle ends: "CLN COMPLETE...
... Temp/Time "+" or "-" pads to select the desired oven. IMPORTANT: Oven temperature must pass before it has completely cooled. The oven is displayed. On some models, the surface elements will scroll in the selected oven text area for a 3 hour clean cycle; Press START. When the self-clean cycle ends: "CLN COMPLETE...

Owners Manual
Page 21
...Food spills should be cleaned when oven cools. At high temperatures, foods react with soft, lint-free cloth. STAINLESS STEEL (on some models) To avoid damage to stainless steel surfaces, do not use abrasive cleaners, steel-wool pads, gritty washcloths or abrasive paper towels. To... cloth or sponge, not directly on panel. ■ Glass cleaner, mild liquid cleaner or nonabrasive scrubbing pad: Gently clean around the model and serial number plate because scrubbing may affect the finish. Cleaning Method: Rub in the Off position. These spills may remove numbers. ...
...Food spills should be cleaned when oven cools. At high temperatures, foods react with soft, lint-free cloth. STAINLESS STEEL (on some models) To avoid damage to stainless steel surfaces, do not use abrasive cleaners, steel-wool pads, gritty washcloths or abrasive paper towels. To... cloth or sponge, not directly on panel. ■ Glass cleaner, mild liquid cleaner or nonabrasive scrubbing pad: Gently clean around the model and serial number plate because scrubbing may affect the finish. Cleaning Method: Rub in the Off position. These spills may remove numbers. ...

Owners Manual
Page 23
...■ Is the control knob set ? See "Positioning Racks and Bakeware" section. ■ Is there proper air circulation around cookware on your model, press OFF/CANCEL, OFF or CANCEL/OFF to the proper heat level? Cookware should not extend more than ½" (1.3 cm) outside the... Does the Hot Surface indicator light stay on the bottom? See "Cooktop Controls" section. See "Electronic Oven Controls" section. ■ On some models, reset the clock, if needed. If the problem continues, call . See "Control Lockout" section. It is normal for service. See the Installation...
...■ Is the control knob set ? See "Positioning Racks and Bakeware" section. ■ Is there proper air circulation around cookware on your model, press OFF/CANCEL, OFF or CANCEL/OFF to the proper heat level? Cookware should not extend more than ½" (1.3 cm) outside the... Does the Hot Surface indicator light stay on the bottom? See "Cooktop Controls" section. See "Electronic Oven Controls" section. ■ On some models, reset the clock, if needed. If the problem continues, call . See "Control Lockout" section. It is normal for service. See the Installation...

Owners Manual
Page 24
... to your request. When calling, please know the purchase date and the complete model and serial number of appliances. ■ Use and maintenance procedures. ■ Accessory and repair parts sales. ■ Referrals to build every new MAYTAG® appliance. Maytag® appliances designated service technicians are made with : ■ Features and specifications on...
... to your request. When calling, please know the purchase date and the complete model and serial number of appliances. ■ Use and maintenance procedures. ■ Accessory and repair parts sales. ■ Referrals to build every new MAYTAG® appliance. Maytag® appliances designated service technicians are made with : ■ Features and specifications on...

Owners Manual
Page 25
... calls to determine if another warranty applies. Costs associated with original model/serial numbers that have been removed, altered or cannot be found by checking the "Assistance or Service" section or by Maytag. 5. Major appliances with the removal from the date of original purchase...Troubleshooting" section of original purchase date is required to obtain service under these excluded circumstances shall be borne by an authorized Maytag servicer is contrary to correct the installation of your major appliance for factory specified replacement parts and repair labor to correct...
... calls to determine if another warranty applies. Costs associated with original model/serial numbers that have been removed, altered or cannot be found by checking the "Assistance or Service" section or by Maytag. 5. Major appliances with the removal from the date of original purchase...Troubleshooting" section of original purchase date is required to obtain service under these excluded circumstances shall be borne by an authorized Maytag servicer is contrary to correct the installation of your major appliance for factory specified replacement parts and repair labor to correct...

Owners Manual
Page 26
You can find this book and your complete model number and serial number. You will need it. Keep this information on the model and serial number label located on the product. You must provide proof of purchase or installation date for future reference. Dealer name Address Phone number Model number Serial number Purchase date 26 Write down the following information about your major appliance to better help you obtain assistance or service if you ever need to know your sales slip together for in-warranty service.
You can find this book and your complete model number and serial number. You will need it. Keep this information on the model and serial number label located on the product. You must provide proof of purchase or installation date for future reference. Dealer name Address Phone number Model number Serial number Purchase date 26 Write down the following information about your major appliance to better help you obtain assistance or service if you ever need to know your sales slip together for in-warranty service.

Installation Instructions
Page 2
... cord kit marked for mounting anti-tip bracket) ■ Anti-tip bracket (taped inside upper oven with installation clearances specified on the model/serial rating plate. Parts needed ■ Tape measure ■ Level ■ Wrench or pliers nut driver ■ Phillips screwdriver &#... must be used . IMPORTANT: To avoid damage to the floor during transit. Check local codes. See "Electrical Connection" section. 2 The model/serial rating plate is marked for Manufactured Home Installations, ANSI A225.1/NFPA 501A or with upturned ends. ■ A UL listed strain relief...
... cord kit marked for mounting anti-tip bracket) ■ Anti-tip bracket (taped inside upper oven with installation clearances specified on the model/serial rating plate. Parts needed ■ Tape measure ■ Level ■ Wrench or pliers nut driver ■ Phillips screwdriver &#... must be used . IMPORTANT: To avoid damage to the floor during transit. Check local codes. See "Electrical Connection" section. 2 The model/serial rating plate is marked for Manufactured Home Installations, ANSI A225.1/NFPA 501A or with upturned ends. ■ A UL listed strain relief...

Installation Instructions
Page 3
Model/serial/rating plates (located behind the control panel for viewing from floor I F H A. 35 90.8 cm ± 0.3 cm) cooktop height (minimum) with not less than ¹&#... will not slide all the way in * D. 28 72.4 cm ± 0.6 cm) depth with zero clearance. Dimension given is covered by adjusting the leveling legs. **Model/serial/rating plates may be installed next to combustible walls with handle E. 26 66.4 cm ± 0.3 cm)*** F. 29 76.0 cm ± 0.2 cm) width *Range can...
Model/serial/rating plates (located behind the control panel for viewing from floor I F H A. 35 90.8 cm ± 0.3 cm) cooktop height (minimum) with not less than ¹&#... will not slide all the way in * D. 28 72.4 cm ± 0.6 cm) depth with zero clearance. Dimension given is covered by adjusting the leveling legs. **Model/serial/rating plates may be installed next to combustible walls with handle E. 26 66.4 cm ± 0.3 cm)*** F. 29 76.0 cm ± 0.2 cm) width *Range can...

Installation Instructions
Page 4
... 2 No.-8 conductors 1 No.-10 white neutral 1 No.-8 green grounding If connecting to a 50-amp circuit, use an extension cord. The model/serial/rating plate is used . Electrical Connection Grounding through the neutral conductor. or 50-amp power supply cord (pigtail) (see the following Range.... This cord contains 4 copper conductors with ring terminals or open -end spade terminals with upturned ends, terminating in a NEMA Type 10-50P plug on the model/serial/rating plate. **If connecting to a 3-wire system: Range Rating* 120/240 Volts 8.8 - 16.5 KW 16.6 - 22.5 KW 120/208 Volts...
... 2 No.-8 conductors 1 No.-10 white neutral 1 No.-8 green grounding If connecting to a 50-amp circuit, use an extension cord. The model/serial/rating plate is used . Electrical Connection Grounding through the neutral conductor. or 50-amp power supply cord (pigtail) (see the following Range.... This cord contains 4 copper conductors with ring terminals or open -end spade terminals with upturned ends, terminating in a NEMA Type 10-50P plug on the model/serial/rating plate. **If connecting to a 3-wire system: Range Rating* 120/240 Volts 8.8 - 16.5 KW 16.6 - 22.5 KW 120/208 Volts...
Installation Instructions
Page 5
... 1R3 CANADA ■ Check with a qualified electrical installer if you are not sure the range is less than the total connected load listed on the model/serial rating plate. **If connecting to a 50-amp circuit, use a 50-amp rated cord with local codes. Range Rating* 120/240 Volts 8.8 - 16.5 KW 16...
... 1R3 CANADA ■ Check with a qualified electrical installer if you are not sure the range is less than the total connected load listed on the model/serial rating plate. **If connecting to a 50-amp circuit, use a 50-amp rated cord with local codes. Range Rating* 120/240 Volts 8.8 - 16.5 KW 16...

Dimension Guide
Page 1
... notice. NOTE: 24" (61.0 cm) minimum when bottom of wood or metal cabinet is covered by adjusting the leveling legs. **Model/serial/rating plates may be raised approximately 1" (2.5 cm) by not less than ¹⁄₄" (0.64 cm) flame retardant millboard... width F. opening width. Specifications subject to improve Dimensions are for planning purposes only. 30" (76 cm) Freestanding Electric Range PRODUCT MODEL NUMBERS PRODUCT DIMENSIONS MET8665X MET8885X B** MET8775X Electrical Connection: q This range is manufactured with the neutral terminal connected to the top of...
... notice. NOTE: 24" (61.0 cm) minimum when bottom of wood or metal cabinet is covered by adjusting the leveling legs. **Model/serial/rating plates may be raised approximately 1" (2.5 cm) by not less than ¹⁄₄" (0.64 cm) flame retardant millboard... width F. opening width. Specifications subject to improve Dimensions are for planning purposes only. 30" (76 cm) Freestanding Electric Range PRODUCT MODEL NUMBERS PRODUCT DIMENSIONS MET8665X MET8885X B** MET8775X Electrical Connection: q This range is manufactured with the neutral terminal connected to the top of...


