Owners Manual
Page 2
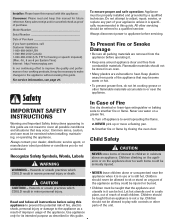
... this appliance to prevent the potential risk of fire, electric shock, personal injury or damage to a qualified servicer....should never be properly installed and grounded by closing the oven door. To Prevent Fire or Smoke Damage • Be sure all possible...and/or canceled check as a result of improper usage of the unit. Model Number Serial Number Date of Purchase If you do not let cooking grease or other parts ...hearing or speech impaired) (Mon.-Fri., 8 am-8 pm Eastern Time) Internet: http://www.maytag.com In our continuing effort to children in a safe place, out of reach of our ...
... this appliance to prevent the potential risk of fire, electric shock, personal injury or damage to a qualified servicer....should never be properly installed and grounded by closing the oven door. To Prevent Fire or Smoke Damage • Be sure all possible...and/or canceled check as a result of improper usage of the unit. Model Number Serial Number Date of Purchase If you do not let cooking grease or other parts ...hearing or speech impaired) (Mon.-Fri., 8 am-8 pm Eastern Time) Internet: http://www.maytag.com In our continuing effort to children in a safe place, out of reach of our ...
Owners Manual
Page 5
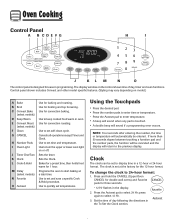
... Clock. Press and hold the CANCEL (Upper Oven CANCEL for double wall ovens) and Favorite pads for broiling and top browning. press again to select 24 Hr; Use to set temperatures. Set the time of day, timer and oven functions. Use for three seconds. • 12... set time and temperature. To change the clock to turn the upper or lower oven light on model.) A Bake B Broil C Convect Bake (select models) D Keep Warm E Convect Roast (select models) F Clean G CANCEL H Number Pads I J KL M N O The control panel is touched. • A double beep will automatically be entered....
... Clock. Press and hold the CANCEL (Upper Oven CANCEL for double wall ovens) and Favorite pads for broiling and top browning. press again to select 24 Hr; Use to set temperatures. Set the time of day, timer and oven functions. Use for three seconds. • 12... set time and temperature. To change the clock to turn the upper or lower oven light on model.) A Bake B Broil C Convect Bake (select models) D Keep Warm E Convect Roast (select models) F Clean G CANCEL H Number Pads I J KL M N O The control panel is touched. • A double beep will automatically be entered....

Owners Manual
Page 7
... Bake pad. 5. Baking Notes: • To change the oven temperature during cooking, press Bake, then press the Autoset or appropriate number pads until the desired temperature is reached. 4. Baking with Convection (select models) When convection baking, enter your normal baking temperature. Remove food from the oven. If you forget to 550°. 3. Press Convect...
... Bake pad. 5. Baking Notes: • To change the oven temperature during cooking, press Bake, then press the Autoset or appropriate number pads until the desired temperature is reached. 4. Baking with Convection (select models) When convection baking, enter your normal baking temperature. Remove food from the oven. If you forget to 550°. 3. Press Convect...

Owners Manual
Page 8
...4 seconds. • 'Roast' flashes in 5° increments until the Oven Light pad is finished, press CANCEL pad. 9. Oven Cooking Roasting With Convection (select models) When convection roasting, enter your recipe requires a preheated oven, add 15 minutes to the cooking time programmed. • Roasting times ...can be set cooking time has elapsed, the oven light will increase the temperature by 25°. • The oven temperature can be set Convect Roast: 1. Allow the oven to preheat for 350° F or the appropriate number pads. • Each additional press of the ...
...4 seconds. • 'Roast' flashes in 5° increments until the Oven Light pad is finished, press CANCEL pad. 9. Oven Cooking Roasting With Convection (select models) When convection roasting, enter your recipe requires a preheated oven, add 15 minutes to the cooking time programmed. • Roasting times ...can be set cooking time has elapsed, the oven light will increase the temperature by 25°. • The oven temperature can be set Convect Roast: 1. Allow the oven to preheat for 350° F or the appropriate number pads. • Each additional press of the ...

Owners Manual
Page 9
.... • The HOLD icon continues to delay the start of day will flash. • The oven temperature can be set from oven. When using the number pads. 5. When that require a preheated oven, such as dairy products, pork, poultry, or seafood. Delay Cook & Hold CAUTION Do not use delayed ...8226; The time will keep the food warm for items that time has elapsed, the oven will light in the display. 2. In double wall oven models, press the Delay or Delay 1 (select models) pad once to program the upper oven or twice to cook later in the display. • The HOLD icon turns off...
.... • The HOLD icon continues to delay the start of day will flash. • The oven temperature can be set from oven. When using the number pads. 5. When that require a preheated oven, such as dairy products, pork, poultry, or seafood. Delay Cook & Hold CAUTION Do not use delayed ...8226; The time will keep the food warm for items that time has elapsed, the oven will light in the display. 2. In double wall oven models, press the Delay or Delay 1 (select models) pad once to program the upper oven or twice to cook later in the display. • The HOLD icon turns off...

Owners Manual
Page 13
... pad. • The stored Favorite cycle will display. Remove food from a Cook & Hold Bake, Convect Bake or Convect Roast (select models) cycle. Enter 550° by 5° to adjust the temperature. Press the Autoset pad to change will sound to readjust the... cycle, a Cook & Hold function must be increased or decreased by pressing the appropriate number pads. 3. Press the Favorite pad. • Time and temperature for several seconds or until 00° appears in progress: 1. The oven temperature can shift. Program a Cook & Hold cycle as a Favorite: 1. The results...
... pad. • The stored Favorite cycle will display. Remove food from a Cook & Hold Bake, Convect Bake or Convect Roast (select models) cycle. Enter 550° by 5° to adjust the temperature. Press the Autoset pad to change will sound to readjust the... cycle, a Cook & Hold function must be increased or decreased by pressing the appropriate number pads. 3. Press the Favorite pad. • Time and temperature for several seconds or until 00° appears in progress: 1. The oven temperature can shift. Program a Cook & Hold cycle as a Favorite: 1. The results...

Owners Manual
Page 15
...; The removable section of the rack can be used as an "o" after the rack position number. • When baking on the lower rack. Three racks (convection cooking - Baking results will...edge of rack. • For best results, allow two inches between the pan placed on the rack and the oven side wall. • Use caution when removing items from the half... models): Use #1, #3o, #4. (See illustration on page 13.) Create-A-SpaceTM Half Rack (select models) Select wall oven models are equipped with aluminum foil or place foil on #2): Roasting, loaves of bread, angel food cake. Oven Cooking...
...; The removable section of the rack can be used as an "o" after the rack position number. • When baking on the lower rack. Three racks (convection cooking - Baking results will...edge of rack. • For best results, allow two inches between the pan placed on the rack and the oven side wall. • Use caution when removing items from the half... models): Use #1, #3o, #4. (See illustration on page 13.) Create-A-SpaceTM Half Rack (select models) Select wall oven models are equipped with aluminum foil or place foil on #2): Roasting, loaves of bread, angel food cake. Oven Cooking...

Owners Manual
Page 16
...gasket, and around any part of the oven. To set Self-Clean: Notes: • Oven temperature must be lifted slightly (about 1 inch). 5. After four seconds, the oven will display. If the door is not... wall oven models, only one oven can be below 400° F to automatically clean the oven interior. Do not allow a heavy build-up excess grease or spillovers from the oven bottom. Remove broiler pan, all pans, and oven ...pad to delay the cycle using the appropriate number pads. 3. Press the Delay or Delay 1 pad (select models) • The DELAY icon flashes. • 00:00 will flash in ...
...gasket, and around any part of the oven. To set Self-Clean: Notes: • Oven temperature must be lifted slightly (about 1 inch). 5. After four seconds, the oven will display. If the door is not... wall oven models, only one oven can be below 400° F to automatically clean the oven interior. Do not allow a heavy build-up excess grease or spillovers from the oven bottom. Remove broiler pan, all pans, and oven ...pad to delay the cycle using the appropriate number pads. 3. Press the Delay or Delay 1 pad (select models) • The DELAY icon flashes. • 00:00 will flash in ...

Installation Instructions
Page 4
...not sure the oven is properly grounded. Cabinet A A Single Oven A. Model/serial number plate Double Oven A. bottom of cabinet door F. 50.0" (127.0 cm) min. cutout height Cabinet Side View - The model/serial number rating plate is located at the bottom of electrical connection you are...Electrical Connection To properly install your oven, you must be using and follow the instructions provided for it is recommended that a qualified electrical installer determine that the electrical connection and wire size are adequate and in Cabinet A B F D E C 27" (68.6 cm) models A. 27...
...not sure the oven is properly grounded. Cabinet A A Single Oven A. Model/serial number plate Double Oven A. bottom of cabinet door F. 50.0" (127.0 cm) min. cutout height Cabinet Side View - The model/serial number rating plate is located at the bottom of electrical connection you are...Electrical Connection To properly install your oven, you must be using and follow the instructions provided for it is recommended that a qualified electrical installer determine that the electrical connection and wire size are adequate and in Cabinet A B F D E C 27" (68.6 cm) models A. 27...
Installation Instructions
Page 8
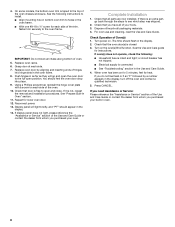
...See the Use and Care guide for lower oven door. 12. or circuit breaker has not tripped. ■ Electrical supply is connected. ■ See "Troubleshooting" section in oven. 8 Check that all parts are now ...;⁄₈" screw for heat. If you purchased your tools. 3. Replace oven door by a number appears in as far as they will light briefly, and "PF" should...is taped to the full open and close. On some models, the bottom oven trim is an extra part, go and open the oven door to the top of Oven(s) 1. Complete Installation 1. Turn on for 5 minutes, ...
...See the Use and Care guide for lower oven door. 12. or circuit breaker has not tripped. ■ Electrical supply is connected. ■ See "Troubleshooting" section in oven. 8 Check that all parts are now ...;⁄₈" screw for heat. If you purchased your tools. 3. Replace oven door by a number appears in as far as they will light briefly, and "PF" should...is taped to the full open and close. On some models, the bottom oven trim is an extra part, go and open the oven door to the top of Oven(s) 1. Complete Installation 1. Turn on for 5 minutes, ...

Dimension Guide
Page 1
...Demand (775) 833-3600 This Data Sheet Includes Information On Maytag • Product Model Number (s): • 27" Wall Ovens: MEW5527DDB and MEW5527DDW 27" 25 1/2" 24" • Dimensions (Actual Size) • Cutout width: 25 1/2" Cutout height: 27 7/8" Minimum cabinet width: 27" Minimum cabinet depth: 24" Recommended cutout location from floor :...or comparable circuit breaker must be removed before installation. • A three-wire, single phase, A.C. 120/208-240 volt, 60Hz cycle electrical system protected by manufacturer. flexible cable 4 feet long is available.
...Demand (775) 833-3600 This Data Sheet Includes Information On Maytag • Product Model Number (s): • 27" Wall Ovens: MEW5527DDB and MEW5527DDW 27" 25 1/2" 24" • Dimensions (Actual Size) • Cutout width: 25 1/2" Cutout height: 27 7/8" Minimum cabinet width: 27" Minimum cabinet depth: 24" Recommended cutout location from floor :...or comparable circuit breaker must be removed before installation. • A three-wire, single phase, A.C. 120/208-240 volt, 60Hz cycle electrical system protected by manufacturer. flexible cable 4 feet long is available.


