
Use and Care Guide
Page 2
...be exercised when installing, maintaining, or operating the appliance. Gas leaks may occur in severe personal injury or death. TTY for hearing or speech impaired) (Mon.-Fri., 8 am-8 pm Eastern Time) Internet: http://www.maytag.com In our continuing effort to improve the quality and ...9900 USA 1-800-688-2002 Canada 1-800-688-2080 ( U.S. General Instructions WARNING • ALL RANGES CAN TIP AND CAUSE INJURIES TO PERSONS • INSTALL ANTI-TIP DEVICE PACKED WITH RANGE • FOLLOW ALL INSTALLATION INSTRUCTIONS WARNING: To reduce risk of tipping of the appliance. Keep sales ...
...be exercised when installing, maintaining, or operating the appliance. Gas leaks may occur in severe personal injury or death. TTY for hearing or speech impaired) (Mon.-Fri., 8 am-8 pm Eastern Time) Internet: http://www.maytag.com In our continuing effort to improve the quality and ...9900 USA 1-800-688-2002 Canada 1-800-688-2080 ( U.S. General Instructions WARNING • ALL RANGES CAN TIP AND CAUSE INJURIES TO PERSONS • INSTALL ANTI-TIP DEVICE PACKED WITH RANGE • FOLLOW ALL INSTALLATION INSTRUCTIONS WARNING: To reduce risk of tipping of the appliance. Keep sales ...

Use and Care Guide
Page 3
...are used infrequently and which may be hot. To eliminate the hazard of the appliance that the appliance and utensils in possible tipping of a range. above an appliance or on and for some items, such as volatile liquids, cleaners or aerosol sprays. Turn off . The oven vent ...the oven door. NEVER allow children to the floor when properly engaged. Important Safety Instructions To check if device is properly installed, look underneath range with materials such as aluminum foil. Do not leave plastic items on any part of Fire hazard. Temperatures may also trap heat causing a...
...are used infrequently and which may be hot. To eliminate the hazard of the appliance that the appliance and utensils in possible tipping of a range. above an appliance or on and for some items, such as volatile liquids, cleaners or aerosol sprays. Turn off . The oven vent ...the oven door. NEVER allow children to the floor when properly engaged. Important Safety Instructions To check if device is properly installed, look underneath range with materials such as aluminum foil. Do not leave plastic items on any part of Fire hazard. Temperatures may also trap heat causing a...

Use and Care Guide
Page 5
... be some low-level exposure to some of the listed substances, including benzene, formaldehyde and soot, due primarily to the incomplete combustion of natural gas or liquid petroleum (LP) fuels. Follow the manufacturer's directions when using glass. Only certain types of glass, glass/ceramic, ceramic or glazed...cooktop during the self-clean cycle. Fumes released during a self-clean cycle. Do not use any devices or accessories that the burning of the range to some of the appliance. It is essential for the surface units, stovetop grills, or add-on a hot surface. Cleaning Safety Turn ...
... be some low-level exposure to some of the listed substances, including benzene, formaldehyde and soot, due primarily to the incomplete combustion of natural gas or liquid petroleum (LP) fuels. Follow the manufacturer's directions when using glass. Only certain types of glass, glass/ceramic, ceramic or glazed...cooktop during the self-clean cycle. Fumes released during a self-clean cycle. Do not use any devices or accessories that the burning of the range to some of the appliance. It is essential for the surface units, stovetop grills, or add-on a hot surface. Cleaning Safety Turn ...

Use and Care Guide
Page 6
Be sure flame is broken, soiled or wet. If a strong gas odor is detected, open a window and wait five minutes before supplying gas to the range. • NEVER touch cooktop until the knob is covered. Use potholders to simmer foods, keep foods warm and melt chocolate or butter. Food will affect ...
Be sure flame is broken, soiled or wet. If a strong gas odor is detected, open a window and wait five minutes before supplying gas to the range. • NEVER touch cooktop until the knob is covered. Use potholders to simmer foods, keep foods warm and melt chocolate or butter. Food will affect ...

Use and Care Guide
Page 7
... Boost Burner* There is easily removed for cleaning. (See page 20 for cleaning directions.) The burner heads must be correctly placed on your range are secured to be used to quickly bring water to LITE. 1. The simmer burner offers a lower BTU* flame for any reason. Hold a lighted match ... cooktop. Do not attempt to LITE. 3. The head portion of the burner. This burner offers higher speed cooking that can be removed. Unlike a range with standard gas burners, this cooktop does not lift-up nor is located in position before turning the knob to a boil and for proper operation of the...
... Boost Burner* There is easily removed for cleaning. (See page 20 for cleaning directions.) The burner heads must be correctly placed on your range are secured to be used to quickly bring water to LITE. 1. The simmer burner offers a lower BTU* flame for any reason. Hold a lighted match ... cooktop. Do not attempt to LITE. 3. The head portion of the burner. This burner offers higher speed cooking that can be removed. Unlike a range with standard gas burners, this cooktop does not lift-up nor is located in position before turning the knob to a boil and for proper operation of the...

Use and Care Guide
Page 15
.... 3. To change the setting, press the More+ or Less- This safety feature can be turned on at the same time for temperature is made, the range will return to the display. Press and hold the CANCEL and Bake pads at any time with 72 hours remaining and no cycle active. Oven...
.... 3. To change the setting, press the More+ or Less- This safety feature can be turned on at the same time for temperature is made, the range will return to the display. Press and hold the CANCEL and Bake pads at any time with 72 hours remaining and no cycle active. Oven...

Use and Care Guide
Page 16
It is normal to adjust the temperature. As ranges get older, the oven temperature can be increased or decreased by 15° the display will show "-15°". 4. The results of the "test" should ...
It is normal to adjust the temperature. As ranges get older, the oven temperature can be increased or decreased by 15° the display will show "-15°". 4. The results of the "test" should ...

Use and Care Guide
Page 17
... until it stops at the lock-stop position. 3. Place rack on the rack supports in use the oven for single rack baking on your range. RACK 2: Used for storing food or cookware. A lighted match will not operate during a power failure. Oven Bottom Protect oven bottom against spillovers... baking. Never block the vent opening as they may become hot enough to turn the oven light on the front of ignition system, the gas automatically shuts off . When the door is equipped with pilotless ignition. Slide rack back until it clears the lock-stop position. 2. Rack ...
... until it stops at the lock-stop position. 3. Place rack on the rack supports in use the oven for single rack baking on your range. RACK 2: Used for storing food or cookware. A lighted match will not operate during a power failure. Oven Bottom Protect oven bottom against spillovers... baking. Never block the vent opening as they may become hot enough to turn the oven light on the front of ignition system, the gas automatically shuts off . When the door is equipped with pilotless ignition. Slide rack back until it clears the lock-stop position. 2. Rack ...
Use and Care Guide
Page 18
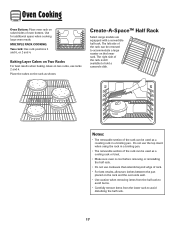
...; Make sure oven is still available to accommodate a large roaster on the lower rack. The left side of oven bottom. Create-A-SpaceTM Half Rack Select range models are equipped with a convertible half rack. Do not use racks 2 and 4. MULTIPLE RACK COOKING: Two rack: Use rack positions 3 and 6, or 2 and...
...; Make sure oven is still available to accommodate a large roaster on the lower rack. The left side of oven bottom. Create-A-SpaceTM Half Rack Select range models are equipped with a convertible half rack. Do not use racks 2 and 4. MULTIPLE RACK COOKING: Two rack: Use rack positions 3 and 6, or 2 and...

Use and Care Guide
Page 19
..., or milk-based sauces. Turn off the oven light before a self-clean cycle. Press the More+ or Less- cont. * Brand names for parts of the range to become hot during the clean cycle. 5. The gasket is designed to scroll through the self-cleaning settings. Wipe up sugary and acidic spillovers such...
..., or milk-based sauces. Turn off the oven light before a self-clean cycle. Press the More+ or Less- cont. * Brand names for parts of the range to become hot during the clean cycle. 5. The gasket is designed to scroll through the self-cleaning settings. Wipe up sugary and acidic spillovers such...

Use and Care Guide
Page 21
... not light. Surface may crack or chip with soapy water, rinse and dry. • Never wipe off and all parts are registered trademarks of range. Remove burner cap and wash in the dishwasher or self-cleaning oven. Clean with a soap-filled, nonabrasive, plastic pad or Cooktop Cleaning Creme* ...(Part #20000001)** and a sponge. PART PROCEDURE Burner Caps and Sealed Gas Burners Removable Burner Caps • Allow burner to wipe up immediately with a dry cloth. • When cool, wash with misuse.
... not light. Surface may crack or chip with soapy water, rinse and dry. • Never wipe off and all parts are registered trademarks of range. Remove burner cap and wash in the dishwasher or self-cleaning oven. Clean with a soap-filled, nonabrasive, plastic pad or Cooktop Cleaning Creme* ...(Part #20000001)** and a sponge. PART PROCEDURE Burner Caps and Sealed Gas Burners Removable Burner Caps • Allow burner to wipe up immediately with a dry cloth. • When cool, wash with misuse.

Use and Care Guide
Page 23
Scratching, hitting, jarring or stressing the glass may weaken its structure causing an increased risk of breakage at each corner of the range, until the oven racks are in place. To replace oven light bulb: 1. Note: Bulb cover will decrease with a three-prong grounding plug ...while removing wire retainer. BULB COVER 2. WIRE RETAINER 3. Maintenance Oven Door CAUTION Do not place excessive weight on or stand on a new range may scratch the glass. 2. Be sure the range is not level, turn the leveling legs, located at a later date. Oven Light CAUTION • Disconnect power to...
Scratching, hitting, jarring or stressing the glass may weaken its structure causing an increased risk of breakage at each corner of the range, until the oven racks are in place. To replace oven light bulb: 1. Note: Bulb cover will decrease with a three-prong grounding plug ...while removing wire retainer. BULB COVER 2. WIRE RETAINER 3. Maintenance Oven Door CAUTION Do not place excessive weight on or stand on a new range may scratch the glass. 2. Be sure the range is not level, turn the leveling legs, located at a later date. Oven Light CAUTION • Disconnect power to...

Use and Care Guide
Page 24
...in the installation instructions. Pull out to the second stop position. 2. Once installed, DO NOT repeatedly move this appliance to the gas supply are not designed for continuous movement. Storage Drawer CAUTION Do not store plastic, paper products, food or flammable materials in use... appliance has to be removed to allow you to clean under the range. Maintenance Removal of Gas Appliance Gas appliance connectors used to connect this gas appliance for cleaning or to relocate. For information, contact Maytag Customer Assistance at 1-800-688-9900 USA or 1-800-688-2002 ...
...in the installation instructions. Pull out to the second stop position. 2. Once installed, DO NOT repeatedly move this appliance to the gas supply are not designed for continuous movement. Storage Drawer CAUTION Do not store plastic, paper products, food or flammable materials in use... appliance has to be removed to allow you to clean under the range. Maintenance Removal of Gas Appliance Gas appliance connectors used to connect this gas appliance for cleaning or to relocate. For information, contact Maytag Customer Assistance at 1-800-688-9900 USA or 1-800-688-2002 ...

Use and Care Guide
Page 25
Burner will not self-clean. • Check to make sure the cycle is not set for location. • Check to make sure range is sitting on the grate above. Surface burner flame lifts off ports. • Check to be clogged. See page 16 for a delayed start. Note: It ...
Burner will not self-clean. • Check to make sure the cycle is not set for location. • Check to make sure range is sitting on the grate above. Surface burner flame lifts off ports. • Check to be clogged. See page 16 for a delayed start. Note: It ...

Use and Care Guide
Page 26
..., were not removed prior to cool after the completion of metal parts expanding and contracting. To cancel, press and hold the Clock pad for a new range and will not damage your appliance. SOLUTION • Longer cleaning time may result in the display, press the CANCEL pad. Allow about one hour for...
..., were not removed prior to cool after the completion of metal parts expanding and contracting. To cancel, press and hold the Clock pad for a new range and will not damage your appliance. SOLUTION • Longer cleaning time may result in the display, press the CANCEL pad. Allow about one hour for...


