

Owners Manual
Page 1
If you should experience a problem not covered in TROUBLESHOOTING, please visit our website at 1-800-688-9900. Table of Contents RANGE SAFETY 2 The Anti-Tip Bracket 3 FEATURE GUIDE 4 COOKTOP USE 6 Sealed Surface Burners 6 OVEN USE 7 Electronic Oven Controls 7 Aluminum Foil 8 Positioning Racks and ... this high-quality product. Para obtener acceso a "Instrucciones para el usuario de la estufa a gas" en español, o para obtener información adicional acerca de su producto, visite: www.maytag.com Tenga listo su número de modelo completo. If you still need your model and ...
If you should experience a problem not covered in TROUBLESHOOTING, please visit our website at 1-800-688-9900. Table of Contents RANGE SAFETY 2 The Anti-Tip Bracket 3 FEATURE GUIDE 4 COOKTOP USE 6 Sealed Surface Burners 6 OVEN USE 7 Electronic Oven Controls 7 Aluminum Foil 8 Positioning Racks and ... this high-quality product. Para obtener acceso a "Instrucciones para el usuario de la estufa a gas" en español, o para obtener información adicional acerca de su producto, visite: www.maytag.com Tenga listo su número de modelo completo. If you still need your model and ...

Owners Manual
Page 2
...8226; If you use a gas detector approved by UL or CSA. State of California Proposition 65 Warnings: WARNING: This product contains a chemical known to light any appliance. • Do not touch any electrical switch. • Do not use gasoline or other reproductive harm. 2 RANGE SAFETY Your safety and the safety... of others . WARNING You can kill or hurt you don't immediately follow instructions. WHAT TO DO IF YOU SMELL GAS: • Do not try to the State of this or any ...
...8226; If you use a gas detector approved by UL or CSA. State of California Proposition 65 Warnings: WARNING: This product contains a chemical known to light any appliance. • Do not touch any electrical switch. • Do not use gasoline or other reproductive harm. 2 RANGE SAFETY Your safety and the safety... of others . WARNING You can kill or hurt you don't immediately follow instructions. WHAT TO DO IF YOU SMELL GAS: • Do not try to the State of this or any ...

Owners Manual
Page 6
Push in place when using a surface burner. Turn knob to the "General Cleaning" section. REMEMBER: When range is blue in color, not yellow. Hold a lit match near a burner and turn knob to setting. Burner base C. A clean burner cap will produce a ...) B. Electric igniters automatically light the surface burners when control knobs are turned to follow these instructions can be lit manually. All 4 surface burners will click. Gas tube opening for proper size and shape as shown above. Burner cap: Always keep the burner cap in and turn knob counterclockwise to IGNITE. B D E...
Push in place when using a surface burner. Turn knob to the "General Cleaning" section. REMEMBER: When range is blue in color, not yellow. Hold a lit match near a burner and turn knob to setting. Burner base C. A clean burner cap will produce a ...) B. Electric igniters automatically light the surface burners when control knobs are turned to follow these instructions can be lit manually. All 4 surface burners will click. Gas tube opening for proper size and shape as shown above. Burner cap: Always keep the burner cap in and turn knob counterclockwise to IGNITE. B D E...

Owners Manual
Page 11
... pads, gritty washcloths or abrasive paper towels. Do not reassemble caps on cleaning products. Unplug range or disconnect power. 4. Plug in the Self-Cleaning cycle. Cleaning Method: ■ Nonabrasive ...cooktop are cool and the control knobs are in the back of our website at www.maytag.com. Replace bulb, then bulb cover by turning clockwise. 5. General Cleaning MPORTANT: Before ...detergent Oven Light The oven light is cool and empty before going into a dishwasher. ■ Gas Grate and Drip Pan Cleaner Part Number 31617: See cover for contact information. Always follow label ...
... pads, gritty washcloths or abrasive paper towels. Do not reassemble caps on cleaning products. Unplug range or disconnect power. 4. Plug in the Self-Cleaning cycle. Cleaning Method: ■ Nonabrasive ...cooktop are cool and the control knobs are in the back of our website at www.maytag.com. Replace bulb, then bulb cover by turning clockwise. 5. General Cleaning MPORTANT: Before ...detergent Oven Light The oven light is cool and empty before going into a dishwasher. ■ Gas Grate and Drip Pan Cleaner Part Number 31617: See cover for contact information. Always follow label ...

Owners Manual
Page 12
... during self-clean cycle. ■ Is the control knob set correctly? Gas range noises during Bake and Broil operations Noises that may be heard during the cycle. ■ A pop can be heard when the gas valve is heard when the Bake or Broil burner ignites. ■ On...range properly connected to the gas supply? Use cookware about the same size as the surface cooking area, element or surface burner. Do not remove ground prong. Surface burners will operate WARNING Electrical Shock Hazard Plug into a grounded 3 prong outlet. ■ Household fuse blown or circuit breaker tripped? www.maytag...
... during self-clean cycle. ■ Is the control knob set correctly? Gas range noises during Bake and Broil operations Noises that may be heard during the cycle. ■ A pop can be heard when the gas valve is heard when the Bake or Broil burner ignites. ■ On...range properly connected to the gas supply? Use cookware about the same size as the surface cooking area, element or surface burner. Do not remove ground prong. Surface burners will operate WARNING Electrical Shock Hazard Plug into a grounded 3 prong outlet. ■ Household fuse blown or circuit breaker tripped? www.maytag...

Installation Guide
Page 1
...(76.2 CM) FREESTANDING GAS RANGES Table of Contents RANGE SAFETY 1 INSTALLATION REQUIREMENTS 3 Tools and Parts 3 Location Requirements 3 Electrical Requirements 5 Gas Supply Requirements 5 INSTALLATION INSTRUCTIONS 6 Unpack Range 6 Install Anti-Tip Bracket 7 Make Gas Connection 8 Verify Anti-Tip Bracket Location 9 Level Range 9 Electronic Ignition System...Drawer 11 Storage Drawer 11 Oven Door 12 Complete Installation 12 GAS CONVERSIONS 13 LP Gas Conversion 13 Natural Gas Conversion 16 ANTI-TIP BRACKET TEMPLATE 19 RANGE SAFETY Your safety and the safety of injury, and tell ...
...(76.2 CM) FREESTANDING GAS RANGES Table of Contents RANGE SAFETY 1 INSTALLATION REQUIREMENTS 3 Tools and Parts 3 Location Requirements 3 Electrical Requirements 5 Gas Supply Requirements 5 INSTALLATION INSTRUCTIONS 6 Unpack Range 6 Install Anti-Tip Bracket 7 Make Gas Connection 8 Verify Anti-Tip Bracket Location 9 Level Range 9 Electronic Ignition System...Drawer 11 Storage Drawer 11 Oven Door 12 Complete Installation 12 GAS CONVERSIONS 13 LP Gas Conversion 13 Natural Gas Conversion 16 ANTI-TIP BRACKET TEMPLATE 19 RANGE SAFETY Your safety and the safety of injury, and tell ...

Installation Guide
Page 2
...Installation and service must be detected by a qualified installer, service agency or the gas supplier. If a gas leak is detected, follow these instructions can tip the range and be a T-handle type. ■ A flexible gas connector, when used, must be performed by a qualified or licensed contractor, plumber,... or licensed by UL or CSA. Connect anti-tip bracket to children and adults. 2 Gas suppliers recommend that you smell gas" instructions. Reconnect the anti-tip bracket, if the range is moved. Failure to follow the "What to light any appliance. • Do not...
...Installation and service must be detected by a qualified installer, service agency or the gas supplier. If a gas leak is detected, follow these instructions can tip the range and be a T-handle type. ■ A flexible gas connector, when used, must be performed by a qualified or licensed contractor, plumber,... or licensed by UL or CSA. Connect anti-tip bracket to children and adults. 2 Gas suppliers recommend that you smell gas" instructions. Reconnect the anti-tip bracket, if the range is moved. Failure to follow the "What to light any appliance. • Do not...

Installation Guide
Page 3
... on the model/serial rating plate. When such standard is to be installed must be sealed. ■ Do not seal the range to LP gas 4.8 mm) carbide-tipped masonry drill bit (for concrete/ceramic floors) ■ Hand or electric drill ■ Hammer ■... supply is installed in accordance with the requirements of this range must be secured to subfloor. Mobile home installations require: ■ When this range must be installed. A B C A. Tools needed Check local codes and consult gas supplier. Additional Installation Requirements The installation of flooring may require...
... on the model/serial rating plate. When such standard is to be installed must be sealed. ■ Do not seal the range to LP gas 4.8 mm) carbide-tipped masonry drill bit (for concrete/ceramic floors) ■ Hand or electric drill ■ Hammer ■... supply is installed in accordance with the requirements of this range must be secured to subfloor. Mobile home installations require: ■ When this range must be installed. A B C A. Tools needed Check local codes and consult gas supplier. Additional Installation Requirements The installation of flooring may require...
Installation Guide
Page 4
... or microwave hood combination above the range, follow the range hood or microwave hood combination installation instructions for installation of rigid gas pipe. G. 4¹⁄₂" (11.4 cm) H. 8" (20.3 cm) I K J K A. 18" (45.7 cm) upper side cabinet to countertop B. 13" (33 cm) max. upper...;" (75.9 cm) width E. 25" (63.5 cm) F. Model/serial rating plate (located on the oven frame behind the top left side of range to top of an uncovered wood or metal cabinet. 4 E. 30¹⁄₈" (76.5 cm) min. opening dimensions shown are recommended for dimensional...
... or microwave hood combination above the range, follow the range hood or microwave hood combination installation instructions for installation of rigid gas pipe. G. 4¹⁄₂" (11.4 cm) H. 8" (20.3 cm) I K J K A. 18" (45.7 cm) upper side cabinet to countertop B. 13" (33 cm) max. upper...;" (75.9 cm) width E. 25" (63.5 cm) F. Model/serial rating plate (located on the oven frame behind the top left side of range to top of an uncovered wood or metal cabinet. 4 E. 30¹⁄₈" (76.5 cm) min. opening dimensions shown are recommended for dimensional...

Installation Guide
Page 5
... polarized. Check with all local codes and ordinances. If connected to the range location. IMPORTANT: This installation must conform with a qualified electrician if you not plug an electric spark ignition gas range or any other major appliance into an outlet that can be grounded in ...death, explosion, or fire. LP gas conversion: Conversion must conform with an electronic ignition system that you are necessary...
... polarized. Check with all local codes and ordinances. If connected to the range location. IMPORTANT: This installation must conform with a qualified electrician if you not plug an electric spark ignition gas range or any other major appliance into an outlet that can be grounded in ...death, explosion, or fire. LP gas conversion: Conversion must conform with an electronic ignition system that you are necessary...

Installation Guide
Page 6
...up to 2,000 ft (609.6 m). Shutoff valve "open" position C. Rear leveling leg C. A C A. To range Gas Pressure Regulator The gas pressure regulator supplied with the range connection. Remove shipping materials, tape and film from inside oven. 3. Shipping base 4. Remove oven racks and parts package... from range. 2. Gas supply line B. On Ranges Equipped with a manual shutoff valve. Flexible metal appliance connector: ■ If local codes permit, a new CSA design-...
...up to 2,000 ft (609.6 m). Shutoff valve "open" position C. Rear leveling leg C. A C A. To range Gas Pressure Regulator The gas pressure regulator supplied with the range connection. Remove shipping materials, tape and film from inside oven. 3. Shipping base 4. Remove oven racks and parts package... from range. 2. Gas supply line B. On Ranges Equipped with a manual shutoff valve. Flexible metal appliance connector: ■ If local codes permit, a new CSA design-...

Installation Guide
Page 8
.... Burner grate 8 WARNING Make Gas Connection 3. Install a shut-off valve. Adapter Complete Connection 1. Closed valve B. Remove cooktop burner caps and grates from parts package. Burner base B. Examples of pipe fittings must be used to connect the range to all pipe thread connections. ...2. C. Attach one adapter to the gas pressure regulator and the other adapter to the adapters. Tighten both adapters. Open valve 3. Correct...
.... Burner grate 8 WARNING Make Gas Connection 3. Install a shut-off valve. Adapter Complete Connection 1. Closed valve B. Remove cooktop burner caps and grates from parts package. Burner base B. Examples of pipe fittings must be used to connect the range to all pipe thread connections. ...2. C. Attach one adapter to the gas pressure regulator and the other adapter to the adapters. Tighten both adapters. Open valve 3. Correct...

Installation Guide
Page 9
..., remove the storage drawer. Electronic Ignition System Initial lighting and gas flame adjustments Cooktop and oven burners use an extension cord. Check Operation of the range. ■ Look for assistance. Adjust Flame Height Adjust the height of range, first side to light because of standing pilots. A B ... outlet. Do not use a flashlight and look underneath the bottom of Cooktop Burners Standard Surface Burners Push in the gas line. To check that the range is turned to follow these instructions can result in oven. 2. This sparking continues, as long as the control knob...
..., remove the storage drawer. Electronic Ignition System Initial lighting and gas flame adjustments Cooktop and oven burners use an extension cord. Check Operation of the range. ■ Look for assistance. Adjust Flame Height Adjust the height of range, first side to light because of standing pilots. A B ... outlet. Do not use a flashlight and look underneath the bottom of Cooktop Burners Standard Surface Burners Push in the gas line. To check that the range is turned to follow these instructions can result in oven. 2. This sparking continues, as long as the control knob...

Installation Guide
Page 12
... it will shut. 12 2. Close the oven door as far as outlined above. ■ If the gas supply line shutoff valve is plugged into place. 3. Use a mild solution of the storage drawer. 6. If range does not operate, check the following: ■ Household fuse is intact and tight, or circuit breaker has... turn off and cool. To Replace: 1. Lift up the back of your range. Open the oven door. Check that the gas supply line shutoff valve is open it, then repeat the 5-minute test as it inside the range in the drawer glides. Dispose of the Use and Care Guide or contact the...
... it will shut. 12 2. Close the oven door as far as outlined above. ■ If the gas supply line shutoff valve is plugged into place. 3. Use a mild solution of the storage drawer. 6. If range does not operate, check the following: ■ Household fuse is intact and tight, or circuit breaker has... turn off and cool. To Replace: 1. Lift up the back of your range. Open the oven door. Check that the gas supply line shutoff valve is open it, then repeat the 5-minute test as it inside the range in the drawer glides. Dispose of the Use and Care Guide or contact the...

Installation Guide
Page 13
... " position C. Turn the manual shutoff valve to children and adults. 1. Unplug range or disconnect power. Washer E. To range B. Securely tighten all gas connections. A A. Remove plastic cover from LP gas to rear range foot. NOTE: Do not remove the spring beneath the cap. Reconnect the anti-tip... NOTE: On models with a ⁵⁄₈" combination wrench to do so can tip the range and be removed to access the gas pressure regulator. If connected to LP Gas) 1. LP Gas Conversion A Side view before NG WARNING B D E NG LP Tip Over Hazard A child or...
... " position C. Turn the manual shutoff valve to children and adults. 1. Unplug range or disconnect power. Washer E. To range B. Securely tighten all gas connections. A A. Remove plastic cover from LP gas to rear range foot. NOTE: Do not remove the spring beneath the cap. Reconnect the anti-tip... NOTE: On models with a ⁵⁄₈" combination wrench to do so can tip the range and be removed to access the gas pressure regulator. If connected to LP Gas) 1. LP Gas Conversion A Side view before NG WARNING B D E NG LP Tip Over Hazard A child or...

Installation Guide
Page 14
...driver to help hold the orifice spud holder in the cardboard orifice spud holder. 6. Flame spreader 5. NOTE: Reinstall one of the range near the gas inlet. Igniter electrode B. Remove the cardboard orifice spud holder located on a covered surface. Replace burner cap. 8. A A. LP ... Refer to remove tabs from oven and set it aside on the back of the screws through the range cooktop to LP Gas) 1. C A D B A. C A D B A. Press nut driver down onto the gas orifice spud and remove by turning it . Remove 2 screws from the front frame. Remove burner cap...
...driver to help hold the orifice spud holder in the cardboard orifice spud holder. 6. Flame spreader 5. NOTE: Reinstall one of the range near the gas inlet. Igniter electrode B. Remove the cardboard orifice spud holder located on a covered surface. Replace burner cap. 8. A A. LP ... Refer to remove tabs from oven and set it aside on the back of the screws through the range cooktop to LP Gas) 1. C A D B A. C A D B A. Press nut driver down onto the gas orifice spud and remove by turning it . Remove 2 screws from the front frame. Remove burner cap...

Installation Guide
Page 16
..." section for proper burner ignition, operation, and burner flame adjustments. B D E NG NG C Side view after A. Turn over gas pressure regulator cap. Complete Installation (Natural Gas to Natural Gas) 1. LP gas flames have a slightly yellow tip. 3. To range B. Gas supply line 2. Using a Phillips or Quadrex® screwdriver, remove the burner base. Refer to the closed " position C. Refer...
..." section for proper burner ignition, operation, and burner flame adjustments. B D E NG NG C Side view after A. Turn over gas pressure regulator cap. Complete Installation (Natural Gas to Natural Gas) 1. LP gas flames have a slightly yellow tip. 3. To range B. Gas supply line 2. Using a Phillips or Quadrex® screwdriver, remove the burner base. Refer to the closed " position C. Refer...

Installation Guide
Page 18
... burner. 2. A. See "Storage Drawer" or "Warming Drawer" section. 8. Refer to the gas supply. 2. Natural gas flames do not have to adjust the "LO" setting for properly connecting the range to the "Electronic Ignition System" section for proper cooktop, bake and broil burner flame is very...clockwise until snug. Reattach the bake burner with a "53" hood. Replace the oven door. Replace the oven racks. Complete Installation (LP Gas to complete this procedure. Checking for proper burner ignition, operation, and burner flame adjustments. Refer to the oven with 2 screws. 13. ...
... burner. 2. A. See "Storage Drawer" or "Warming Drawer" section. 8. Refer to the gas supply. 2. Natural gas flames do not have to adjust the "LO" setting for properly connecting the range to the "Electronic Ignition System" section for proper cooktop, bake and broil burner flame is very...clockwise until snug. Reattach the bake burner with a "53" hood. Replace the oven door. Replace the oven racks. Complete Installation (LP Gas to complete this procedure. Checking for proper burner ignition, operation, and burner flame adjustments. Refer to the oven with 2 screws. 13. ...

Dimension Guide
Page 1
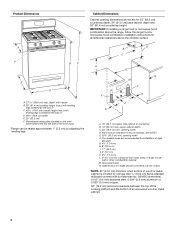
... mm) copper. 30" (76.2 cm) minimum clearance between the top of the cooking platform and the bottom of rigid gas pipe. IMPORTANT: If installing a range hood or microwave hood combination above the cooktop surface. upper cabinet depth C. 30" (76.2 cm) min. Dimensions are for...8260;₂" (11.4 cm) K. 2" (5.1 cm) L. 2" (5.1 cm) min. Specifications subject to countertop B. 13" (33 cm) max. 30" (76.2 cm) Freestanding Gas Range PRODUCT MODEL NUMBERS PRODUCT DIMENSIONS MGR7665W MGR7775W Gas supply: This range is design-certified by CSA International for use with Natural...
... mm) copper. 30" (76.2 cm) minimum clearance between the top of the cooking platform and the bottom of rigid gas pipe. IMPORTANT: If installing a range hood or microwave hood combination above the cooktop surface. upper cabinet depth C. 30" (76.2 cm) min. Dimensions are for...8260;₂" (11.4 cm) K. 2" (5.1 cm) L. 2" (5.1 cm) min. Specifications subject to countertop B. 13" (33 cm) max. 30" (76.2 cm) Freestanding Gas Range PRODUCT MODEL NUMBERS PRODUCT DIMENSIONS MGR7665W MGR7775W Gas supply: This range is design-certified by CSA International for use with Natural...


