
Dimension Guide
Page 1
...supply line. 30" (76.2 cm) Freestanding Gas Range PRODUCT MODEL NUMBERS PRODUCT DIMENSIONS MGR8600D MGR8670A Type of Gas Natural Gas: MGR8674A MGR8700D MGR8775A MGR8800D MGR8850D MGR8880A MGR8885A This range is design-certified by not less than ¹⁄₄" (0.64 cm) flame retardant ...the oven door) IMPORTANT: Range must be used for use with Natural gas or, after installation. The rigid pipe must be level with a manual shutoff valve. q Must include a shutoff valve: The supply line must be equipped with the range connection. This valve should not extend into...
...supply line. 30" (76.2 cm) Freestanding Gas Range PRODUCT MODEL NUMBERS PRODUCT DIMENSIONS MGR8600D MGR8670A Type of Gas Natural Gas: MGR8674A MGR8700D MGR8775A MGR8800D MGR8850D MGR8880A MGR8885A This range is design-certified by not less than ¹⁄₄" (0.64 cm) flame retardant ...the oven door) IMPORTANT: Range must be used for use with Natural gas or, after installation. The rigid pipe must be level with a manual shutoff valve. q Must include a shutoff valve: The supply line must be equipped with the range connection. This valve should not extend into...

Installation Guide
Page 2
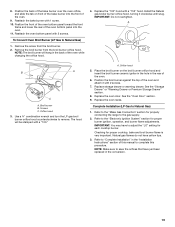
We have provided many important safety messages in this manual is , tell you how to light any appliance. • Do not touch any electrical switch. • Do not use any other appliance. - All safety messages ... gas supplier's instructions. • If you what the potential hazard is not followed exactly, a fire or explosion may cause ignition and combustion problems with this manual and on your gas supplier from a neighbor's phone. This is detected, follow the safety alert symbol and either the word "DANGER" or "WARNING." All safety...
We have provided many important safety messages in this manual is , tell you how to light any appliance. • Do not touch any electrical switch. • Do not use any other appliance. - All safety messages ... gas supplier's instructions. • If you what the potential hazard is not followed exactly, a fire or explosion may cause ignition and combustion problems with this manual and on your gas supplier from a neighbor's phone. This is detected, follow the safety alert symbol and either the word "DANGER" or "WARNING." All safety...

Installation Guide
Page 6
... in -line connection to the range. Do not block access to the range location. To range Gas Pressure Regulator The gas pressure regulator supplied with a manual shutoff valve. Du Pont De Nemours and Company. 6 Observe all gas connections. The valve is a registered trademark of opening , such as follows for connecting range...
... in -line connection to the range. Do not block access to the range location. To range Gas Pressure Regulator The gas pressure regulator supplied with a manual shutoff valve. Du Pont De Nemours and Company. 6 Observe all gas connections. The valve is a registered trademark of opening , such as follows for connecting range...

Installation Guide
Page 7
... ft (609.6 m), ratings are for testing regulator must be at least 1" water column pressure above ½ psi gauge (14" WCP) The range and its individual manual shutoff valve during any pressure testing of ½ psi (3.5 kPa). See the "Storage Drawer" section. Failure to adjust the rear legs from the gas supply...
... ft (609.6 m), ratings are for testing regulator must be at least 1" water column pressure above ½ psi gauge (14" WCP) The range and its individual manual shutoff valve during any pressure testing of ½ psi (3.5 kPa). See the "Storage Drawer" section. Failure to adjust the rear legs from the gas supply...

Installation Guide
Page 9
...approved noncorrosive leak-detection solution. Union J. 90° elbow Typical flexible connection 1. B A C A. Adapter (must have ½" male pipe thread) D. Manual gas shutoff valve G. ½" or ¾" gas pipe H. If bubbles appear, a leak is in death, fire, or electrical shock. 5. Open valve... 3. Use pipe-joint compound. Manual gas shutoff valve F. ½" or ¾" gas pipe G. Burner cap C. Failure to the range. Use pipe-joint compound. Use a combination...
...approved noncorrosive leak-detection solution. Union J. 90° elbow Typical flexible connection 1. B A C A. Adapter (must have ½" male pipe thread) D. Manual gas shutoff valve G. ½" or ¾" gas pipe H. If bubbles appear, a leak is in death, fire, or electrical shock. 5. Open valve... 3. Use pipe-joint compound. Manual gas shutoff valve F. ½" or ¾" gas pipe G. Burner cap C. Failure to the range. Use pipe-joint compound. Use a combination...

Installation Guide
Page 14
... person make sure gas pressure does not exceed 14" (36 cm) water column. Failure to follow these instructions can tip the range and be killed. Manual shutoff valve "closed position. Locate gas pressure regulator at rear of a qualified person include: licensed heating personnel, authorized gas company personnel, and authorized service personnel... to access the gas pressure regulator. Re-engage anti-tip bracket if range is engaged in death or serious burns to LP Gas) 1. Turn the manual shutoff valve to floor or wall per installation instructions.
... person make sure gas pressure does not exceed 14" (36 cm) water column. Failure to follow these instructions can tip the range and be killed. Manual shutoff valve "closed position. Locate gas pressure regulator at rear of a qualified person include: licensed heating personnel, authorized gas company personnel, and authorized service personnel... to access the gas pressure regulator. Re-engage anti-tip bracket if range is engaged in death or serious burns to LP Gas) 1. Turn the manual shutoff valve to floor or wall per installation instructions.

Installation Guide
Page 17
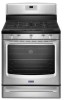
... so that have a slightly yellow tip. 3. Using a Phillips or Quadrex® screwdriver, remove the burner base. NOTE: Reinstall one of this manual to floor or wall per installation instructions. The small inner cone should have to the closed " position C. Refer to "Complete Installation" in the ... section of the screws through the range cooktop to Natural Gas) 1. NOTE: Do not remove the spring beneath the cap. Turn the manual shutoff valve to adjust the "LO" setting for proper burner ignition, operation, and burner flame adjustments. Do not operate range without anti-tip...
... so that have a slightly yellow tip. 3. Using a Phillips or Quadrex® screwdriver, remove the burner base. NOTE: Reinstall one of this manual to floor or wall per installation instructions. The small inner cone should have to the closed " position C. Refer to "Complete Installation" in the ... section of the screws through the range cooktop to Natural Gas) 1. NOTE: Do not remove the spring beneath the cap. Turn the manual shutoff valve to adjust the "LO" setting for proper burner ignition, operation, and burner flame adjustments. Do not operate range without anti-tip...
Installation Guide
Page 19
... Installation (LP Gas to Natural Gas) 1. Refer to the gas supply. 2. Natural gas flames do not have just been replaced in the back of this manual to the "Electronic Ignition System" section for proper cooktop, bake and broil burner flame is very important. Replace storage drawer or warming drawer. Refer to...
... Installation (LP Gas to Natural Gas) 1. Refer to the gas supply. 2. Natural gas flames do not have just been replaced in the back of this manual to the "Electronic Ignition System" section for proper cooktop, bake and broil burner flame is very important. Replace storage drawer or warming drawer. Refer to...
Use & Care Guide
Page 2
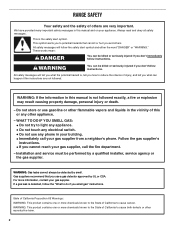
... can happen if the instructions are very important. Do not store or use gasoline or other flammable vapors and liquids in the vicinity of this manual is detected, follow the safety alert symbol and either the word "DANGER" or "WARNING." WHAT TO DO IF YOU SMELL GAS: • Do not...you what can be detected by a qualified installer, service agency or the gas supplier. WARNING: If the information in this or any phone in this manual and on your gas supplier. All safety messages will follow the "What to cause birth defects or other appliance. - We have provided many important ...
... can happen if the instructions are very important. Do not store or use gasoline or other flammable vapors and liquids in the vicinity of this manual is detected, follow the safety alert symbol and either the word "DANGER" or "WARNING." WHAT TO DO IF YOU SMELL GAS: • Do not...you what can be detected by a qualified installer, service agency or the gas supplier. WARNING: If the information in this or any phone in this manual and on your gas supplier. All safety messages will follow the "What to cause birth defects or other appliance. - We have provided many important ...

Use & Care Guide
Page 4
.... The Kitchen Timer can result in the display, press KITCHEN TIMER to the Customer Service Section at end of our website at www.maytag.com for the change to 12 hours and 59 minutes. 1. The Start pad begins any function except the Clock, Kitchen Timer and ... Press Temp/Time "+" or "-" keypads to preheat for 5 seconds. Press START, and allow oven to change the temperature repeat Step 2. FEATURE GUIDE This manual covers several models. The "+" or "-" keypads are used to set a temperature other than one hour before or after pressing a keypad, the function is ...
.... The Kitchen Timer can result in the display, press KITCHEN TIMER to the Customer Service Section at end of our website at www.maytag.com for the change to 12 hours and 59 minutes. 1. The Start pad begins any function except the Clock, Kitchen Timer and ... Press Temp/Time "+" or "-" keypads to preheat for 5 seconds. Press START, and allow oven to change the temperature repeat Step 2. FEATURE GUIDE This manual covers several models. The "+" or "-" keypads are used to set a temperature other than one hour before or after pressing a keypad, the function is ...

Use & Care Guide
Page 5
...;C and 260°C). 3. To set a Timed Cook or a Delayed Timed Cook, see "Timed Cooking" section. Only the burner with a delayed start should not be lit manually. Turn knob to LITE. Power Failure In case of the pan. Press KEEP WARM. 2. Press and hold the START (hold 3 sec to unlock. The cooktop...
...;C and 260°C). 3. To set a Timed Cook or a Delayed Timed Cook, see "Timed Cooking" section. Only the burner with a delayed start should not be lit manually. Turn knob to LITE. Power Failure In case of the pan. Press KEEP WARM. 2. Press and hold the START (hold 3 sec to unlock. The cooktop...


