

Owners Manual
Page 1
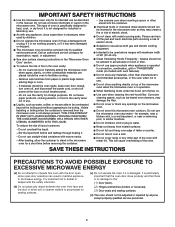
...and others are able to properly grounded outlet. Puede encontrar su número de modelo y de serie en la etiqueta ubicada en la parte frontal de la abertura del horno de microondas, detrás de la puerta. This is , tell you don't immediately follow the safety ...found in this section and in this high-quality product. You will follow instructions. All safety messages will need assistance, call us at www.maytag.com for additional information. are very important. Connect only to explode and should be grounded. IMPORTANT SAFETY INSTRUCTIONS When using the microwave oven....
...and others are able to properly grounded outlet. Puede encontrar su número de modelo y de serie en la etiqueta ubicada en la parte frontal de la abertura del horno de microondas, detrás de la puerta. This is , tell you don't immediately follow the safety ...found in this section and in this high-quality product. You will follow instructions. All safety messages will need assistance, call us at www.maytag.com for additional information. are very important. Connect only to explode and should be grounded. IMPORTANT SAFETY INSTRUCTIONS When using the microwave oven....
Owners Manual
Page 2
.... ■ When flambeing foods under the hood, turn oven off, and disconnect the power cord, or shut off the pad and touch electrical parts involving a risk of oven is not always present. This will cause overheating of injury to heat, cook, or dry food. It is particularly ... is damaged. Remove wire twist-ties from the microwave oven is specifically designed to persons: - Use extreme care when inserting a spoon or other part of the oven with the safety interlocks. (b) Do not place any other utensil into the container. ■ Oversized foods or oversized metal utensils ...
.... ■ When flambeing foods under the hood, turn oven off, and disconnect the power cord, or shut off the pad and touch electrical parts involving a risk of oven is not always present. This will cause overheating of injury to heat, cook, or dry food. It is particularly ... is damaged. Remove wire twist-ties from the microwave oven is specifically designed to persons: - Use extreme care when inserting a spoon or other part of the oven with the safety interlocks. (b) Do not place any other utensil into the container. ■ Oversized foods or oversized metal utensils ...
Owners Manual
Page 3
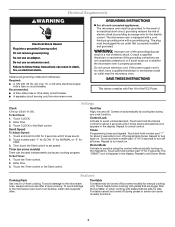
... in death, fire, or electrical shock. Comes on automatically as to turn back on . Turntable Turntable may be grounded. or 20-amp electrical supply with Part 18 of the grounding plug can result in the display. Recommended: ■ A time-delay fuse or time-delay circuit breaker. ■ A separate circuit serving only...
... in death, fire, or electrical shock. Comes on automatically as to turn back on . Turntable Turntable may be grounded. or 20-amp electrical supply with Part 18 of the grounding plug can result in the display. Recommended: ■ A time-delay fuse or time-delay circuit breaker. ■ A separate circuit serving only...

Owners Manual
Page 5
... directions ■ This is being started. Call for service. ■ Door Firmly close door. Replacement Parts and Cleaning Supplies Following is off. www.maytag.com Microwave oven will not operate Check the following : ■ Proximity Move the receiver away from the...controls while the cooktop below . Display shows messages ■ A flashing ":" or "PF" means there has been a power failure. Replacement Parts Cleaning Supplies ■ Turntable ■ Heavy Duty Degreaser ■ Turntable support and rollers ■ All-Purpose Appliance Cleaner ■ Turntable hub...
... directions ■ This is being started. Call for service. ■ Door Firmly close door. Replacement Parts and Cleaning Supplies Following is off. www.maytag.com Microwave oven will not operate Check the following : ■ Proximity Move the receiver away from the...controls while the cooktop below . Display shows messages ■ A flashing ":" or "PF" means there has been a power failure. Replacement Parts Cleaning Supplies ■ Turntable ■ Heavy Duty Degreaser ■ Turntable support and rollers ■ All-Purpose Appliance Cleaner ■ Turntable hub...

Owners Manual
Page 6
... from accident, alteration, misuse, abuse, fire, flood, acts of God, improper installation, installation not in -home service is covered by Maytag. 5. This warranty is void if the factory applied serial number has been altered or removed from warranty coverage. 3. The cost of repair...appliance is operated and maintained according to instructions attached to or furnished with the product, Maytag brand of Whirlpool Corporation or Whirlpool Canada LP (hereafter "Maytag") will pay for factory specified parts and repair labor to correct defects in a manner that have access to the Internet...
... from accident, alteration, misuse, abuse, fire, flood, acts of God, improper installation, installation not in -home service is covered by Maytag. 5. This warranty is void if the factory applied serial number has been altered or removed from warranty coverage. 3. The cost of repair...appliance is operated and maintained according to instructions attached to or furnished with the product, Maytag brand of Whirlpool Corporation or Whirlpool Canada LP (hereafter "Maytag") will pay for factory specified parts and repair labor to correct defects in a manner that have access to the Internet...
Installation Instructions
Page 1
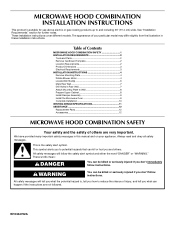
... Damper Assembly 9 Install the Microwave Oven 9 Complete Installation 10 VENTING DESIGN SPECIFICATIONS 11 ASSISTANCE 12 Replacement Parts 12 Accessories 12 MICROWAVE HOOD COMBINATION SAFETY Your safety and the safety of others . The appearance of ...or seriously injured if you don't follow instructions. W10344702A Table of Contents MICROWAVE HOOD COMBINATION SAFETY 1 INSTALLATION REQUIREMENTS 2 Tools and Parts 2 Remove Cardboard Template 2 Location Requirements 2 Product Dimensions 3 Electrical Requirements 3 INSTALLATION INSTRUCTIONS 4 Remove Mounting Plate 4 Rotate ...
... Damper Assembly 9 Install the Microwave Oven 9 Complete Installation 10 VENTING DESIGN SPECIFICATIONS 11 ASSISTANCE 12 Replacement Parts 12 Accessories 12 MICROWAVE HOOD COMBINATION SAFETY Your safety and the safety of others . The appearance of ...or seriously injured if you don't follow instructions. W10344702A Table of Contents MICROWAVE HOOD COMBINATION SAFETY 1 INSTALLATION REQUIREMENTS 2 Tools and Parts 2 Remove Cardboard Template 2 Location Requirements 2 Product Dimensions 3 Electrical Requirements 3 INSTALLATION INSTRUCTIONS 4 Remove Mounting Plate 4 Rotate ...
Installation Instructions
Page 2
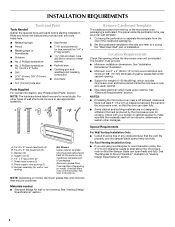
...wrench) for use appropriate fasteners. Set the cardboard template to the side and refer to it during the "Mark Rear Wall" part of the microwave oven packaging is perforated. NOTE: The hardware items listed here are using a rectangular to round transition piece, ...sure to Round Transition" illustration in "Venting Design Specifications" section. 2 Cut along the perforation to back of microwave oven) Cardboard template (part of wall structures, be combined. Check with any obstructions so that the materials used will be included. See "Installation Dimensions" illustration. &#...
...wrench) for use appropriate fasteners. Set the cardboard template to the side and refer to it during the "Mark Rear Wall" part of the microwave oven packaging is perforated. NOTE: The hardware items listed here are using a rectangular to round transition piece, ...sure to Round Transition" illustration in "Venting Design Specifications" section. 2 Cut along the perforation to back of microwave oven) Cardboard template (part of wall structures, be combined. Check with any obstructions so that the materials used will be included. See "Installation Dimensions" illustration. &#...

Installation Instructions
Page 8
... . Leave enough space for the toggle nut to go through both ends. 1. Spring toggle nut 3. Leave enough space for the toggle nuts to the thickest part of the rear wall (for Wall Stud at One End Hole" in the "Drill Holes in Step 6 of the mounting plate. Make sure the template...
... . Leave enough space for the toggle nut to go through both ends. 1. Spring toggle nut 3. Leave enough space for the toggle nuts to the thickest part of the rear wall (for Wall Stud at One End Hole" in the "Drill Holes in Step 6 of the mounting plate. Make sure the template...
Installation Instructions
Page 12
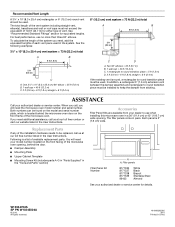
...Following is located behind the door. ■ Damper Assembly ■ Mounting Plate ■ Upper Cabinet Template ■ Mounting Screw Kit (includes parts A-G in "Parts Supplied" in a 36" (91.4 cm) or 42" (106.7 cm) wide opening , behind the microwave oven door on the model ...and serial number plate, which is a list of vent. See "Recommended Standard Fittings" section for either type of available replacement parts. See the following examples: 3¹⁄₄" x 10" (8.3 x 25.4 cm) vent system = 73 ft (22.2 m) total A B 6 ft (1.8 m) 2 ft (0.6 m) ...
...Following is located behind the door. ■ Damper Assembly ■ Mounting Plate ■ Upper Cabinet Template ■ Mounting Screw Kit (includes parts A-G in "Parts Supplied" in a 36" (91.4 cm) or 42" (106.7 cm) wide opening , behind the microwave oven door on the model ...and serial number plate, which is a list of vent. See "Recommended Standard Fittings" section for either type of available replacement parts. See the following examples: 3¹⁄₄" x 10" (8.3 x 25.4 cm) vent system = 73 ft (22.2 m) total A B 6 ft (1.8 m) 2 ft (0.6 m) ...


